Hystax Acura Control Panel#
Hystax Acura Control Panel (ACP) is a web-application for managing Hystax Migration solution.
The main functions are included in the menu: download agent, migrate. Additionally, the menu includes the ability to view reports, events, as well as the “Settings” section, where you can manage users, their roles and permissions, and the “Help” section. Some of these menu items are duplicated in the Notification Panel.
Recommended browsers: Google Chrome, Mozilla Firefox, Safari.
Overview of the menu items and notification panel#
 takes you to the download replication agent wizard. Follow the master to the agent
replication has become available for download and deployment. More details here.
takes you to the download replication agent wizard. Follow the master to the agent
replication has become available for download and deployment. More details here.
 will take you to the data migration wizard. This page assumes that you have a migration plan in place.
More.
will take you to the data migration wizard. This page assumes that you have a migration plan in place.
More.
 the application implements the ability to generate reports on completed migration actions. See section About reports
 or
or  will show a list of events that occurred in the system.
 or
or  user settings.
Notification panel#

Notification panel informs users about certain events that need attention or require actions to solve issues with replication or recovery process. ACP uses the following color scheme:
Green color of the panel means that customers do not have issues requiring immediate intervention.
Yellow color of the panel means that there are issues that require attention/solution in the near future. For example, a machine is out of free space, a machine has been unavailable for several days.
Red color - immediate action is required. For example, several unsuccessful consecutive replications of a machine, lost connection to a replication agent, etc.
User and general solution settings#
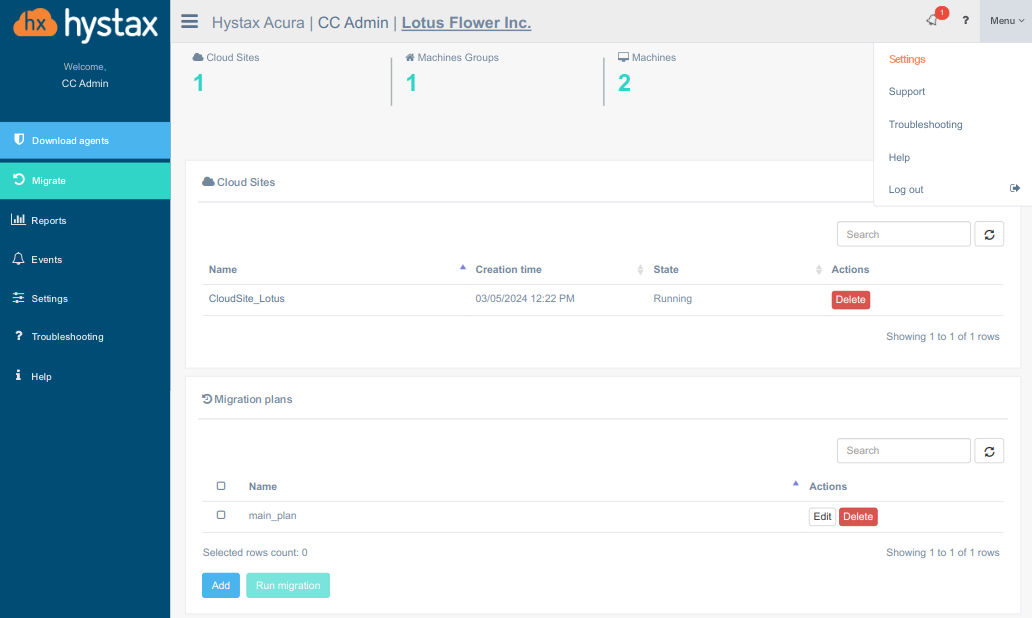
Access user and solution settings from the menu bar on the left side of the page or by selecting Menu in the upper right corner. Then, choose Settings.
Warning
Depending on user's rights and permissions, the set of available options may vary.
User settings#
Go to Menu → Settings → User settings tab.
Update the password and username:
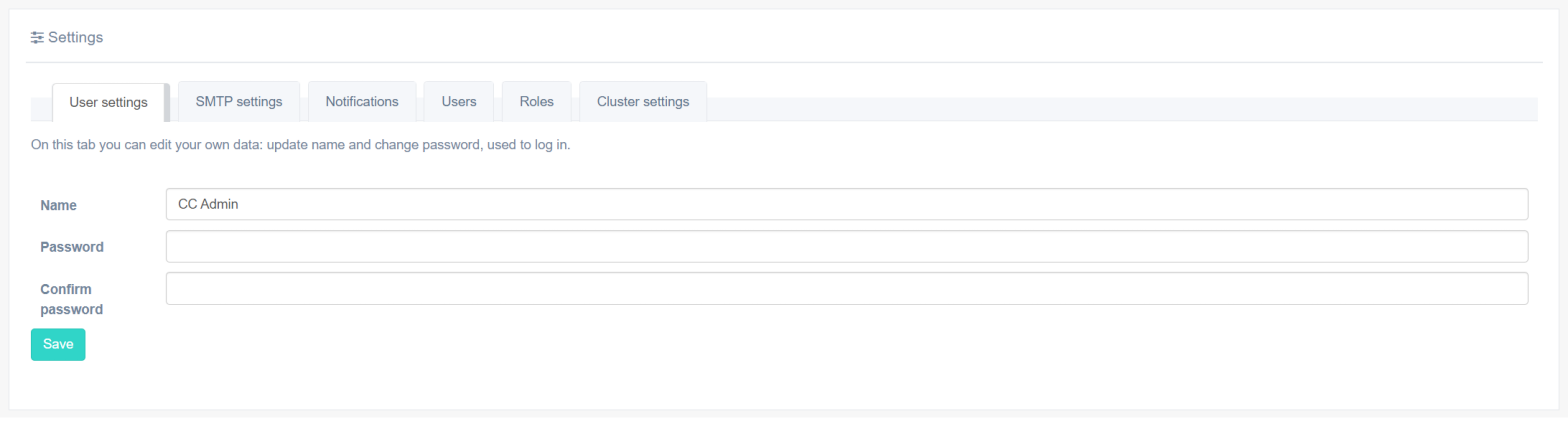
Warning
Once modified, the settings automatically take effect, and you will be asked to enter updated data in order to perform a new login.
SMTP settings management#
Go to Menu → Settings → SMTP settings tab.
Manage SMTP settings and configure SMTP server that is used to send product notifications on the SMTP Settings tab.

SMTP settings tab determines the type of encription (SSL/TSL) and
such SMTP server settings as address, port, username,
password. Use
 to get hints on the fields. Organization
and License key are unavailable for editing. They are specified
during the initial installation of Hystax Acura and remain
unchanged.
to get hints on the fields. Organization
and License key are unavailable for editing. They are specified
during the initial installation of Hystax Acura and remain
unchanged.
If the mail server requires the FROM field and it does not match the login, update the data in the SMTP FROM field.
To check the SMTP server connection and configuration enter the test email address into the Test email field.
Click Check connection to check if the SMTP settings are valid. If succeed, a test message on your test email will be sent.
Warning
The settings will not be saved when press Check connection.
To save changes click Save.
Notifications management#
Go to Menu → Settings → Notifications tab.
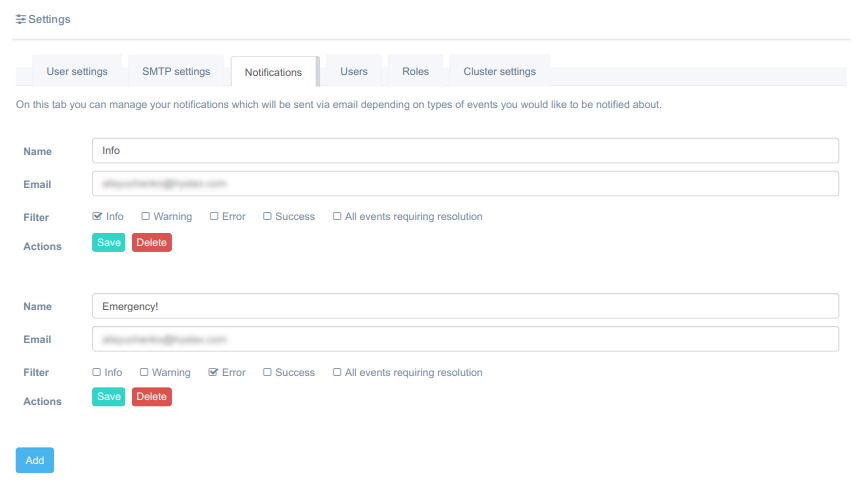
Edit or delete existing notifications. To create a new one, click Add, enter a name, specify an email, and select the events for which notifications should be sent. Then, save your changes.
User management#
Attention
This option is available only if the current user has been assigned with a role that can manage users.
Management is possible only by users of the same hierarchy level and below, so that a user of a customer account wouldn't be able to view and edit users of another customer and partner.
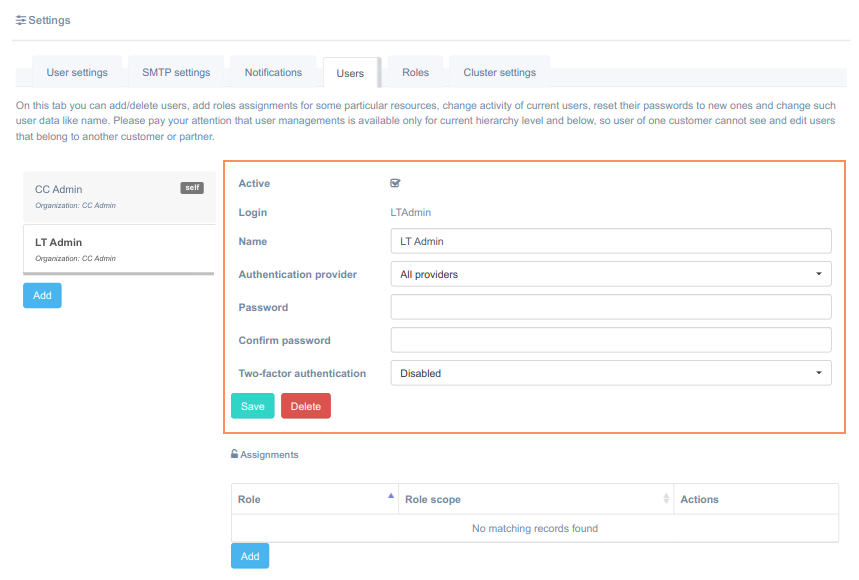
Go to Menu → Settings → Users tab.
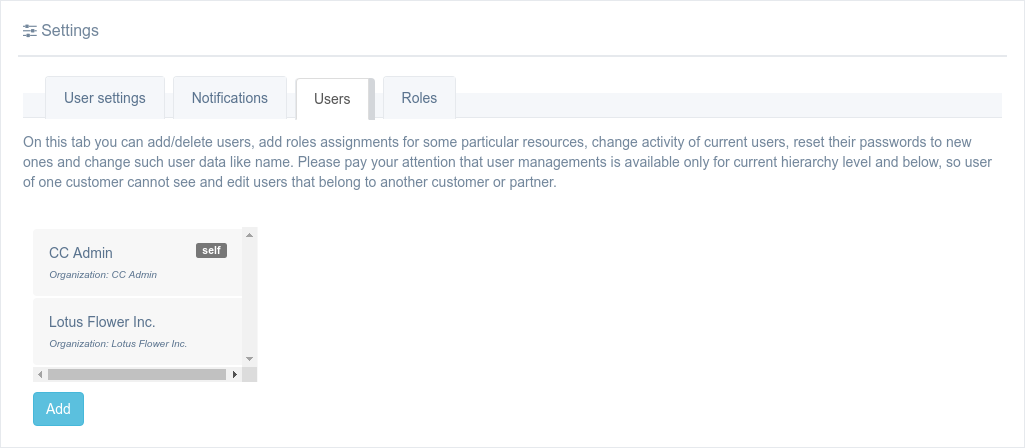
Use this tab to add or remove users, assign roles for specific resources, change the activity status of current users, reset their passwords, and update user data, such as their full name.
Create users#
Go to Menu → Settings → Users tab → click Add.
As the result, a dialog window appears. Fill in the information about a new user and user's Organization (partner or customer).
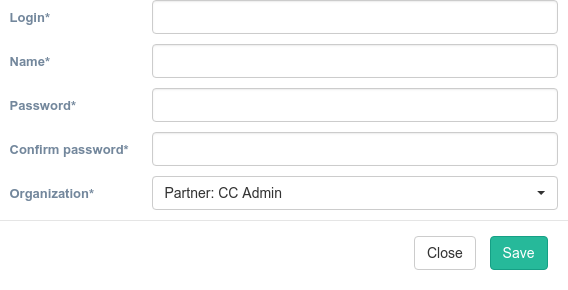
Fill in the fields and click Save. Once saved successfully, the user appears in the list.
After creation, assign roles to the user.
Assign roles#
Assigning a role determines the rights a user has within a specific scope, such as a partner, client, or group of client machines. If an administrator role is created and assigned to a specific client, the user will have administrator rights over that client’s resources.
Partner users can access partner roles, while client users can access client roles, as well as any roles shared with them by their partner.
Once assigned, the user has a specific role within a defined area of expertise or resources.
Attention
To assign roles, a user must have the appropriate rights. Roles are assigned based on the user's rights and are limited to that specific scope.
To assign a role, go to Menu → Settings → Users tab. Click on the username in the table.
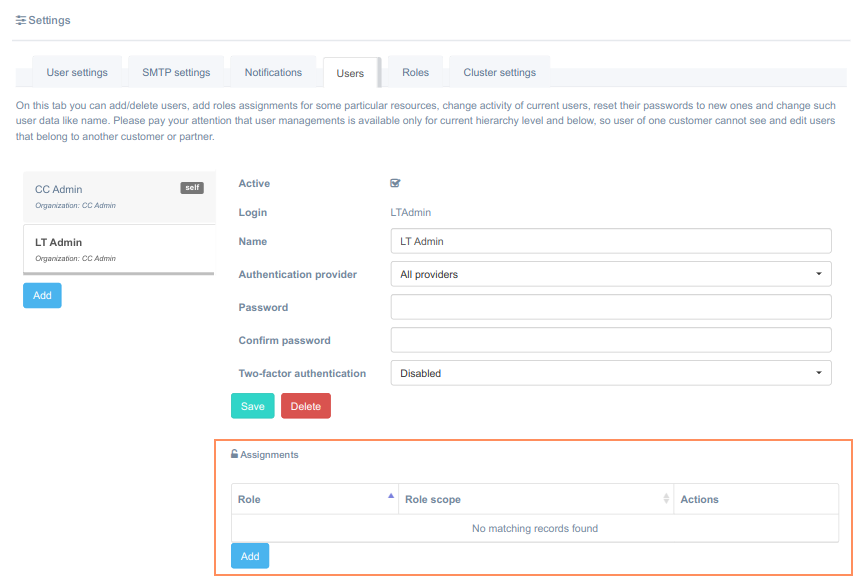
In the Assignments section, click Add, select the role to assign from the list, and define its scope. Then, click Save.
The assignment takes effect automatically as soon as it is created.
Edit a User#
To edit a user, go to Menu → Settings → Users tab. Click on the username in the table.
Modify the fields that can be edited and click Save.
Roles management#
Attention
This tab is only available if the current user has been assigned a role with permission to manage roles.
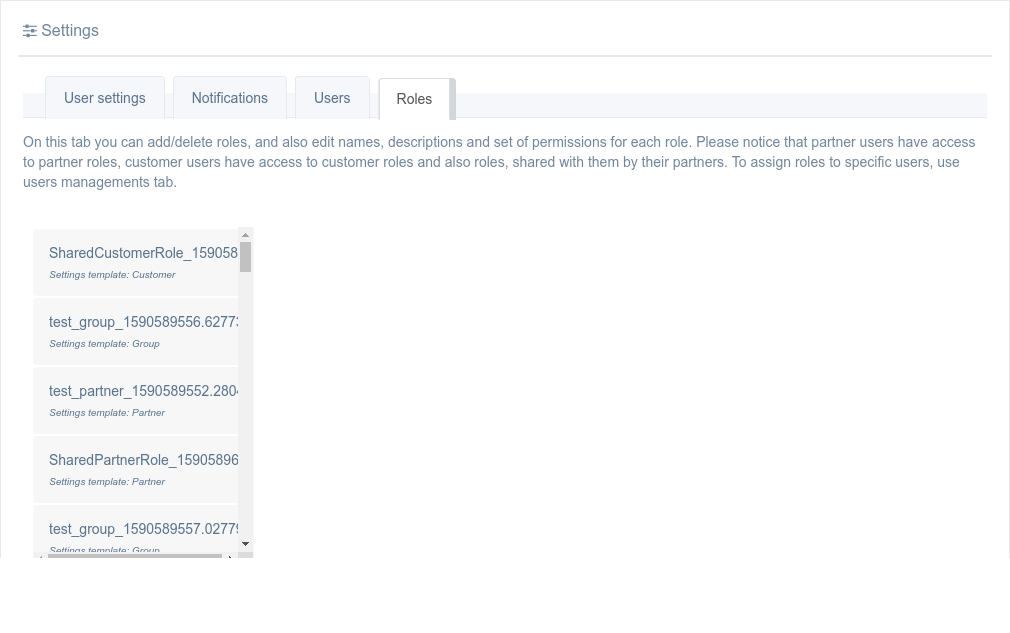
Go to Menu → Settings → Roles tab.
This tab allows you to add/remove roles, edit the rights associated with each role, and change their activity status.
Add a role#
Go to Menu → Settings → Roles tab → click Add.
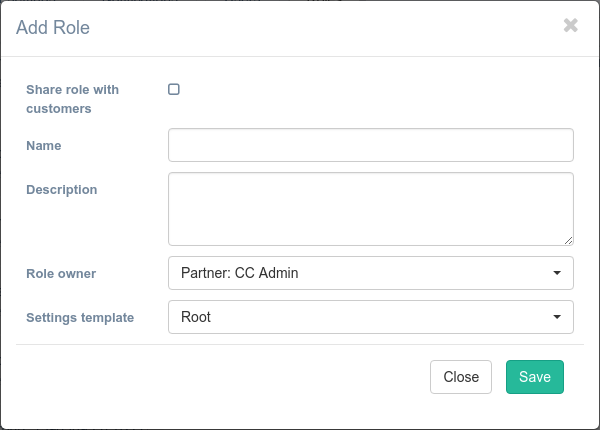
Fill in the required fields, select the role settings template (which defines the set of permissions, with options such as root, partner, customers, or group), and choose the organization to which the role will belong and where it will be available for assignment.
Warning
If the user has the appropriate rights, they will be able to view roles within the organization that owns the role when assigning it.
Make sure to check the Share role with customers box if you want the role to be available to the partner's clients.
Manage a set of permissions#
Go to Menu → Settings → Roles tab → click on a role in the list.
To manage a set of permissions for a role (already existing or newly created) just change the status of the checkboxes for each permission.
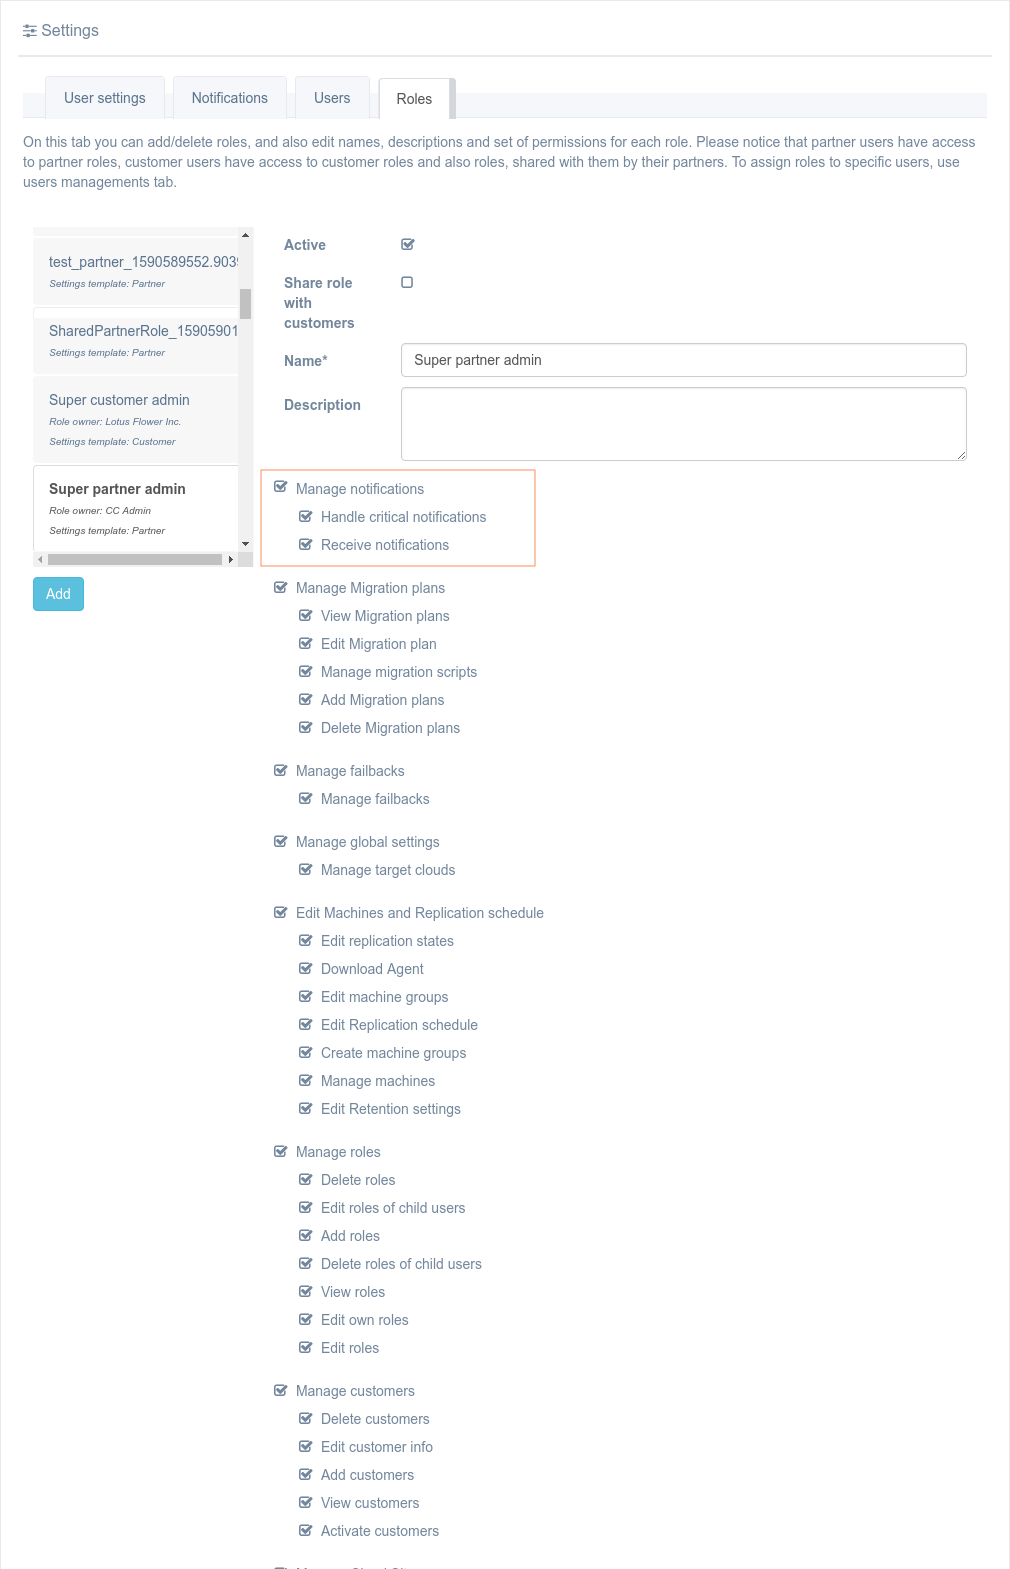
A ticked checkbox means the action is permitted; an empty checkbox means the action is banned. Therefore, a selected checkbox in one of the roles and its assignment to the scope grant permission for a particular action within this scope in spite of the fact that it can be removed in other roles assigned to the scope.
Warning
Editing existing roles will change the list of rights for users to whom this role has already been assigned. When a role is created and permissions are set, it can be assigned to users through the «Users» tab.
Cluster settings management#
To manage cluster settings, go to Menu → Settings → Cluster Settings tab.
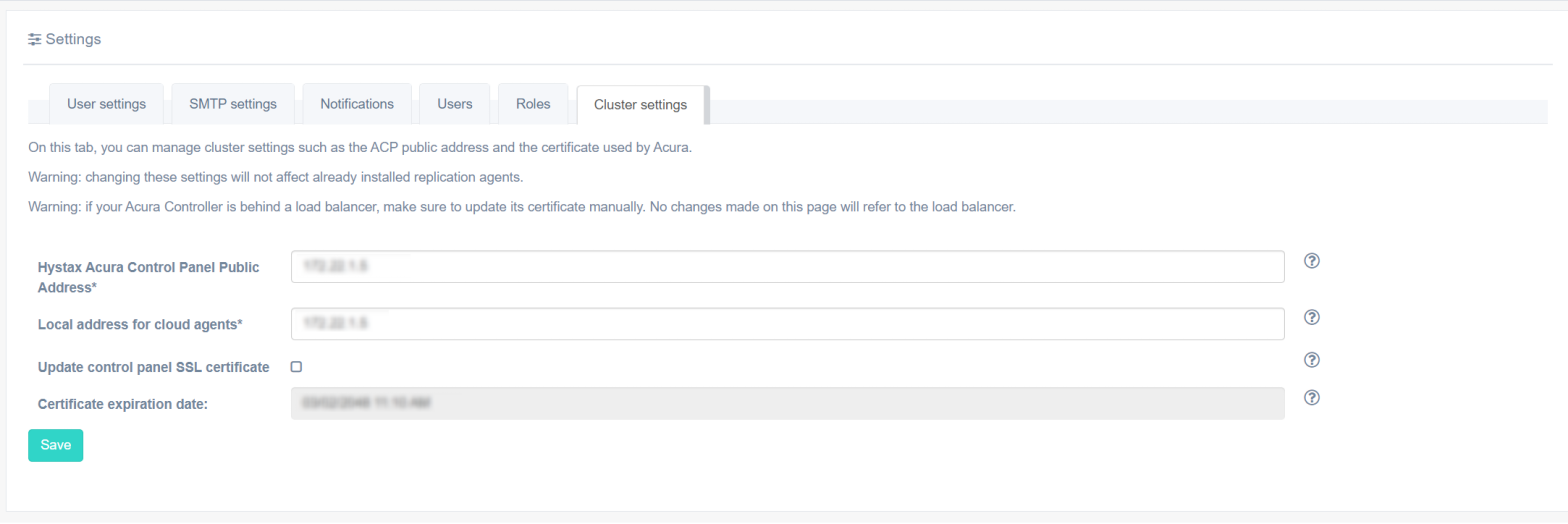
Both IPs (public and local) and SSL certificate are available
for changing. Use
icons to get fields hints.
Fill in Recipient email if you want to receive daily statistics about replicated/parked machines.
Hystax Acura Control Panel Public Address is the address that is used by replication agents to access the Acura. An IP-address or DNS-name can be specified.
Local address for cloud agents is the local address of the Acura in the cloud. Used if the Acura is located in the target cloud. By default, it matches the public address. An IP-address or DNS-name can be specified.
Click the Update control panel SSL certificate checkbox if you want to specify a new certificate. If it is not checked, the private key and certificate are not displayed. After the click, both fields will appear.

Both certificates can be uploaded from the file. Use
![]() icon on the right of the field. You can
specify a self-signed certificate or a complete chain of certificates
(including the root one).
icon on the right of the field. You can
specify a self-signed certificate or a complete chain of certificates
(including the root one).
Private key format:
-----BEGIN PRIVATE KEY-----
ABCDEABCDEABCDEABCDEABCDEABCDEABCDEABCDEABCDEABCDEABCDEABCDEABCD
<several base64 string with length 64>
ABCDEABC=
-----END PRIVATE KEY-----
Certificate format:
-----BEGIN CERTIFICATE-----
ABCDEABCDEABCDEABCDEABCDEABCDEABCDEABCDEABCDEABCDEABCDEABCDEABCD
<several base64 string with length 64>
ABCDEABC=
-----END CERTIFICATE-----
-----BEGIN CERTIFICATE-----
FGHIJFGHIJFGHIJFGHIJFGHIJFGHIJFGHIJFGHIJFGHIJFGHIJFGHIJFGHIJFGHI
<several base64 string with length 64>
FGHIJFGHIJFGHIJ
-----END CERTIFICATE-----
Certificate expiration date is calculated automatically when the value in the "Certificate" field is changed.
To save your changes click Save.
Warning
Changing these settings will not affect already installed replication agents.
Warning
If your Acura Controller is behind a load balancer, make sure to update its certificate manually. No changes made on this page will refer to the load balancer.
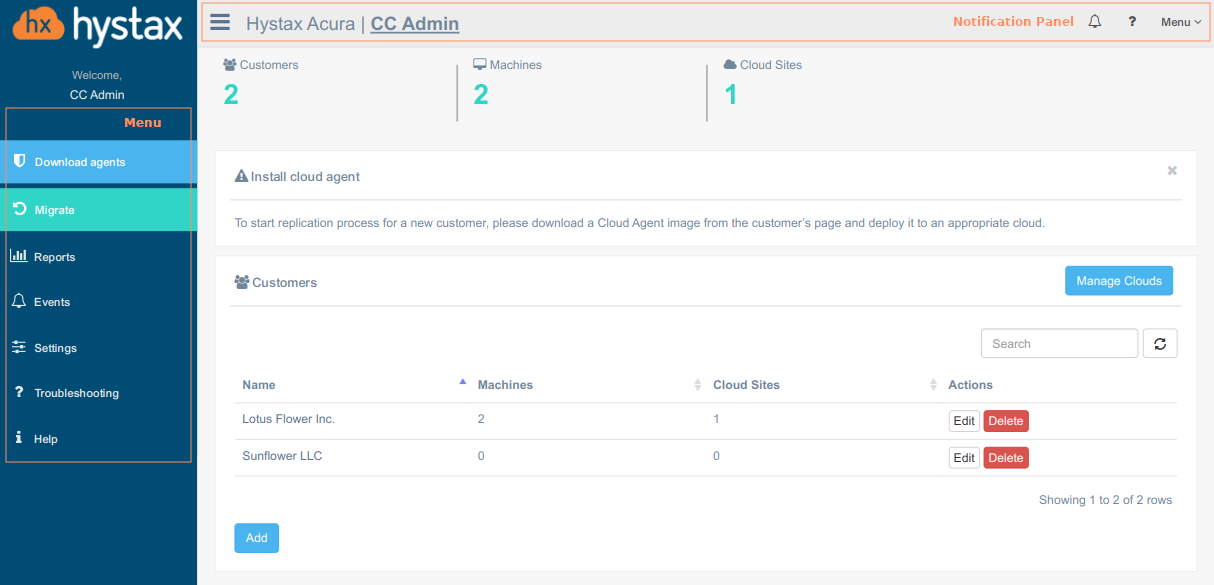
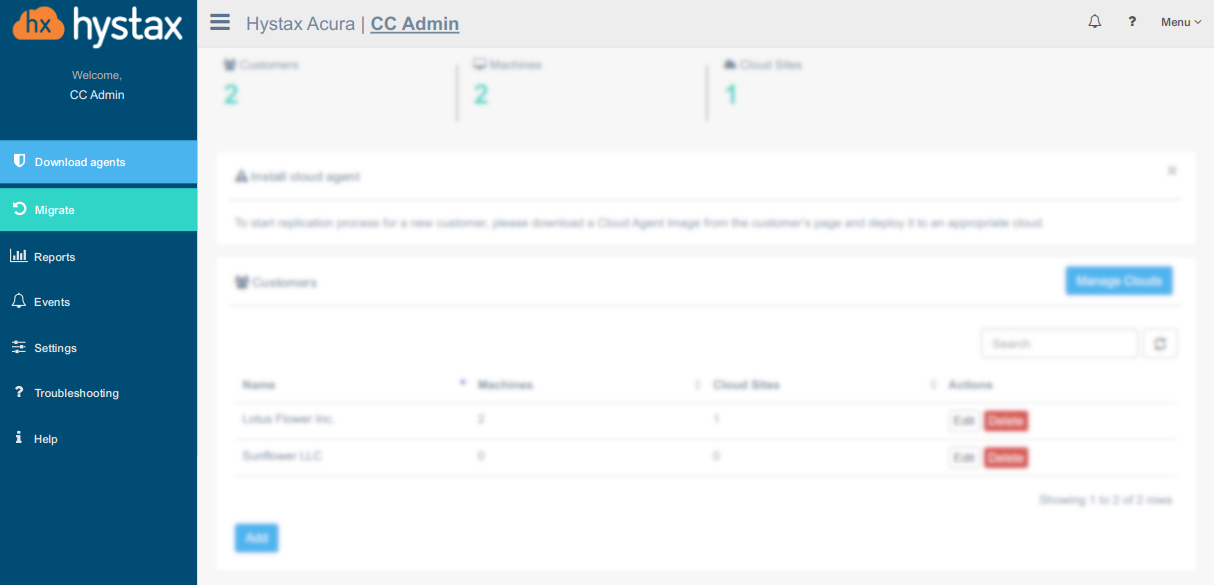
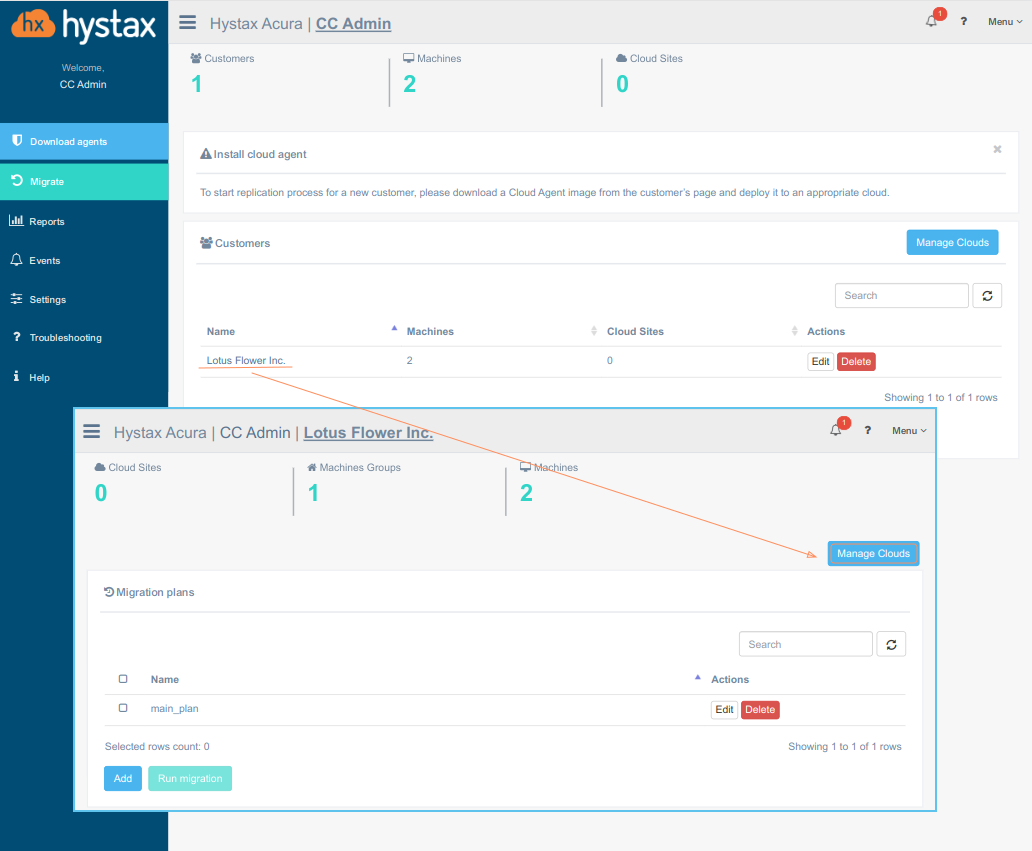
Partner page overview#
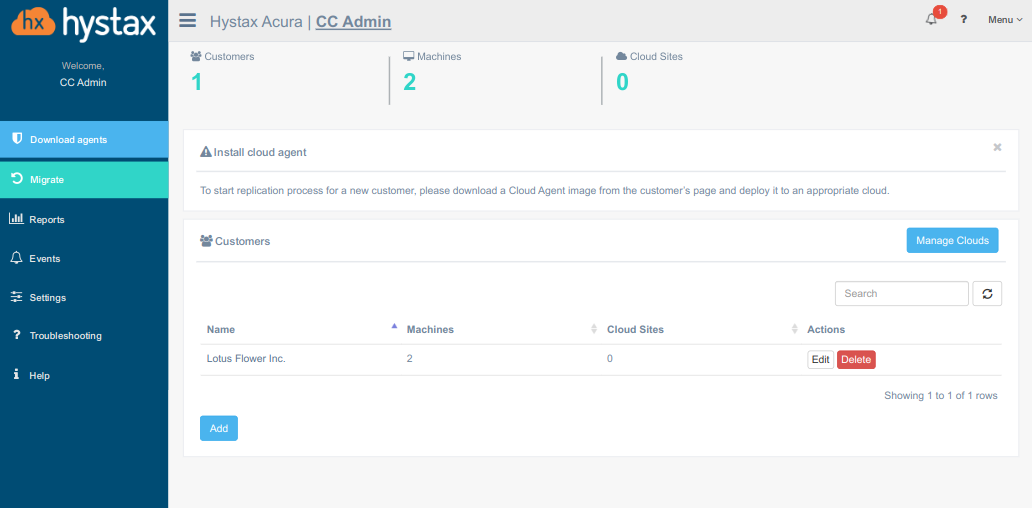
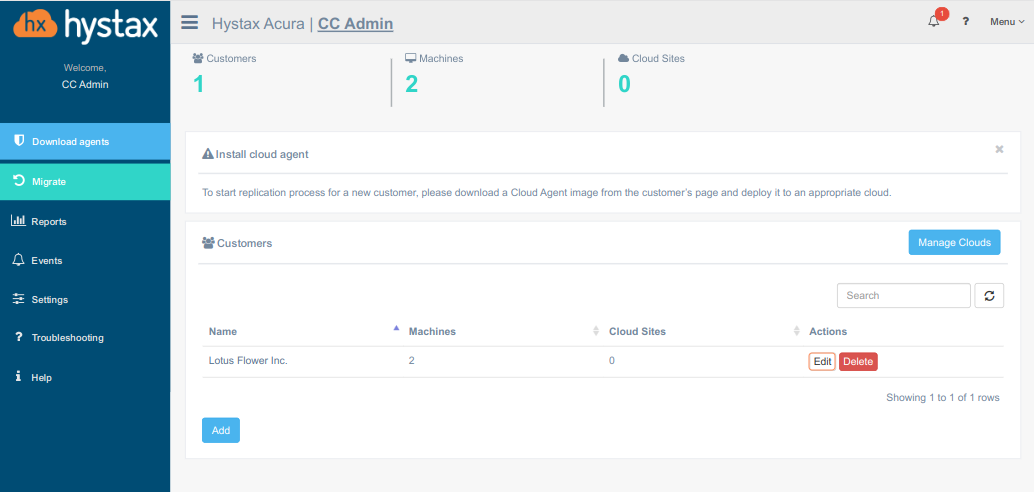
The partner page contains the following information:
-
The summary cards show:
- the number of clients
- the total number of client machines
- the number of client cloud sites
-
The Manage Cloud button. How to manage target clouds
-
List of customers with statistics decomposition for each customer
- Functionality for adding new customers or editing information about existing ones. More details in the section Adding a new customer
During the initial setup of the solution, a target cloud is created and used by default, but there is also the ability to create additional clouds and assign them to clients. This provides multi-tenancy for partners.
Manage Target Clouds#
Acura provides an ability to manage target clouds, the cloud to which customer devices will be replicated. This provides multitenancy to partners. Just click on the Manage Clouds button on the Partner's page.
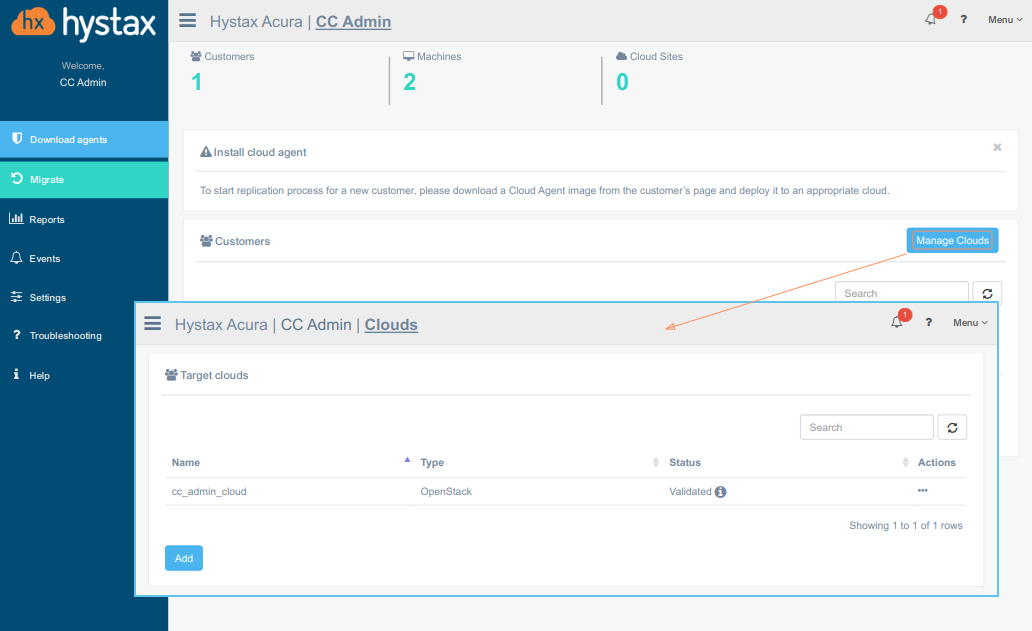
The target cloud page has a number of options for working with this type of cloud:
- to create a new target cloud

- to edit an existing cloud
- to revalidate a cloud
- to delete an existing cloud
Add Target Cloud#
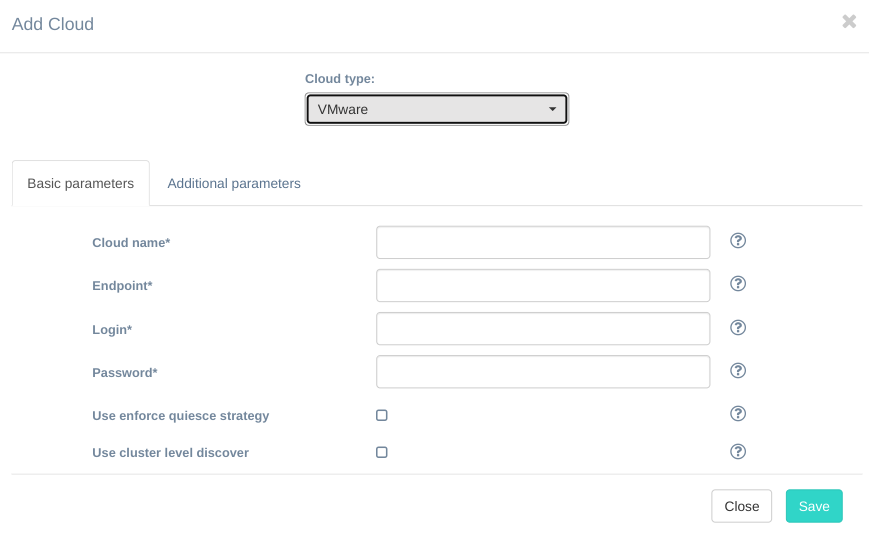
Just click Add button on the Target clouds panel.
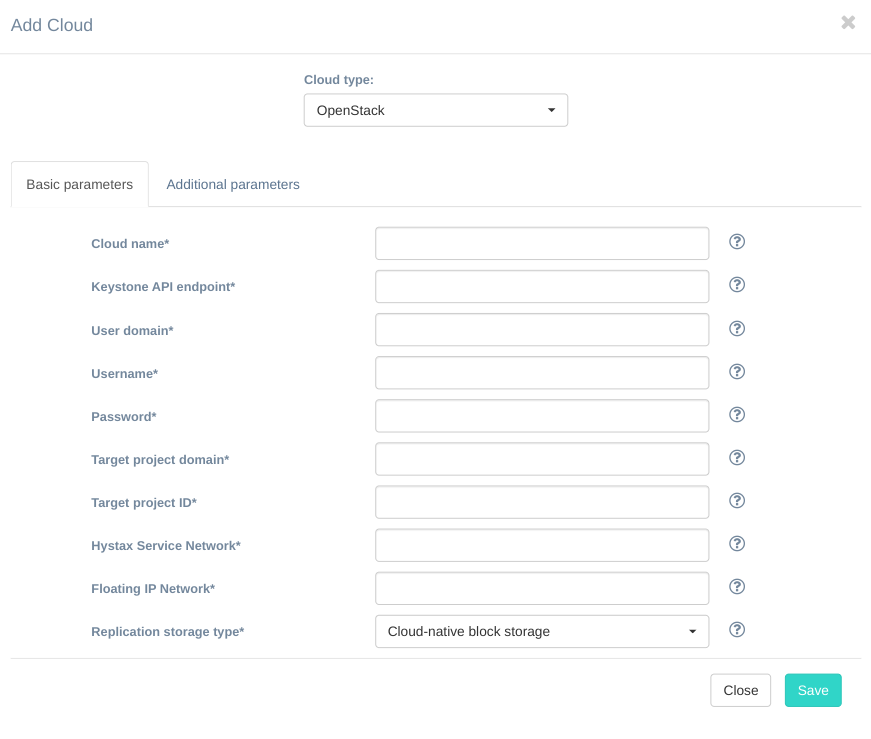
Specify the cloud type to which the solution is deployed, fill in all the fields by providing cloud configuration details. Use question mark icons to get hints on the fields.
Note
Fields description for Alibaba, Amazon Web Services, Azure, Flexible Engine, Google Cloud Platform, OpenNebula, OpenStack, oVirt, VMware.
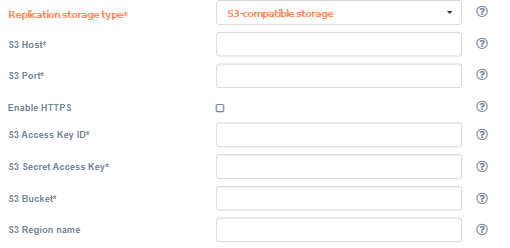
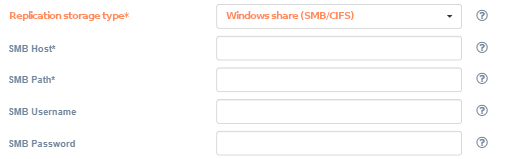
Below we'll take a closer look at the field Replication storage type. The Replication storage type field contains a list of supported storages for replicated data. Use Cloud-native block storage when implement a migration or a disaster recovery scenario, S3-compatible storage, Unix share (NFS) or Windows share (SMB/CIFS) - for a backup scenario.
There is no need to specify additional parameters when select Cloud-native block storage. The data is stored on the target cloud.
When select S3-compatible storage, Unix share (NFS) or Windows share (SMB/CIFS), the data is stored in the external third-party storage. There is a set of parameters that should be specified for each type of storage.

A new cloud is listed and validated after saving. As soon as the validation is passed the status is set to  .
.
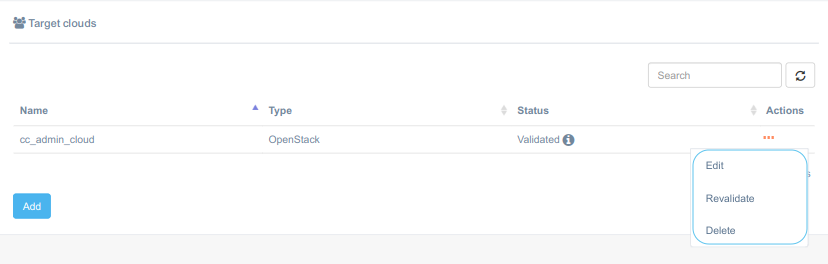
Edit Target Cloud#
Select the Edit menu item from the Actions drop-down menu. The Edit Cloud panel is similar to the Add Cloud except the Cloud type and the Replication storage type fields are disable for editing.
Note
Fields description for Alibaba, Amazon Web Services, Azure, Flexible Engine, Google Cloud Platform, OpenNebula, OpenStack, oVirt, VMware.
Note
Specify the password before save.
The validation process starts just after saving. A new cloud will be listed and validated after saving. As soon as the validation
is passed the status is set to .
Revalidate Target Cloud#
Validation process starts automatically after the cloud is created or edited. However, there is an ability to start this process manually.
Just select Revalidate from the drop-down menu. During this process, test cloud volume and test Cloud Agent are created on the
target cloud to check whether the solution is able to use cloud APIs and actually works. As soon as the validation is passed the status
is set to .
Otherwise, the status shows the reason why the check is failed. Fix it and revalidate.
Delete Target Cloud#
Additionally, the ability to delete target clouds has been implemented. For this purpose, the Delete command has been added to the drop-down list of actions.
Warning
A deleted cloud cannot be restored.
Add new customer#
To add a new customer, go to the Partner page and just click Add.
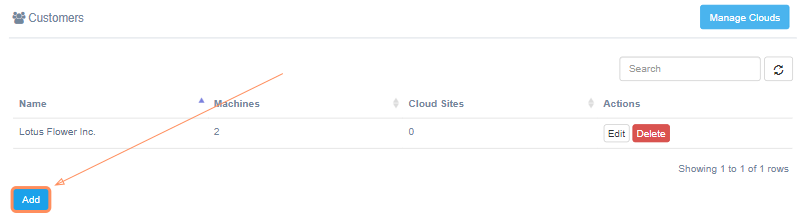
Fill in the following required fields to add a customer: Company Name, Contact Email, Contact Phone, Address, Active checkbox (activity status of a customer and all their users).
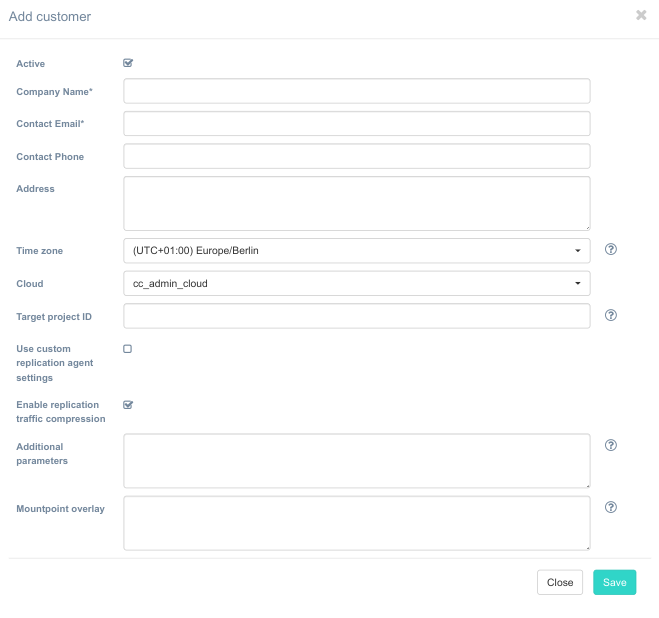
- Active - shows whether the customer is active or not, this field affects the ability of customer users to use the system.
- Company Name - customer's company name, unique within the partner, will be displayed in the UI.
- Contact Email - email address for communication with a customer's representative on the solution usage and billing, unique within the partner.
- Contact Phone is the telephone number of the customer's representative.
- Address
- Time zone - time zone to use for replication scheduling
- Cloud - target cloud.
- Target project ID - target project ID where replicated loads will be spun up.
- Use custom replication agent settings - off by default. Use this if you need to put Acura behind a proxy.
- Enable replication traffic compression - when on this might save a lot of network bandwidth. Checked by default.
- Additional parameters - other additional parameters in JSON format.
- Mountpoint overlay - overrides default mountpoint in JSON format.
After clicking Save, the customer will be created and shown in the customer list. An admin user for the customer is created with the default password, which will have to be changed at the first login. When a customer is created, it is advisable to proceed to the infrastructure protection sequence.
Custom replication agent settings#
Applying custom settings can be essential for organizing an operational environment if there is a proxy server between Acura and the machine to be replicated or, for example, there is supposed to be a different endpoint IP for each customer.
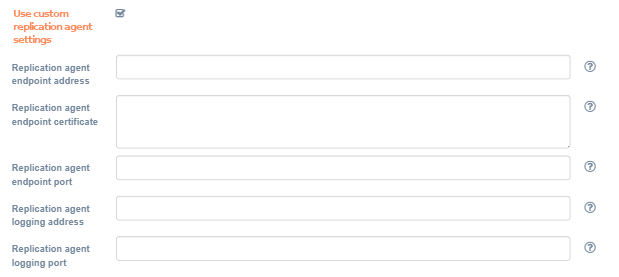
Providing custom replication agent settings is available for every new customer that is being added to the ACP. Tick the checkbox next to Use custom replication agent settings to access the following fields.
Warning
Agent settings can no longer be modified through the UI, once a Customer has been successfully created.
Replication agent endpoint IP is an IPv4 address or DNS name that will be used by the replication agents to connect, send data, and make REST API calls to Acura.
Replication agent endpoint certificate is required if a proxy server is present between the components to ensure the security of the HTTPS connection. Input should be an SSL certificate in PEM format for the replication endpoint IP (proxy server).
Replication agent endpoint port is the port used by replication agents to send data.
Replication agent logging address is a custom IPv4 address or DNS name for sending logs. Replication agents downloaded for the customer will use this IP as the Logstash IP. This field typically contains the same address as the Replication agent endpoint IP.
Replication agent logging port is the port used by replication agents to send logs.
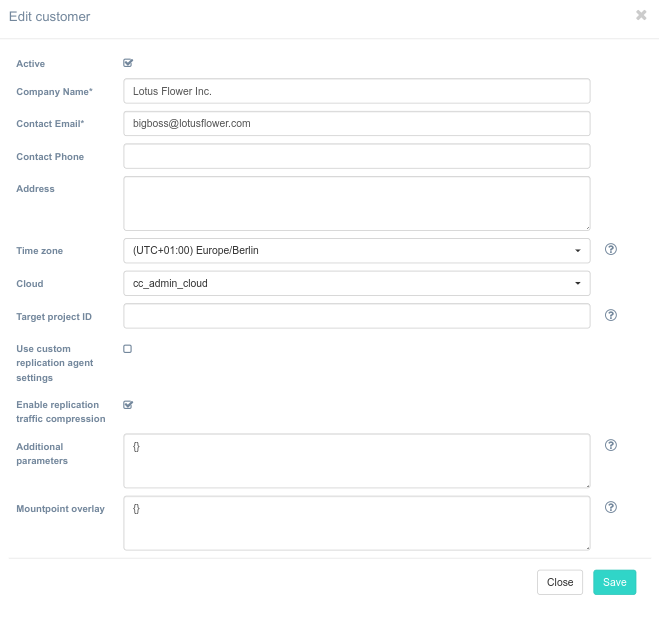
Edit existing customer#
To edit an existing customer, click on the Edit button to the right of their name.
A dialog window with filled in customer data will appear. Make the necessary changes and click Save, after that the customer data will be updated.
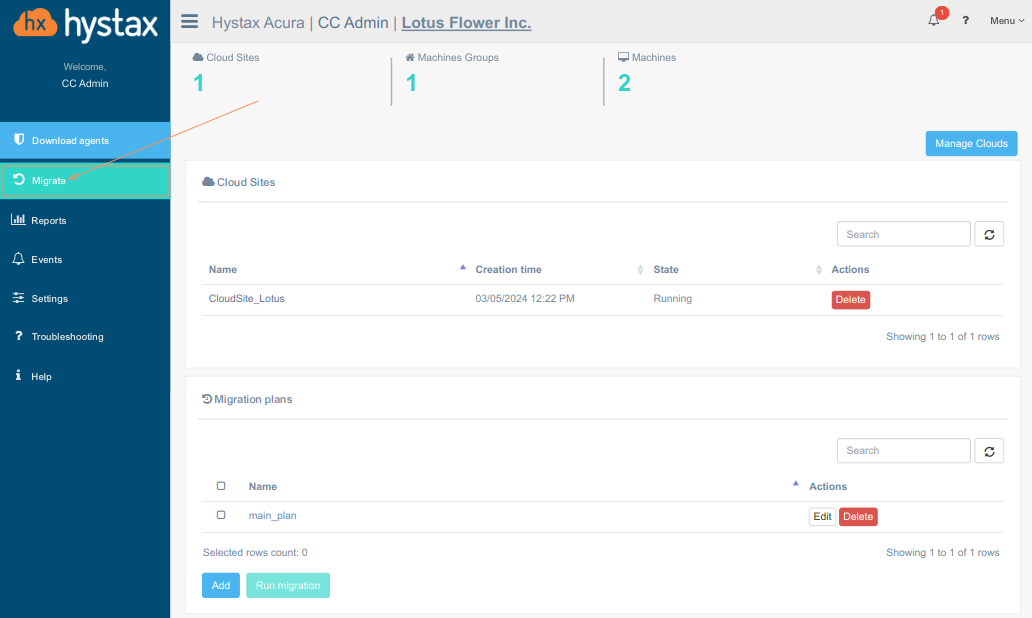
Customer dashboard overview#
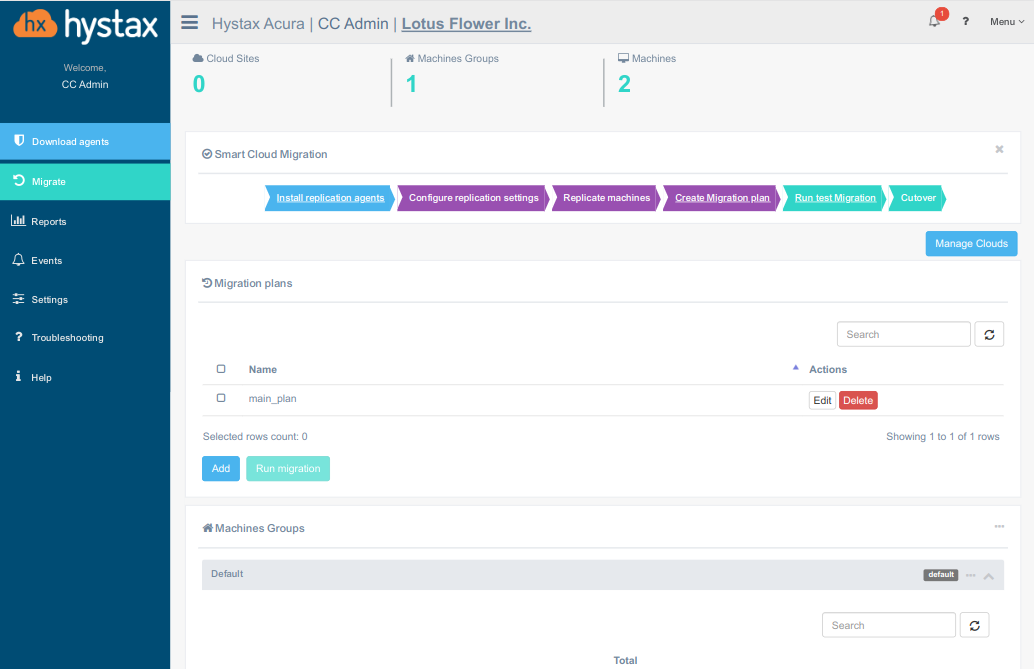
The customer dashboard contains the following information:
-
The summary cards show
- the number of customer cloud sites,
- the number of groups of machines,
- and the total number of customer machines
-
Use Smart Cloud Migration flow to get better results
- The Manage Clouds button. How to Manage Source Clouds
- The list and groups of machines on the Machines tab (details at Machines and actions over them)
- List of Migration plans with the ability to manage them can be found on the Migration Plans tab (details)
- The Migrations tab contains lists of
Manage Source Clouds#
Acura provides an ability to manage source clouds. Just click on the customer and press the Manage Clouds button on the Customer page.
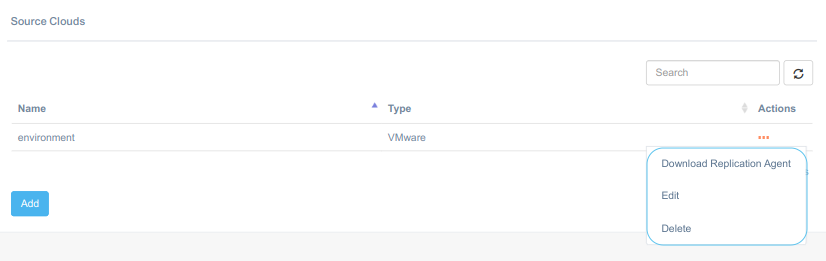
The source cloud page has a number of options for working with this type of cloud:
- to create a new source cloud
- to download Replication Agent for VMware/oVirt cloud
- to edit an existing cloud
- to delete an existing cloud
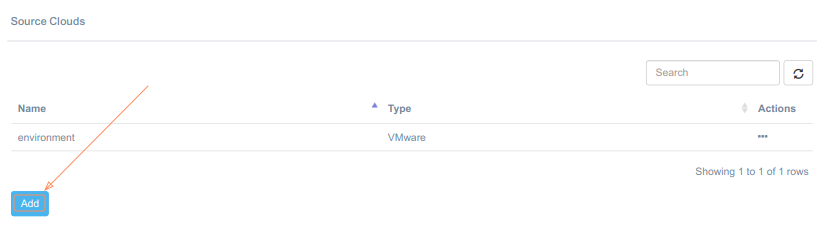
Add Source Cloud#
Just click Add button on the Source clouds panel.
Specify the cloud type to which the solution is deployed, fill in all the fields by providing cloud configuration details. Use question mark icons to get hints on the fields.
A new cloud is added to the list after saving.
Edit Source Cloud#
Select the Edit menu item from the Actions drop-down menu. The 'Edit Cloud' panel is similar to the 'Add Cloud' except the Cloud type field is disable for editing.
Note
Specify the password before save.
Save it and the cloud is ready to go.
Download Replication Agent#
To download Replication Agent click on the approptiate item of the drop-down list. Pay attention that this feature is available for Replication Agents for VMware/oVirt/OpenStack clouds only.
Note
Downloading process takes some time.
Replication Agents deploying instructions:
Delete Source Cloud#
Additionally, the ability to delete source clouds has been implemented. For this purpose, the Delete command has been added to the drop-down list of actions.
Warning
A deleted cloud cannot be restored.
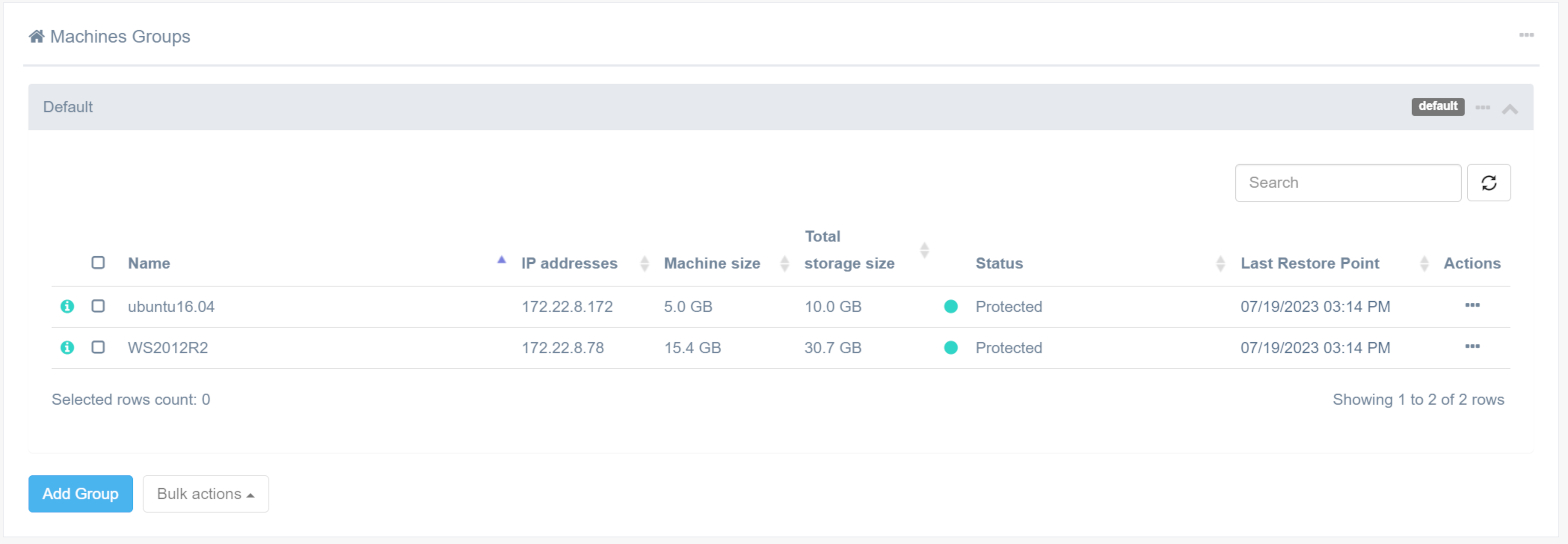
Machines and actions over them#
Customer page displays the machines that are replicated by the solution.
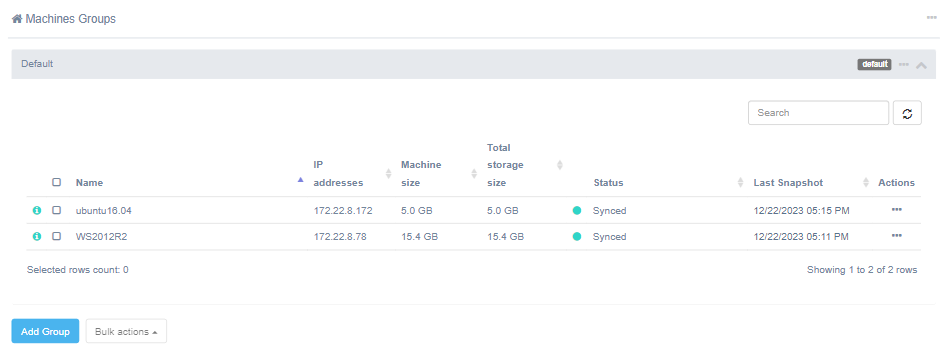
When detected, new machines are placed in a group that is created by default and marked accordingly.
The solution provides the ability to create, rename and delete groups, as well as move machines between groups, grouping them by various criteria: geographic location of the machine, general snapshot storage policy or replication schedule, etc.
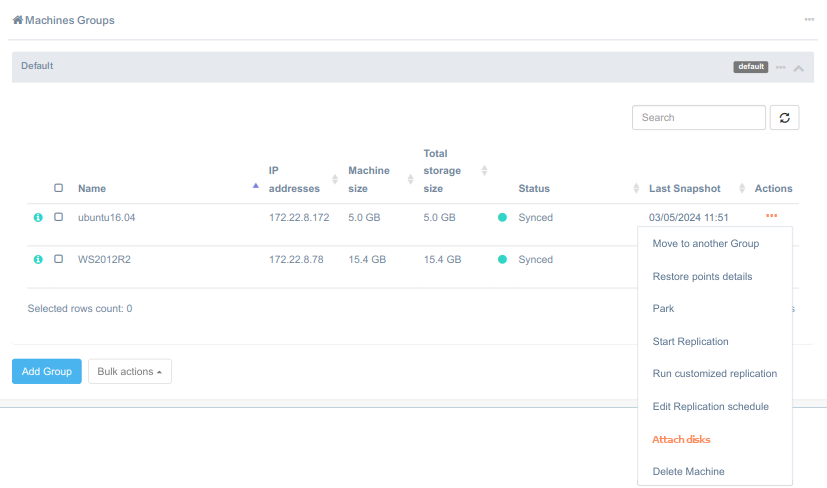
In addition, it is possible to start/pause replication, change replication parameters, view information about recovery points, attach disks, generate migration plans, and delete machines.
All or some of the settings described above are included in the global, group, selected machines or single machine settings menu.
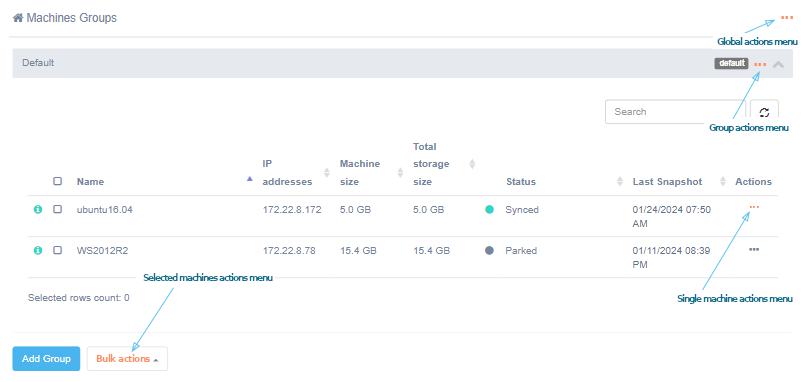
Settings are as follows:
-
By default, global settings are applied to all groups and machines.
-
Upon editing group settings, the new settings are applied to all machines (in the group or the ones added later) with the default settings, otherwise, the settings of individual machines will still be valid.
-
Upon editing the settings of selected machines, only the selected specific machines are affected, otherwise, group settings or global settings apply.
-
Upon editing the settings of a machine, only the one specific machine is affected, otherwise, group settings or global settings apply.
Generate Migration plan from Machines Group
Groups actions#
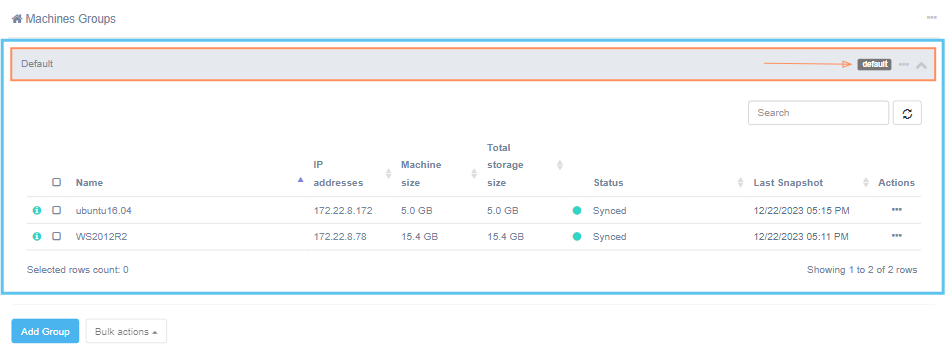
Initially, there is a Default group for each customer.
The Default group, which includes all machines that have not been added to other groups, is
created automatically.
It is highlighted by the corresponding symbol  next to its name in the list of groups.
The default group cannot be deleted.
next to its name in the list of groups.
The default group cannot be deleted.
Add new machine group#
To add a new group, go to Machines Groups and just click Add Group. Fill in the group name and its description. Group name should be unique within a customer.
It is possible to add any number of groups. By default, each group inherits global settings for a replication schedule and snapshot retention policies of a customer. Editing group settings will be described below. Note that group name must be unique within the customer.
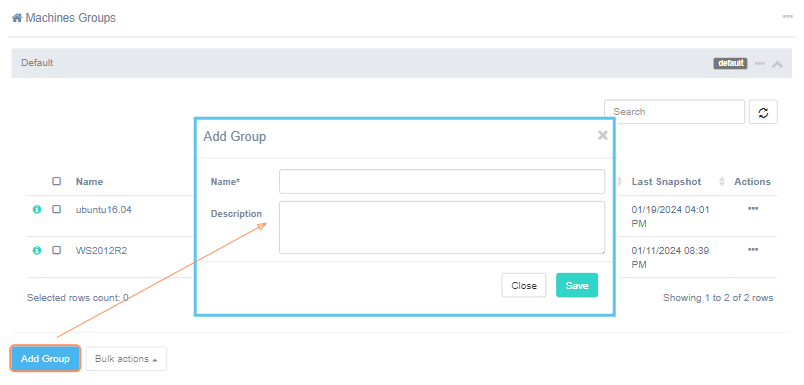
Pay special attention to the Rate limits field. Use it to set the total replication rate of machines in a group. "0" is unlimited.
After clicking Save, the group will be created. It will appear on the customer page.
Remove and rename groups#
To remove or rename a group, select appropriate items in the group menu:
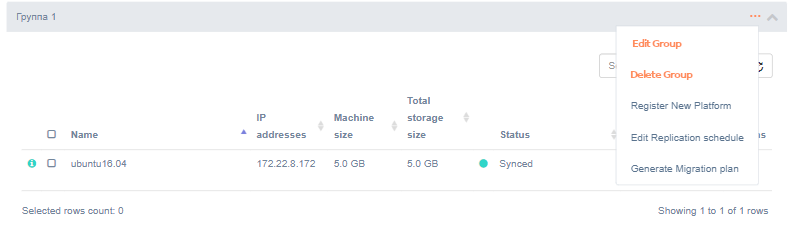
Note
The default group cannot be deleted.
Download machine list#
To download the machine list, you can either select the menu item Download machine list in the group menu
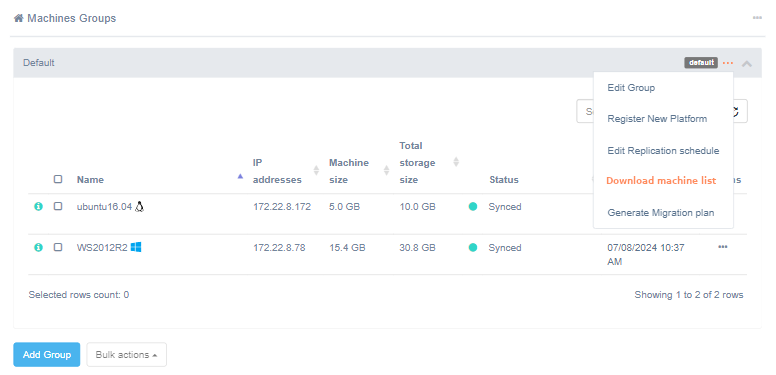
or in the general settings menu
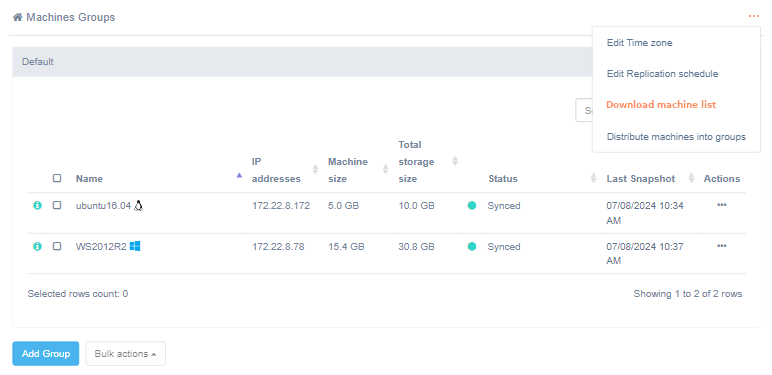
Once the download is completed, a file named machines_list.csv will appear in your Downloads folder. You can use this file later to move machines between groups or generate a migration plan for machines from a file.
Move machines between groups and customers#
An ability to move machines between groups and customers is implemented:
-
transfer machines manually between groups is available through the menu "Move to another group"
-
transfer machines manually between customers
-
transfer machines automatically between customers for a VMware case
Transfer machines manually between groups
Moving machines between groups is available through the "Move to another group" item in the bulk or a single machine actions menu.
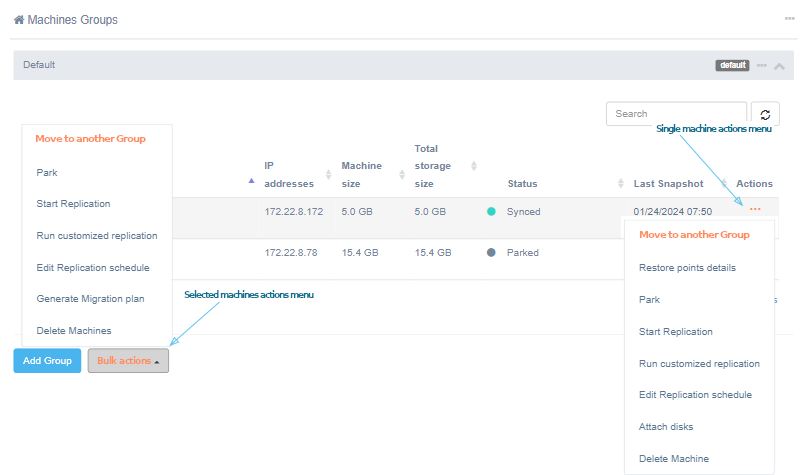
Select the group from the list and save your selection. Note that if replication schedule and snapshot storage policies have not been redefined exclusively, the new group's parameters will apply after transfer.
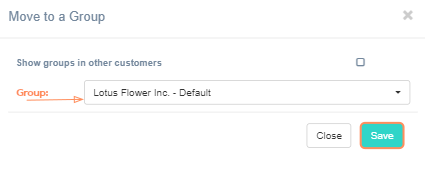
Transfer machines manually between customers
Additionally, there is an ability to transfer machines between groups of customers. To do this, just on the "Show groups of other customers" checkbox, select the group and save changes.
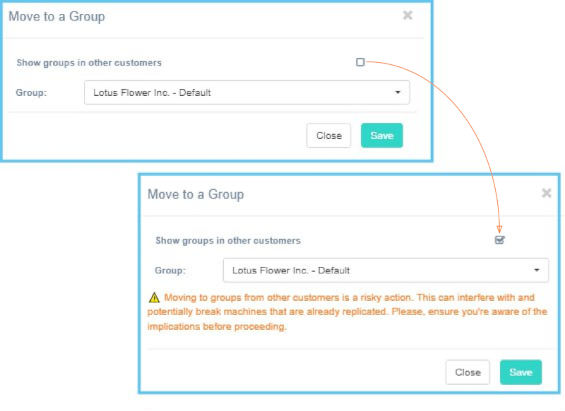
Warning
Moving to groups from other customers is a risky action. This can interfere with and potentially break machines that are already replicated. Please, ensure you're aware of the implications before proceeding.
Warning
A machine must not have any restore points.
Transfer machines automatically between customers for a VMware case
If you want to move a large number of VMware machines located on the same host, use the automatic transfer feature.
To do this, deploy a new replication agent configured for the new customer on the host. Then delete the old customer from Acura. The machines will automatically appear in the new customer's machine list.
Note
If the old customer is not deleted, the machines will still be in its list. However, machines that join the host after installing the new replication agent will appear in the list of the machines of the new customer.
Move machines between groups using a csv file#
Please follow the steps below to move machines between groups using a CSV file:
Step 1. Download machines list from this link.
Step 2. Edit the downloaded list, and for each machine, fill in the group_name field. It's important to ensure that the group_name field is filled in for each machine_id. Please note that the contents of other columns will be ignored when allocating machines.
Step 3. To perform the operation, go to the general settings menu, select Distribute machines into groups, and upload the edited file.
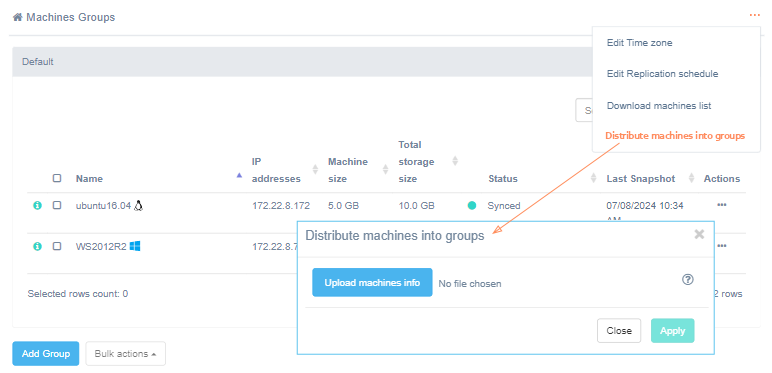
Click on Apply to start the movement. Upon completion, a message will display the number of machines moved and the number of new groups created. If the group specified in group_name is not registered in the system, a new one will be created.
Operations for working with replications#
Edit Replication schedule#
By default, the replication interval is set to once every thirty days.
It is possible to edit replication schedule for separate machines, groups or as general settings.
To change the settings, click Edit replication schedule in the Actions menu (for separate machines),
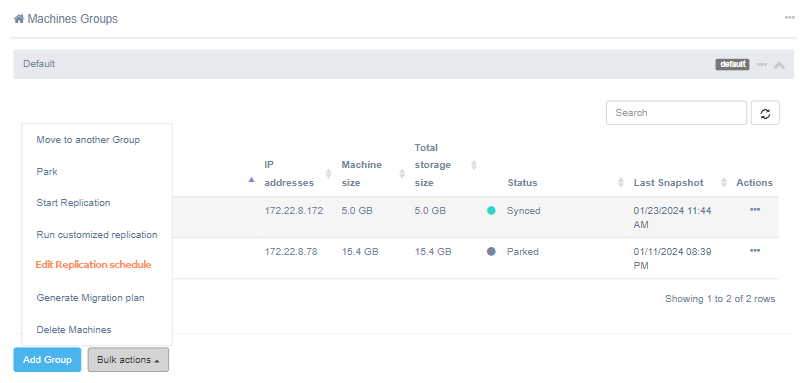
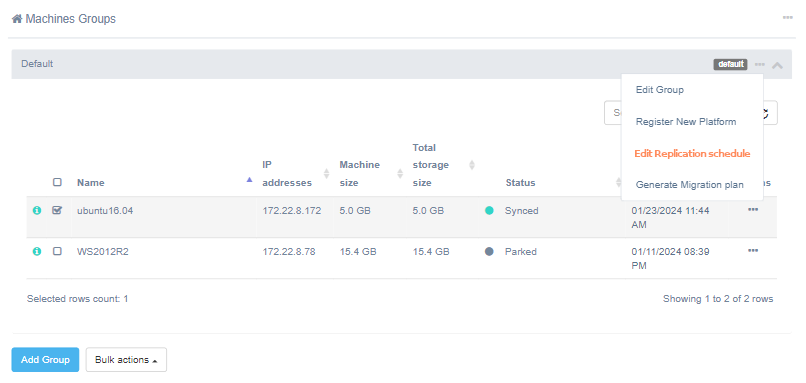
in the menu of separate groups
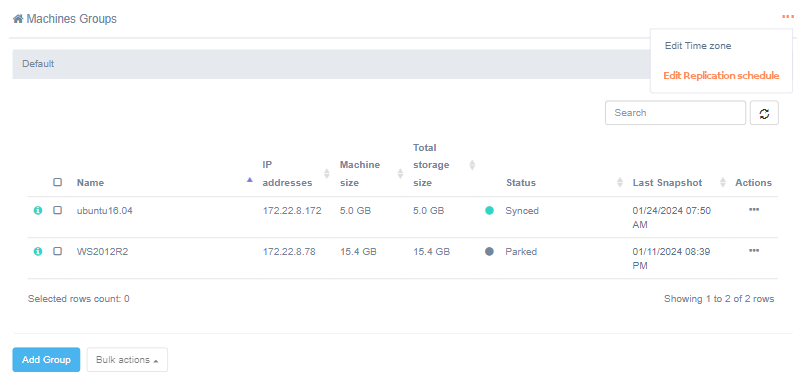
or in the general settings menu of Machines Groups.
Note
Changing the replication schedule and additional settings is only possible for a machine in the Discovered status (before the first replication).
Note
The Additional Settings section includes parameters that are configured individually for each machine. Therefore, it is only available when the form is accessed from the machine’s Actions menu.
About replication settings inheritance principles.
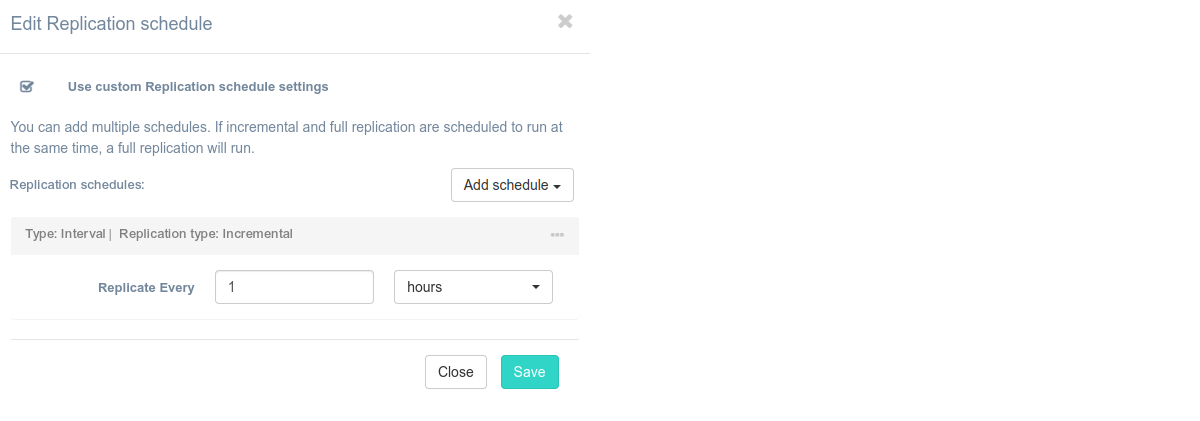
Click the Add schedule button, select the schedule type from the list, and enter the values.
There are several options for a schedule:
- Interval schedule - replication occurs at equal intervals of time. For example, every 15 minutes or every 6 hours. This option is ideal for non-critical elements of a business-application, so it does not seriously affect the performance of the system and does not load the network.
- Continuous replication - a new replication starts immediately after the completion of the previous one. It is ideal for critical components, such as databases and mail services.
Warning
A minor impact on the performance of the machine and the network through continuous replication can be found with continuous replication.
- Daily - replication is done daily at the specified time (multiple values can be specified).
- Weekly - replication is done weekly. It is required to specify the numbers of weeks in the month (or all weeks), days of the week and a specific time. Multiple values can be specified for all parameters.
- Monthly - replication is done monthly. It is required to specify the numbers of days in the month and a specific time. Multiple values can be specified for all parameters.
- Cron (expert) - schedule in cron format.
Additional parameters
The Additional parameters section appears when edit the schedule of a specific machine.
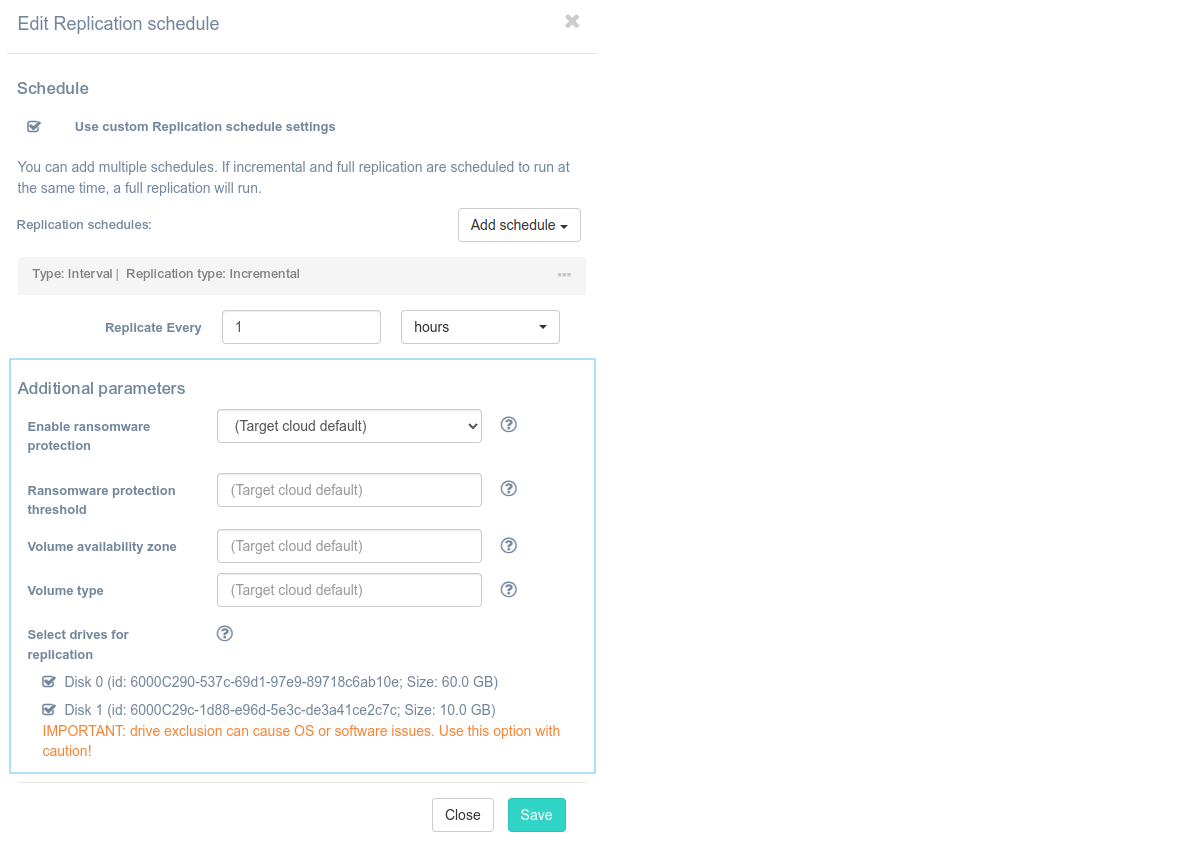
Additional parameters can be set before first replication.
The Enable ransomware protection, Ransomware protection threshold settings, and the Select drives for replication section can be configured for all cloud types; the remaining settings depend on the cloud type.
Use the Enable Ransomware Protection option to detect and suspend machines with an abnormally large incremental replication size in order to reduce the potential impact of ransomware.
Enter the Ransomware protection threshold as a percentage. This defines the maximum allowed size of incremental replication relative to the most recent full backup. If the threshold is exceeded, the machine will be automatically suspended.
Select drives for replication. Deselect the drives that you do not want to replicate and create in the target cloud.
Warning
IMPORTANT: drive exclusion can cause OS or software issues. Use this option with caution!
Warning
Dynamic disks cannot be excluded when discovered by the Windows Replication Agent.
The list of other additional parameters depends on the cloud type.
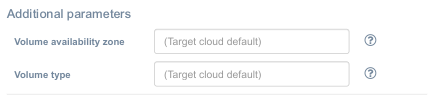
Additional parameters for AWS, Flexible Engine, and OpenStack clouds
| Field | Description |
|---|---|
| Volume availability zone | Override the default availability zone for replicated volumes. Type in a valid abbreviation or acronym that is in use by the cloud platform itself, usually listed in its supporting documentation or at the volume creation step. |
| Volume type | Override the default volume type for replicated volumes. It can be specified as a comma-separated string of disk types, e.g. SSD, SATA. Redundant commas and whitespaces are ignored. If a machine has more disks than the number of specified disk types, the last disk type will be used for all of the remaining disks. This way, if a machine has 5 volumes, the first volume will have SSD type, and the remaining ones will have SATA. HDD will be used by default if no other settings are provided. Check with your cloud platform to input the correct names of volume types. |
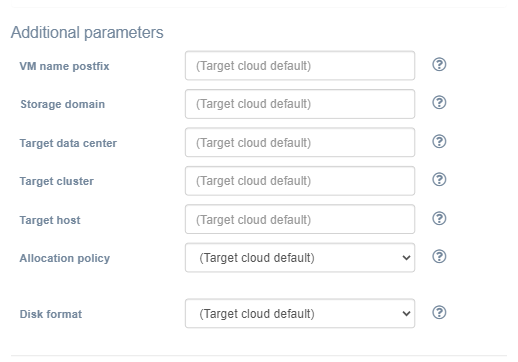
Additional parameters for oVirt
| Field | Description |
|---|---|
| VM name postfix | Set custom name postfix to avoid name collision with already existing VMs |
| Storage domain | Override the default storage domain |
| Target data center | Override the default data center |
| Target cluster | Override the default cluster |
| Target host | Override the default host |
| Allocation policy | Allocation policy for disks: target cloud default, sparse/thin provision or preallocated |
| Disk format | Override the default disk file format: target cloud default, qcow2, raw |
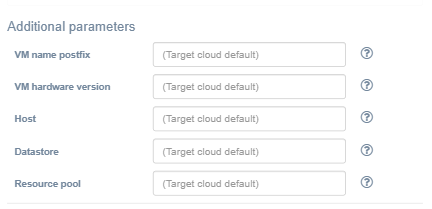
Additional parameters for VMware
| Field | Description |
|---|---|
| VM name postfix | Set custom name postfix to avoid name collition with already existing VMs |
| VM hardware version | Override the default VM hardware version, example: vmx-12 |
| Host | Override the default host |
| Datastore | Override the default datastore |
| Resource pool | Override the default VMware resource pool |
Additional parameters for VMware vCloud
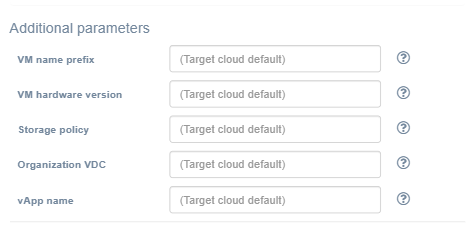
| Field | Description |
|---|---|
| VM name prefix | Set custom name prefix to avoid name collision with already existing VMs |
| VM hardware version | Override the default VM hardware version, example: vmx-12 |
| Storage policy | Override the default VM storage policy |
| Organization VDC | Override the default organization VDC |
| vApp name | Override the default vApp name |
After the initial replication is completed, the additional parameters will become inaccessible. Modifying them is only possible before a new full replication.
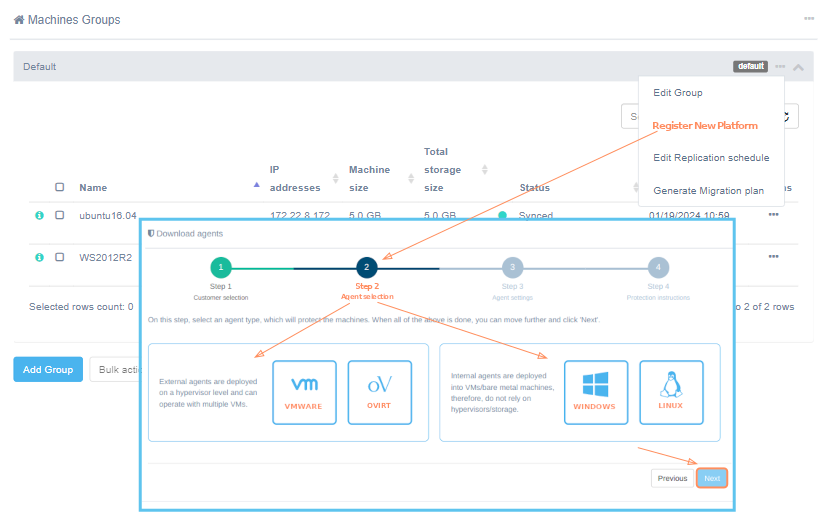
Register New Platform#
To replicate a machine, click Register new platform in the Group settings menu
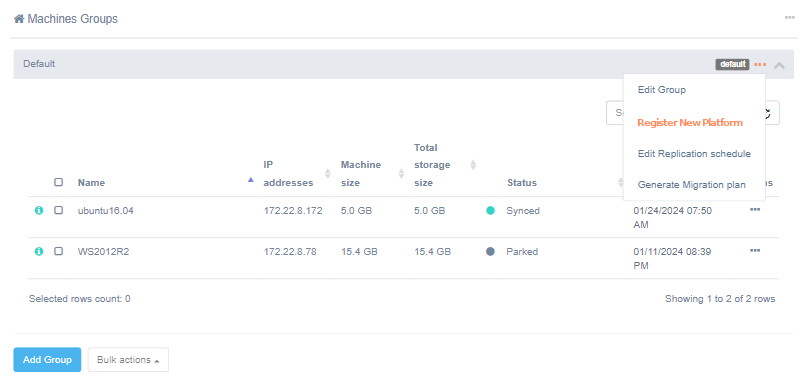
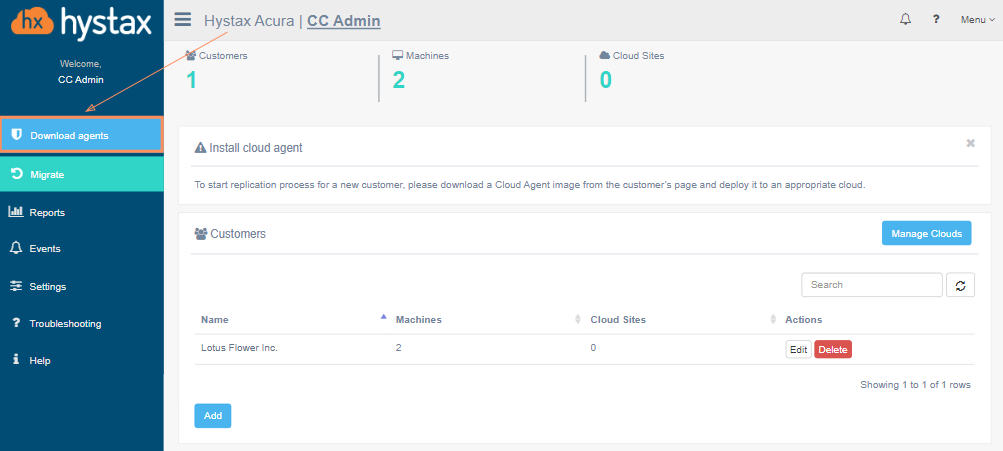
or Download agents in the main menu of the web interface.
Detailed information about this action is available at Protecting machines section.
After this action, all machines will automatically appear in the UI in the machine group specified in the second step. Machines will be in Discovered state.
Start Replication#
When a machine or a group of machines is registered on the solution, start the replication.
Select machines to replicate and click Start replication in the Actions menu.

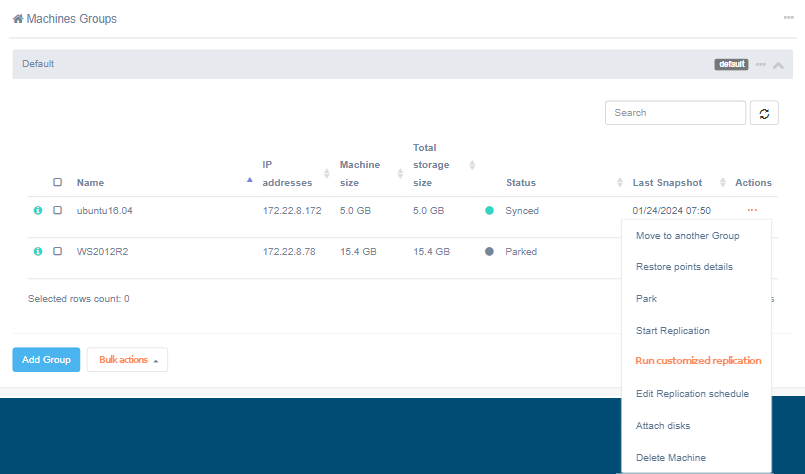
Run customized replication#
Note
Replications start and finish actions are only supported by VMware Replication Agent. These actions will be ignored by other replication agents.
The feature is available for a single machine or a group of machines via Run customized replication in menus Actions or Bulk actions.
Set the values of the parameters:
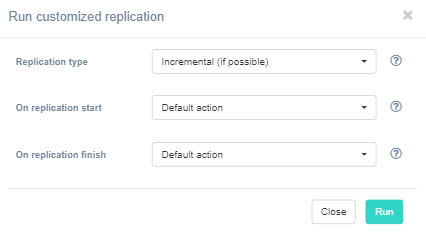
The Replication type, as well as the actions On replication start and finish are available for editing.
Select the Replication type:
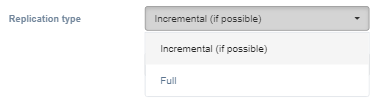
- incremental – send only changed data blocks
- full – send all data blocks
Select the actions on start/end replication:

- default action – configured in the source cloud configuration, the default action corresponds to the value no action, unless otherwise specified
- no action – leave the machine in its original state
- power source machine off
- power source machine on
When click on the Start button, the values are saved and the replication starts.
Note
After the replication is succeed, the values will return to the original state set before the replication was started.
Sync machines replications#
To sync a machines replication, mark the machines which should be replicated simultaneously and click Start replication in the Actions menu. Replication of all selected machines will start and then they will be replicated in parallel.
Park (pause)/Start replication#
To park a replication, select machines from different groups and click Park in the Actions menu. This action stops the agent replicating task for the machine. No further replications will be started by schedule for the machine.
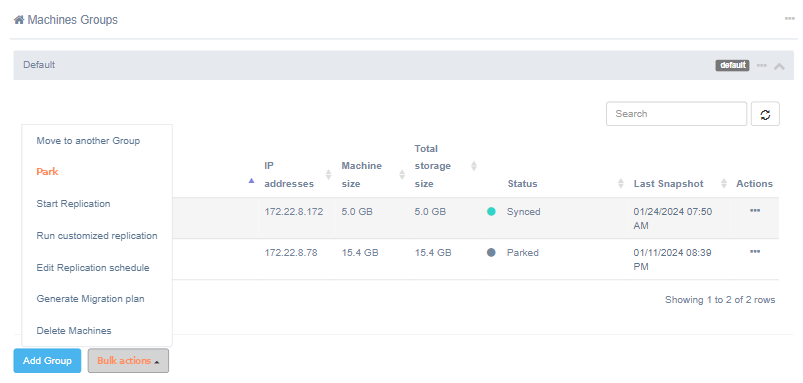
To start a replication again, click Start replication in the Actions menu. A new replication will start for the machine.
Generate Migration plan from Machines Group#
It is possible to generate a Migration plan for an individual machine, a group of selected machines, or for the whole group at once. To generate a Migration plan for several machines or groups, select the required machines by ticking their checkboxes and click Generate Migration plan in the Action menu or in the menu of groups.
Detailed information is available in the section dedicated to this issue.
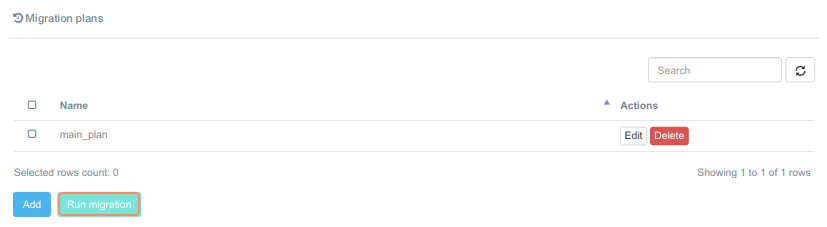
Migration plans#
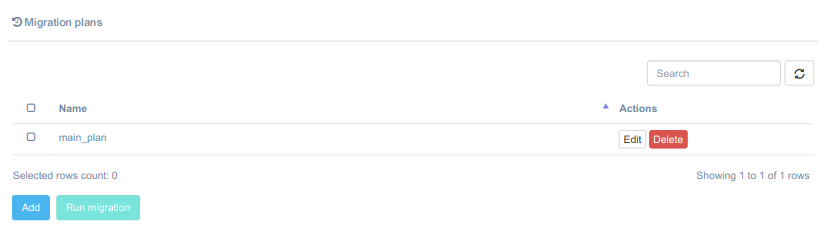
Migration plan is a description of the infrastructure and a set of necessary instructions used to recreate a business application on a target cloud. Migration plan is created in advance on the basis of a productive infrastructure, tested by running cloud sites and transferred to the migration process.
A customer can create any number of Migration plans: one for migrating the entire infrastructure or several with a breakdown into groups of machines, departments, machine roles, etc.
To perform a migration, select one or several Migration plans to be implemented during cloud site creation.
Get more details on rules for creating Migration plans and their syntax.
Cloud sites#
Cloud site is a customer business application running on AWS or KVM Platform that consists of network infrastructure components included into the business application.
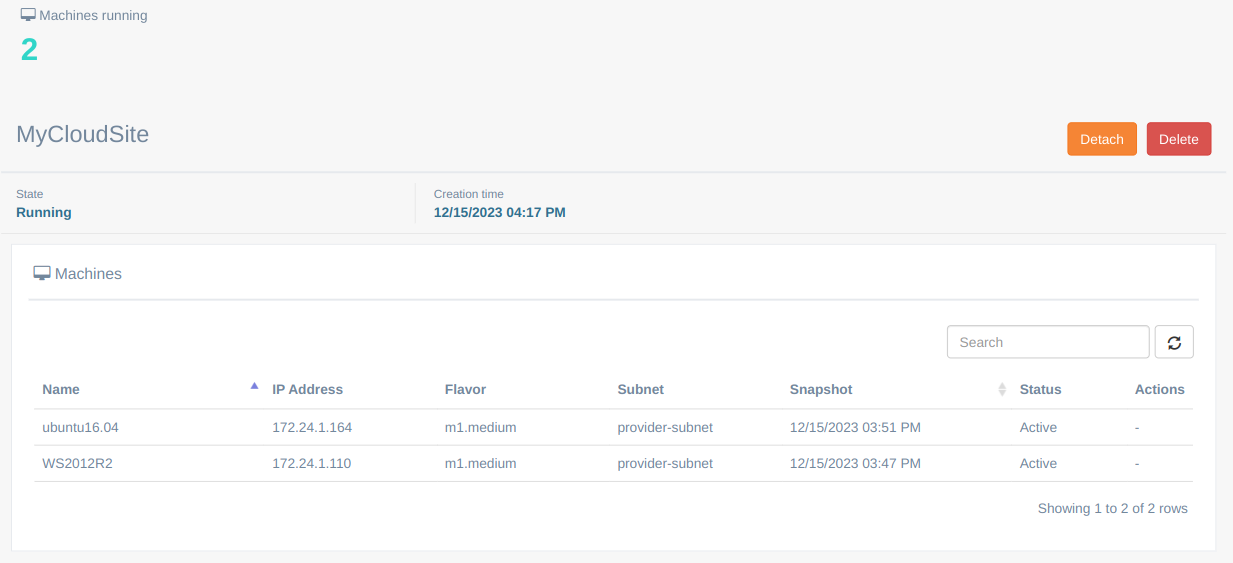
The main components of the page are:
- Resource Management and Functionality menu
- Total number of machines running in the cloud site
- Functionality for removing the site
- Information about type and condition of the cloud site
- List of running machines with the ability to manage them
To run a cloud site, start the Migration Process.
When a machine is ready to be used for production and work independently from the Acura cluster, use the Detach button.

Before detaching, the solution will request confirmation of the action and provide an option to move the machines to a group. This can be either a new group or an existing one. By default, the "Do not move" option is selected, meaning the machines will remain in their original group.
Disk attach#
Hystax Acura allows to recover protected machine disk(s) and attach it to the existing machines. This feature can be found in the Machines Groups section on the customer's page and on the third step of the Cloud site creation.
Note
Attaching disks is possible to machines restored for target OpenStack and Amazon Web Services clouds.
Invoke disk attachment in one of three ways:
1. Select the Attach disk action for the source machine.
2. On the third step of the Cloud site creation (Section: ACP - Cloud sites).
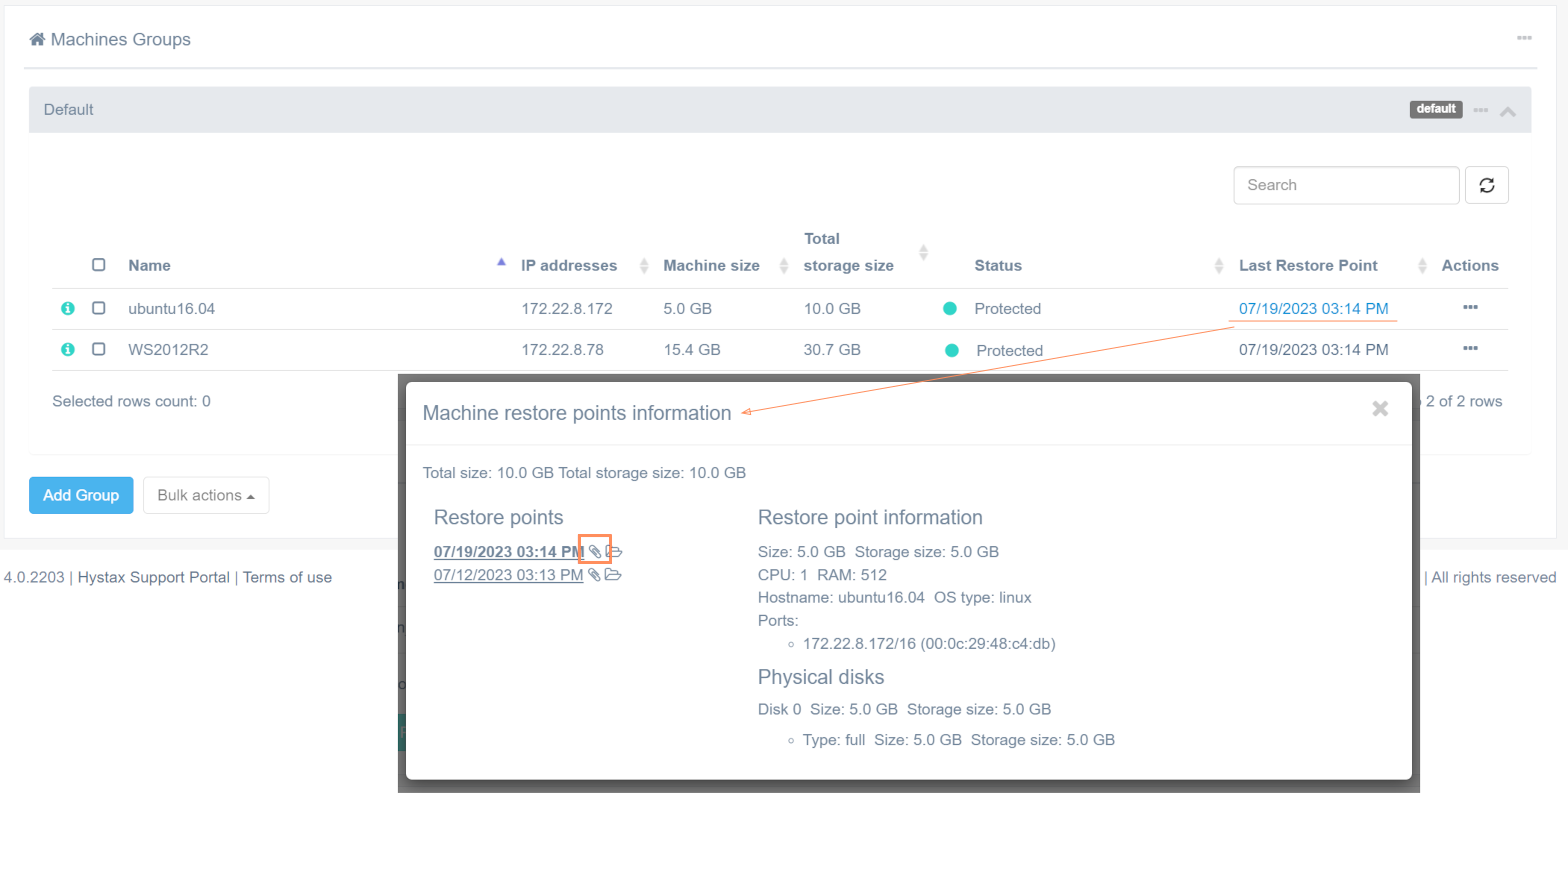
3. Select the Attach disk action on Machine restore points information (to get there click on the machine's Last Restore point column of the table). Click on the paperclip icon near the restore point on the Machine restore points information window.
Note
The disk will be attached to the failover machine.
Select the disk(s) you want to attach to the target machine in the Attach disks window and the ID of the target machine from the list. Restore point can be changed, if necessary.
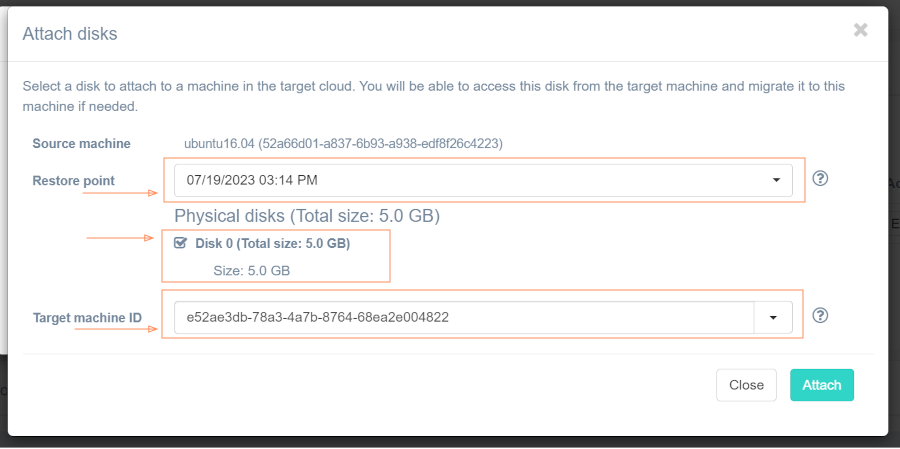
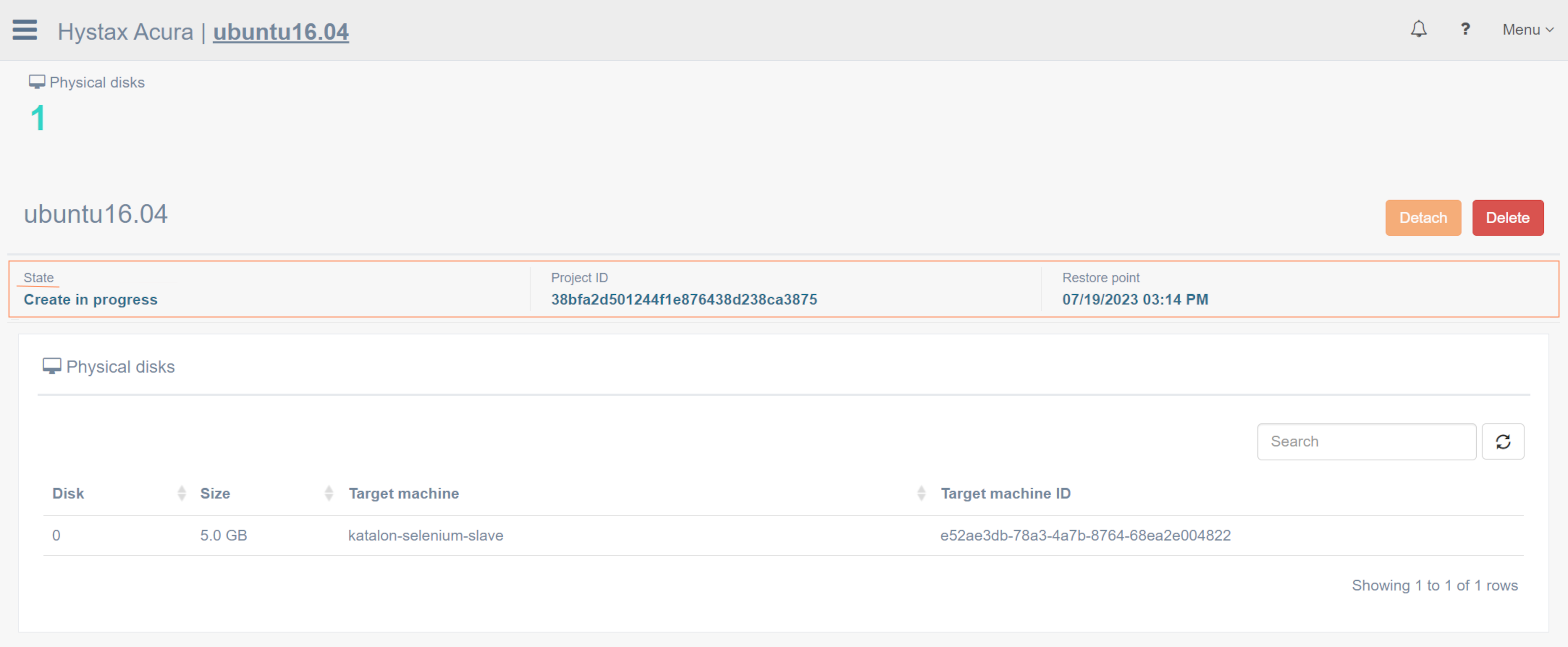
The process starts when the Attach button is pressed. The page appears on the screen showing the options of connection. When the disk is linked, the State changes into Active.
Note
This process doesn't guarantee that the disk will be detected by the operating system of a virtual machine. Use the administrative tools of the OS to mount the disc manually.
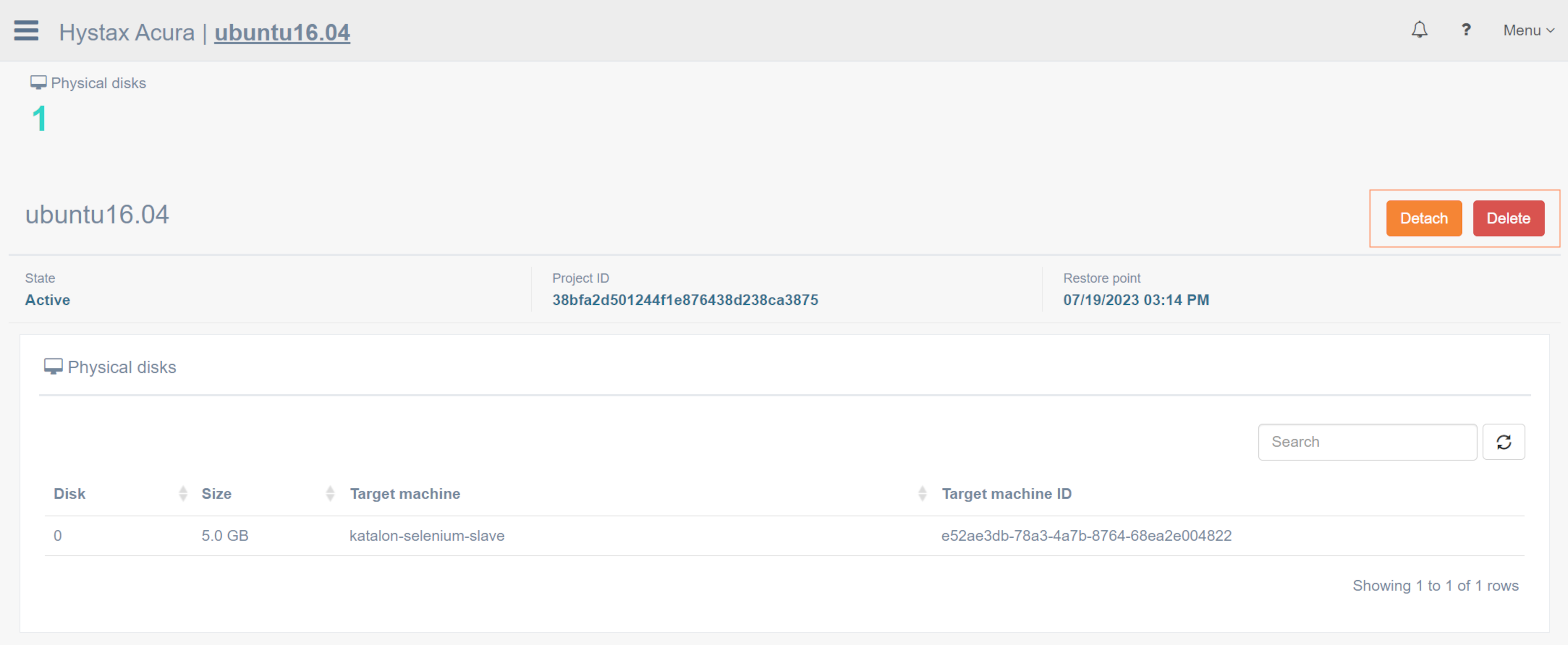
On the customer's page in the Attach disk section all attached disks are listed.

Cick on the machine name and the page with additional information launches. There are two buttons on this page Detach and Delete. The detached disk becomes invisible for the Hystax Acura, but remains mounted to the virtual machine. Further it's impossible to manage it by Hystax Acura. To unmount and delete disk press the Delete button.
Replicating machines#
To replicate a machine, click Register new platform in the Group settings menu
or Download agents in the main menu of the web interface.
Depending on whether a user is authorized as partner or customer, a replication process consists of four (for partner) or three (for customer) steps.
For partner, the first step is to select a customer who requires machine replication.
The second step is to select an agent type depending on the platform to be replicated - VMware, oVirt, OpenStack, Linux or Windows:
The next step is to configure:
- a group.
- parameters.
The list of parameters depends on the cloud type. Detailed information about them and description can be seen via links:
The last step is to download the agent.

After downloading and installing the agent, all machines will automatically appear in the UI in the machine group specified in the second step. Machines will be in Discovered state.
Select machines to replicate and click Start replication in the Actions menu.
Another ability to start the replication is to Run customized replication.
If necessary, an action Sync machines replications is available.
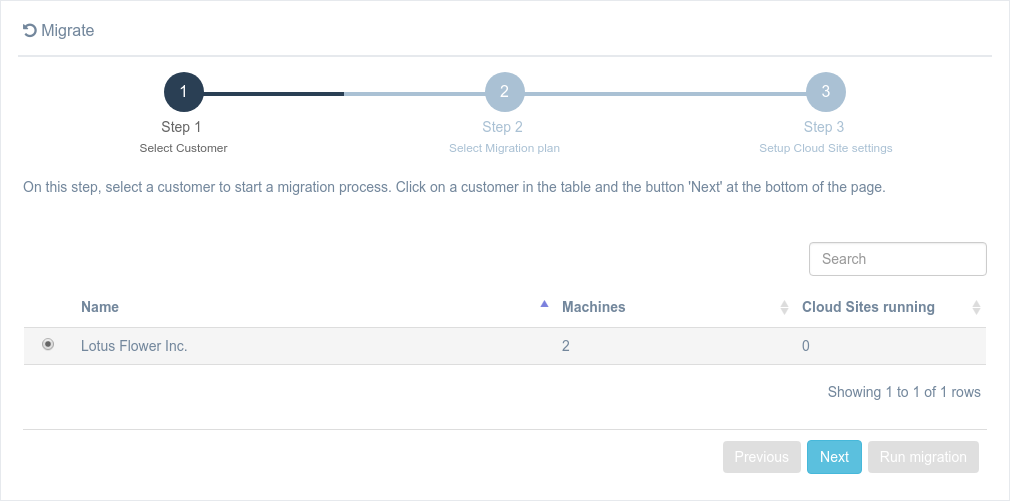
Migration process#
To start a migration process during testing or in case of the final migration Run Migration on the customer page with selected Migration plans
or Migrate in the main menu.
Migration process consists of three (for partner) or two (for customer) steps.
For partner, the first step is to select a customer who requires machine migration.
The second step is to select a Migration plan (Section ACP - Migration plans) that will be used to implement the migration process. Here, it is possible to create a customized Migration plan - in case Migration plans have not been updated for a while.
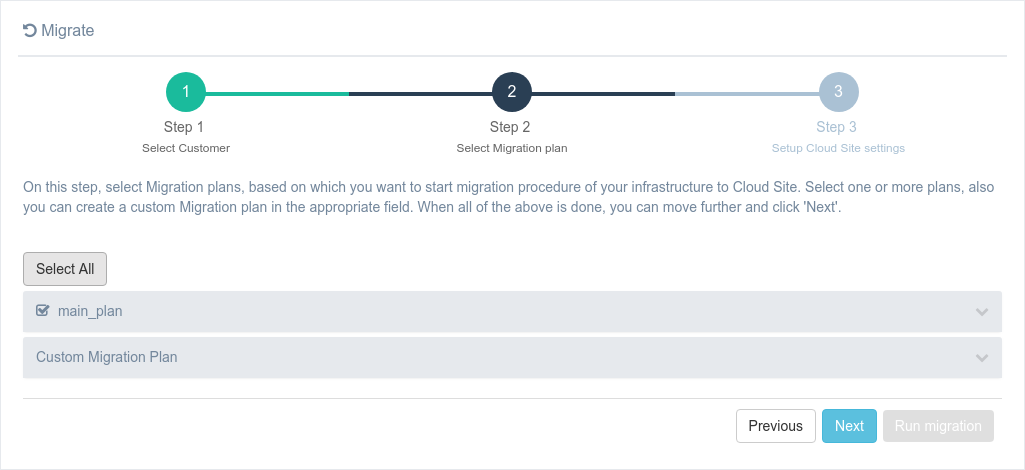
Warning
If several Migration plans contain descriptions of the same resources, the next step will not be available until the conflict is resolved by changing one of the plans. This is done to prevent collisions during cloud site start, which can lead to unpredictable consequences.
The last step while spinning up an infrastructure on AWS or KVM Platform consists of filling in the cloud site name, snapshot time (time to which an infrastructure should be restored) and a final validation / modification of a Migration plan.
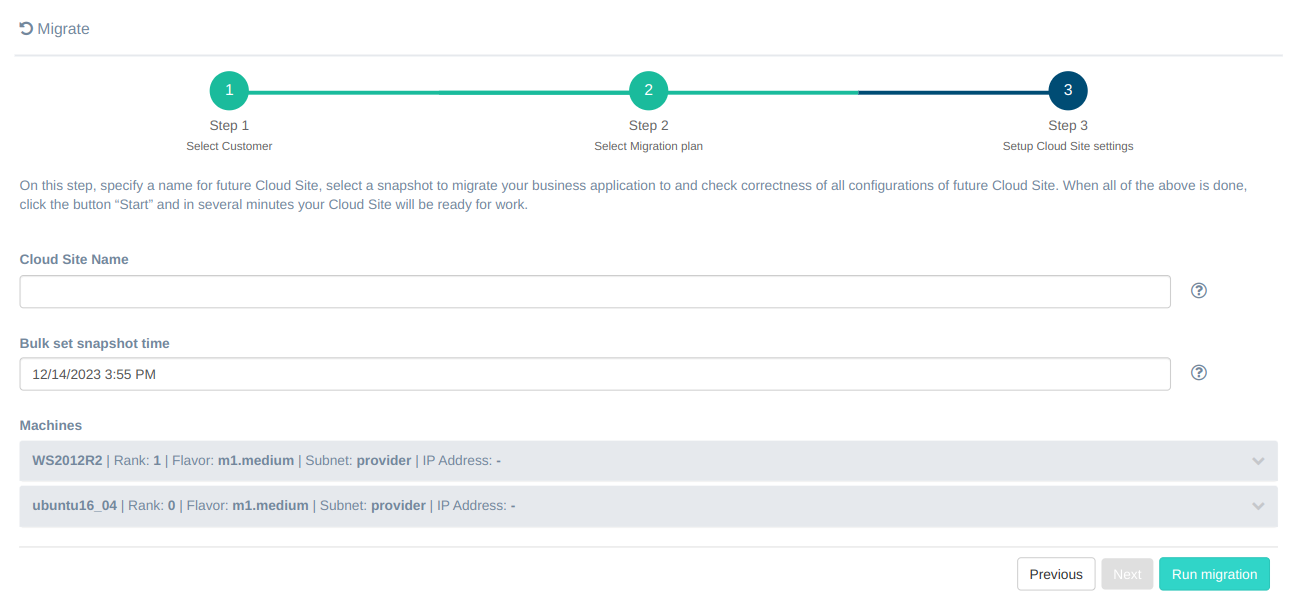
Cloud site name must be unique within the customer and contain only Latin letters, numbers and special symbols "-", "_" and ".".
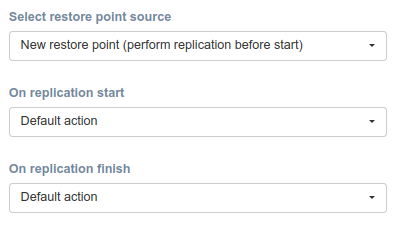
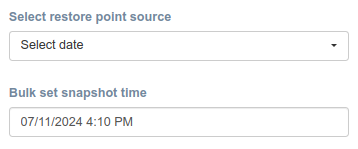
Select restore point source enables you to select:
- latest restore point (default)
-
new restore point - the replication will be performed before the migration, producing the most recent VM version. This option allows you to select the actions that should happen to the machine when replication starts/ends. Replications start and finish actions are only supported by VMware Replication Agent (version 4.2+). These actions will be ignored by other replication agents.
-
select date to which a business application will be restored. Specify the date and time the snapshot was created in the Bulk set snapshot time. For each machine, the replicas closest to the specified point in time will be used.
The ability to select the snapshot time for each machine is implemented. Expand the panel with the machine name and select the desired value in the Snapshot time field.
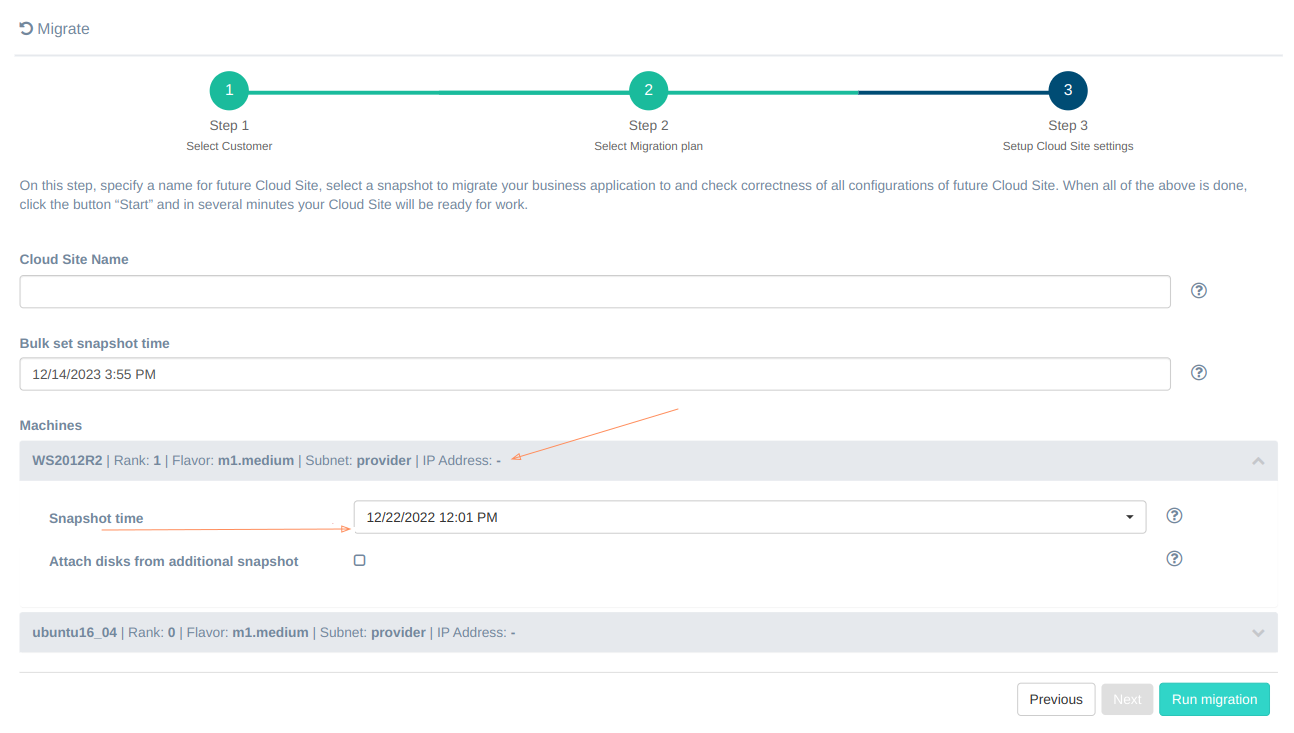
Additionally, it is possible to attach disks to the machine being restored.
Note
Attaching disks is possible to machines restored from OpenStack, Amazon Web Services, Flexible Engine clouds.
Just check the Attach disks from additional snapshot checkbox, select Additional snapshot time and physical disks, which need to be restored.
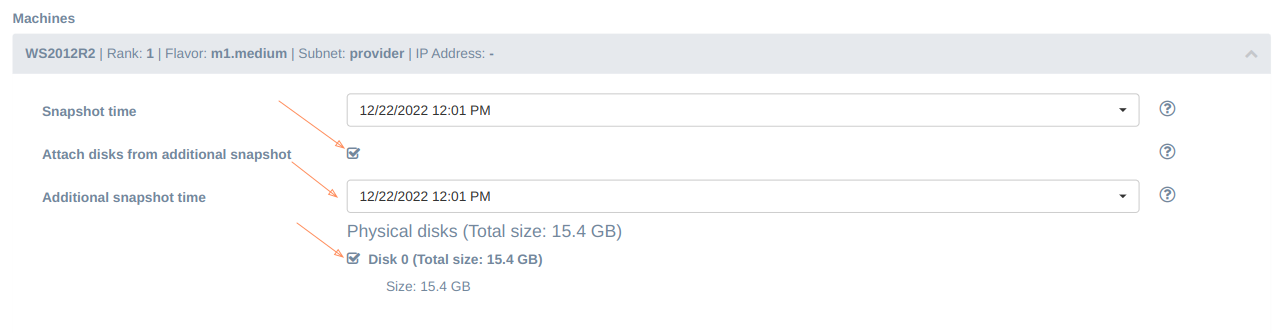
Note
The Snapshot time and Additional snapshot time values may differ.
To run a cloud site for migration, start machines and configure them in accordance with the final Migration plan click Run Migration.
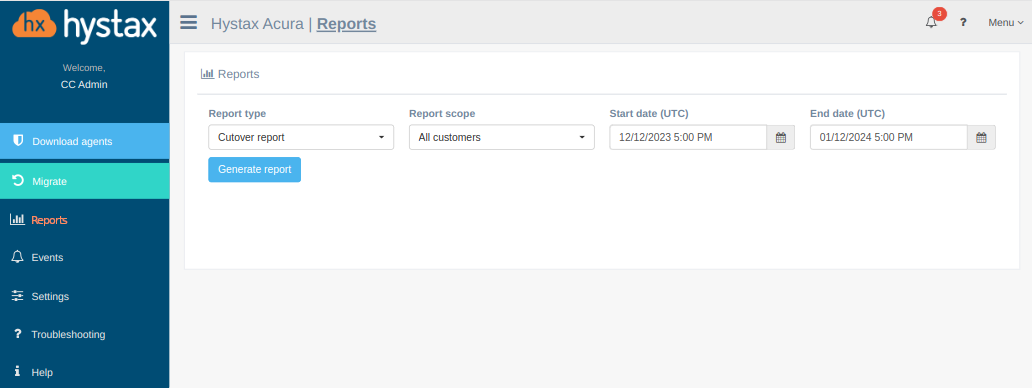
Reports#
To access this section in Acura Control Panel, click on the "Reports" menu item in the left sidebar.
- Hystax Acura provides a sophisticated set of reports on the performed Migration activities:
-
- Cutover report
-
- MSP migration report
-
- Storage size report
To generate a report, select its type in the drop-down menu as well as the Start and End dates to define the desired time frame, click on the blue "Generate report" button to get the results.
Note
Partners can get statistics for a specific customer or for all customers by utilizing the "Report scope" field. Customers can obtain statistics applicable only to them.
The output can be exported to a CSV file in case further data analysis is necessary.
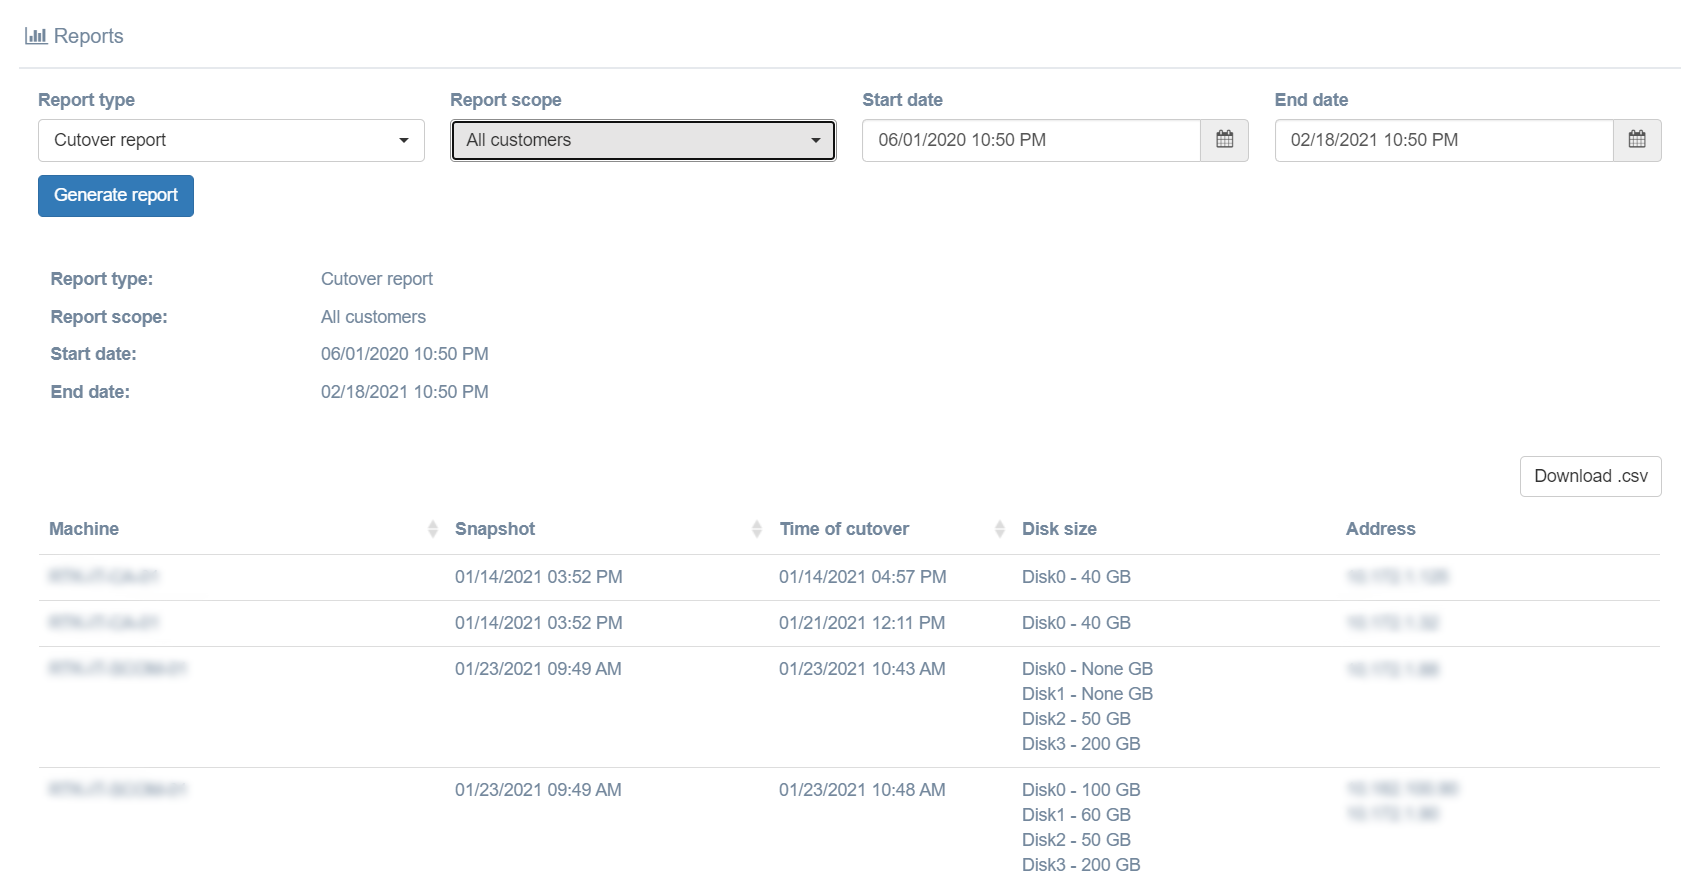
Cutover report#
-
- includes details of the go-live phase of customer's migrations showing the exact time when the created machine was detached from Acura to become completely independent in the target cloud, as well as the time when the utilized snapshot was taken, the disk sizes and the IP address of the new VM.
MSP migration report#
-
- indicates the number of consumed licenses for the customer based on the number of successful initial replications for the new machines and on the number of the machines with finished replica. It consists of two tables: Licenses by customer and Licenses by machines. Each table has a Download .csv button. In the report header (the 'Total licenses' field) the total number of consumed licenses is displayed.
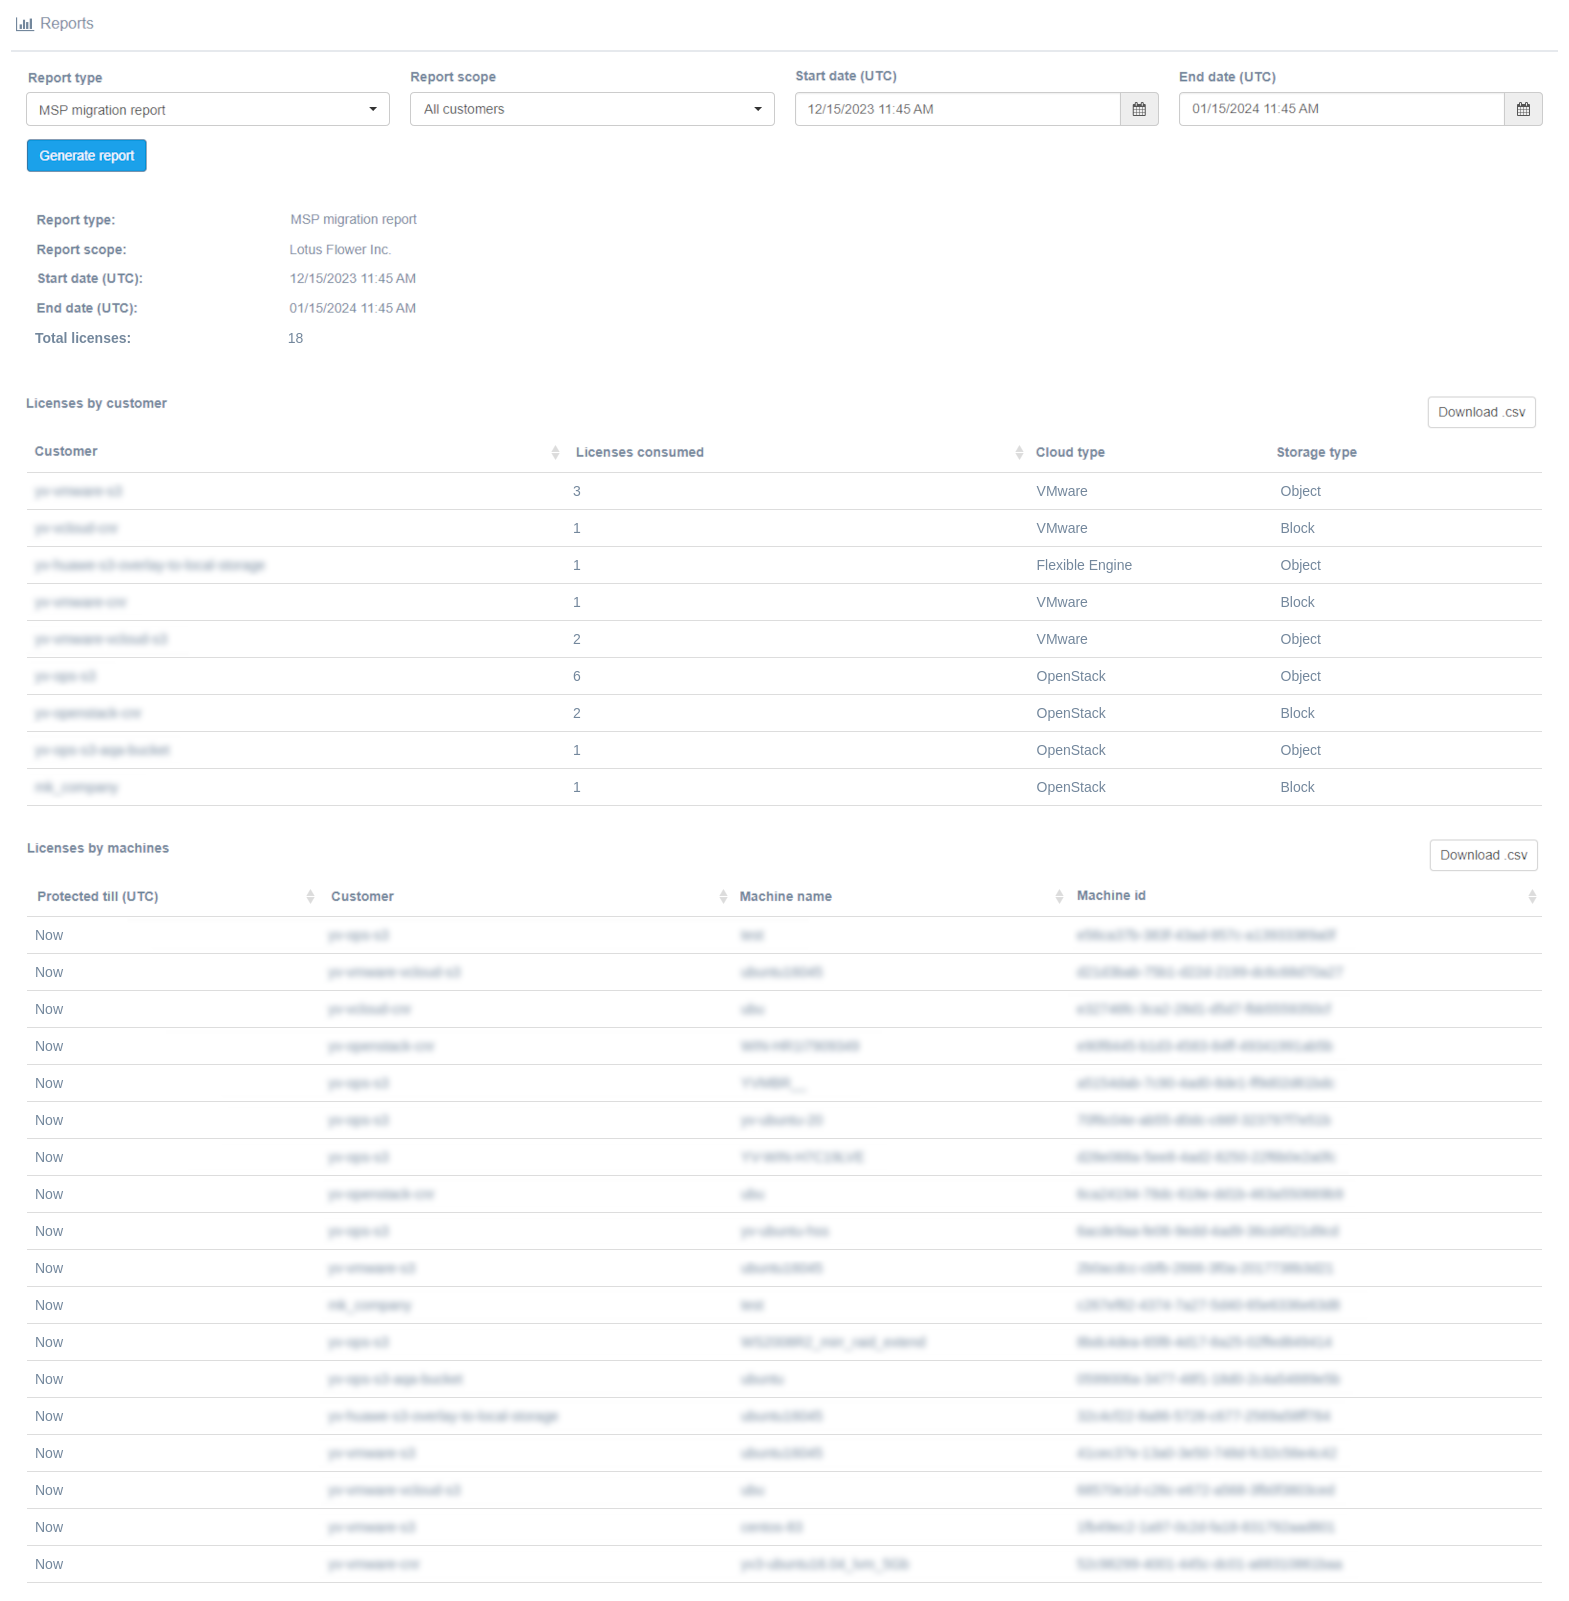
The Licenses by customer table displays the amount of licenses consumed, cloud type and storage type for each client. Depending on the Storage Type, the type of license is determined: block - migration licenses, object - backup.
The Licenses by machines table shows the time when the licenses were consumed, client's name, machine's name and machine's id.
Storage size report#
-
- provides information about object storage consumption. It gives details by customer and client. Download .csv is available for both.
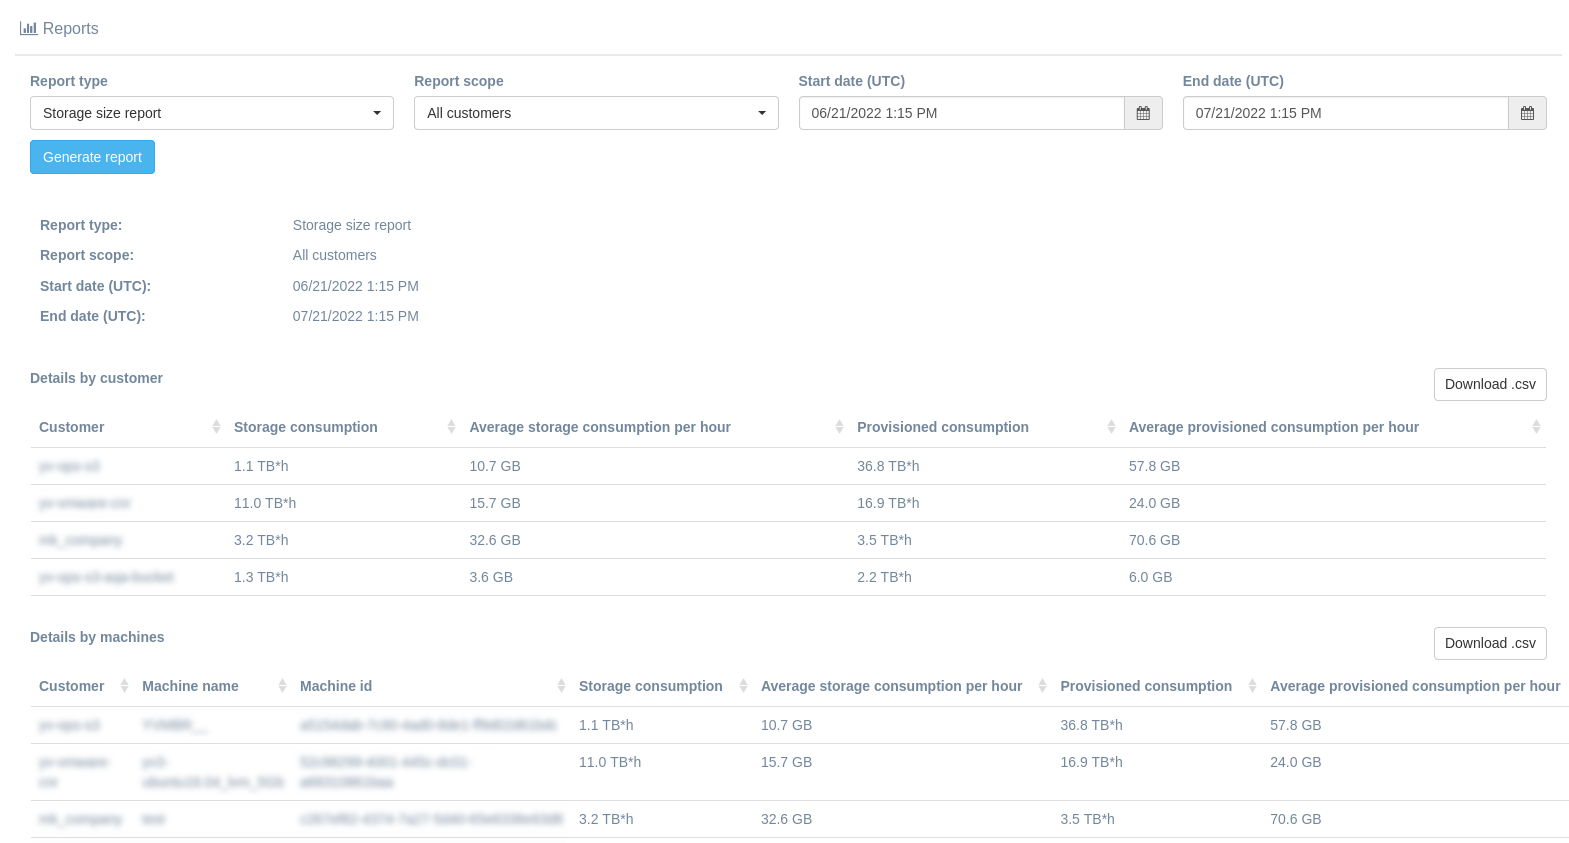
The Details by customer table shows total storage consumption per the whole selected period, average storage consumption per hour. This values can be compared with provisioned consumption (per the hole period of time) and average provisioned consumption per hour.
The Details by machines table displays the same columns and id addition gives information about machine's name and machine's id.