Initial product configuration#
Once the solutions is deployed, the next step is to configure it to work with your cloud. This process is called initial configuration and differs from cloud to cloud.
Alibaba#
Installation requirements Alibaba#
- Golden image with Hystax Acura (provided by request).
- Resources to launch a virtual machine with 8 vCPUs, 16GB RAM, 200GB disk created from the Hystax Acura Golden image.
- Resources to launch a virtual machine with 2 vCPUs, 4GB RAM, 20GB disk for the Hystax Cloud Agent. Created in each target / failover project.
- SMTP server with TLS/SSL encryption.
-
Security groups allowing the following traffic:
-
- Hystax Acura host:
-
- Ingress -- tcp/443
-
- Ingress -- tcp/4443
-
- Ingress -- udp/12201
-
- Hystax Cloud Agent (spawned automatically in the Target
- Project):
-
- Ingress -- tcp/80
-
- Ingress - tcp/15000
-
Installation steps#
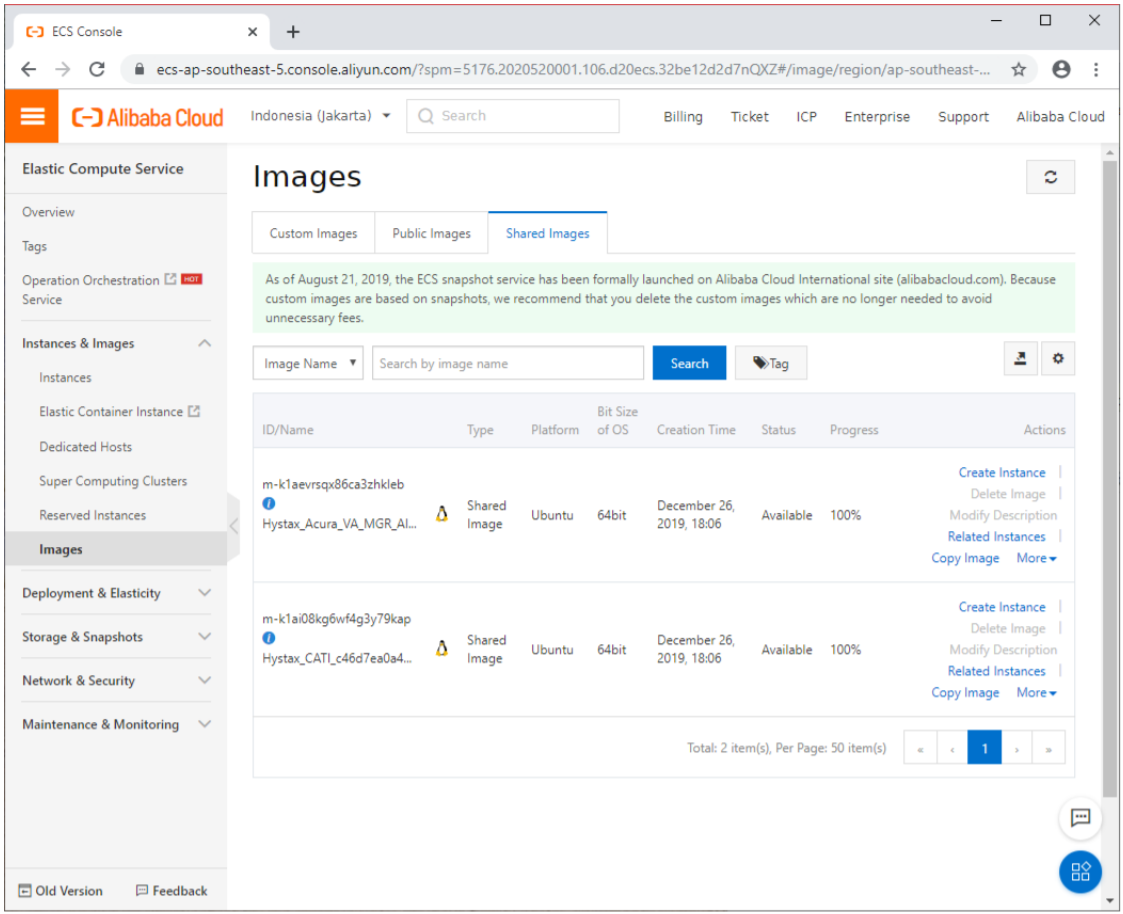
1. Find the shared images in the cloud.
There should be two new images at the "Shared Images" tab: one for Hystax Acura Controller, and one for Hystax Cloud Agent.
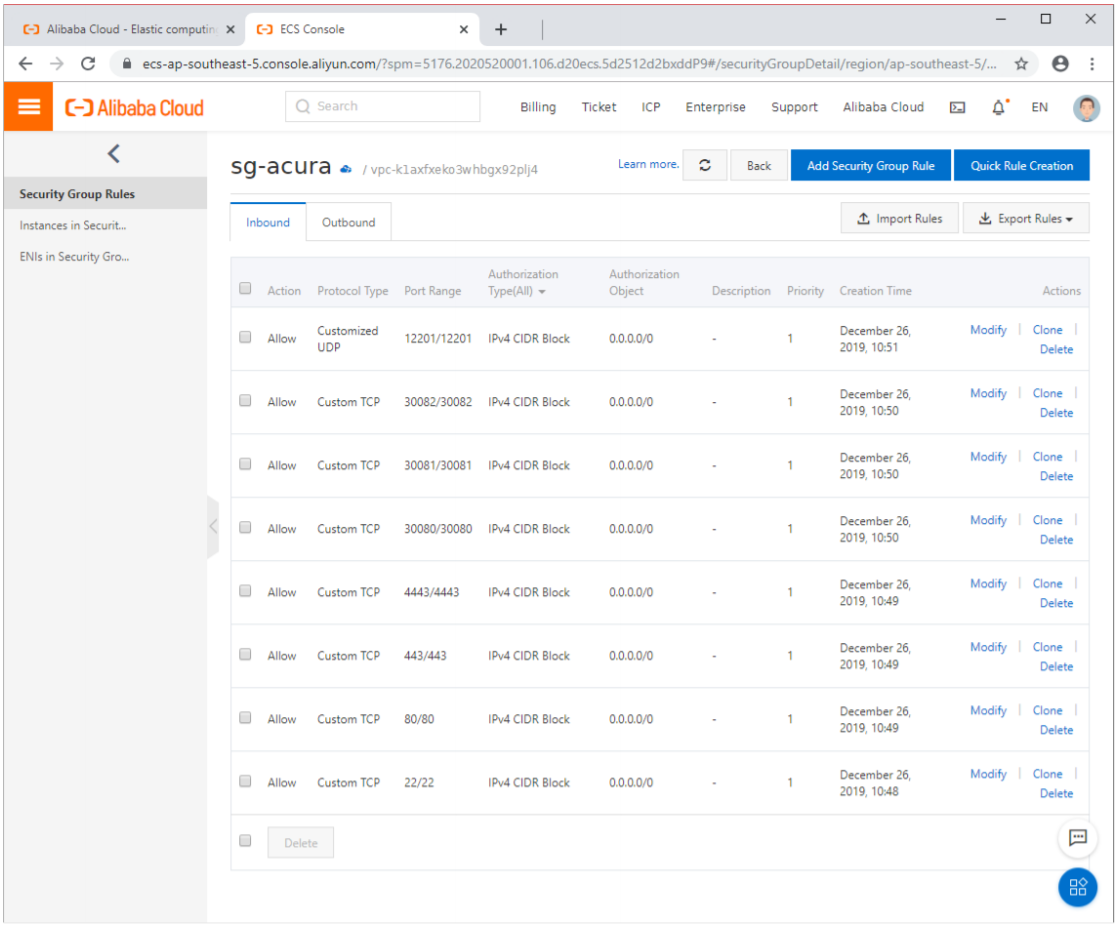
2. Create a Security Group for Acura.
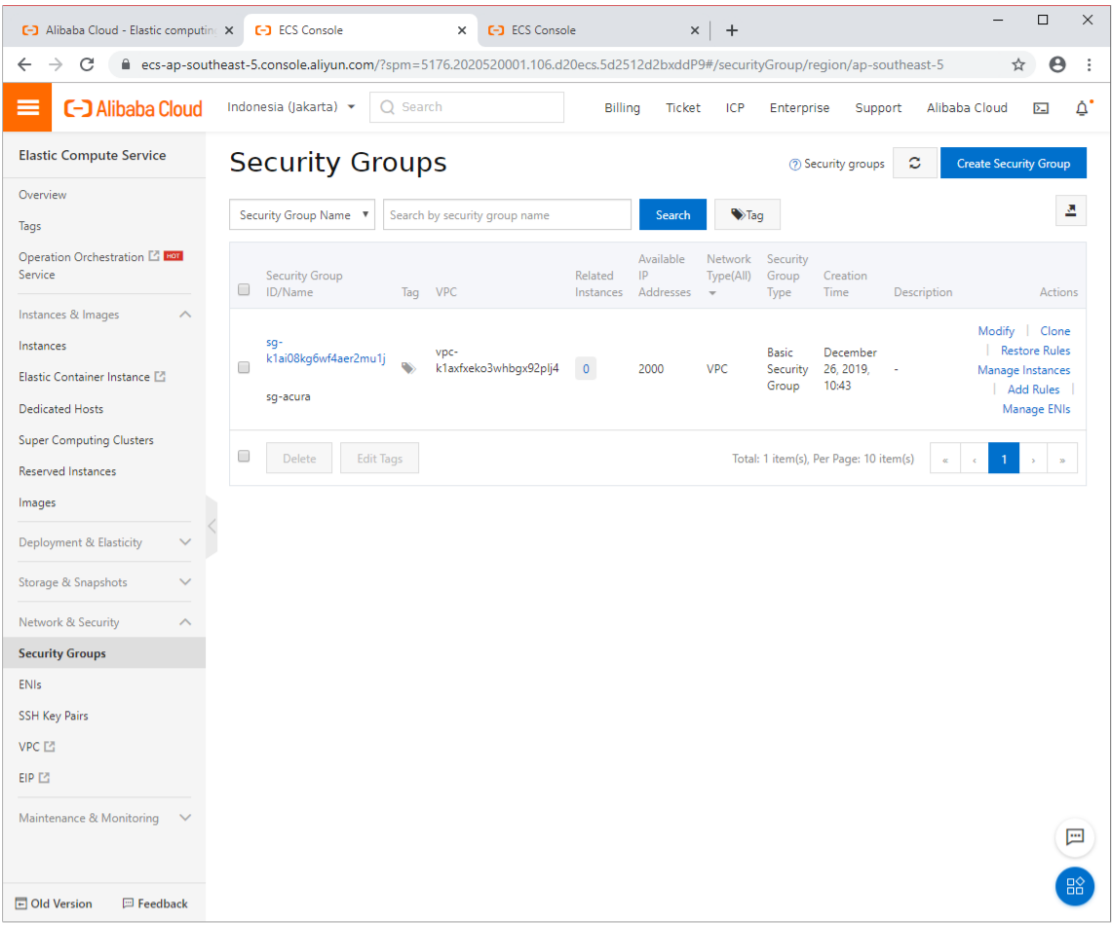
- This SG should allow incoming traffic at the following ports:
-
- tcp: 22, 80, 443, 4443, 30080, 30081, 30082
- udp: 12201
3. Create an Acura VM.
Press "Create Instance" on the Acura's image and proceed through the wizard.
Required settings for the VM:
- A flavor with at least 2 CPUs and 8 GB RAM.
- Disk size should be at least 200 GB.
- Assign a public IP address with maximum possible bandwidth. This IP will be used to receive replication data.
- Choose the Acura security group you have created earlier.
Note
Adding a key pair during Acura's deployment is highly recommended to provide you with SSH access to the machine. Although Hystax Engineering team will be able to perform maintenance checks and troubleshooting (as long as the network is reachable and your security groups allow the corresponding traffic), it is better to have your own means of accessing the Acura instance. Please refer to Alibaba official documentation on using SSH public-private key pairs.
There is no need to create a Cloud Agent instance -- only Acura instance is required. Acura will spawn and remove Cloud Agent instances automatically.
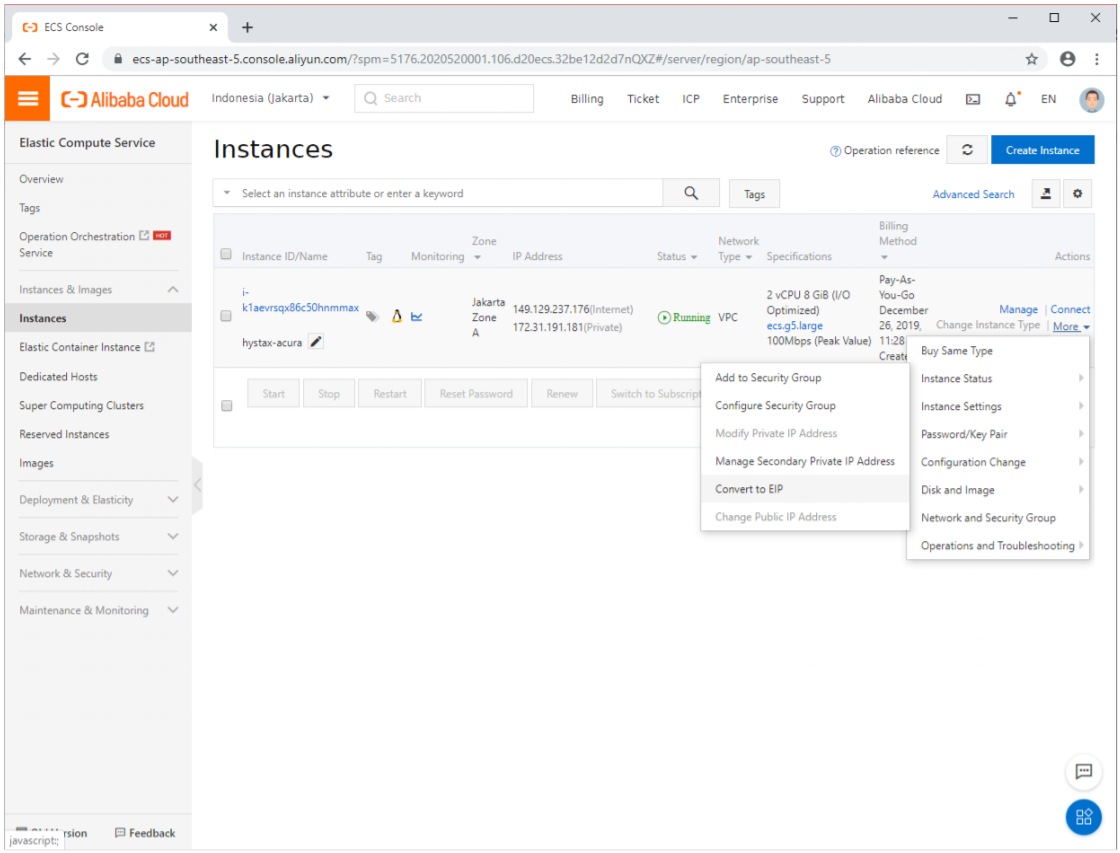
4. Convert a Public IP to an Elastic IP for Acura instance.
Acura instance requires a fixed public IP.
Find your freshly created instance, click "More → Network and Security Group → Convert to EIP". This will make it a fixed IP that will not be released if the instance is stopped.
5. Pass Acura's initial configuration.
Once the VM is started, wait approximately 20 minutes for it to boot up, then open its EIP in a web browser. Please accept the certificate warnings so that you are redirected to the initial configuration page.
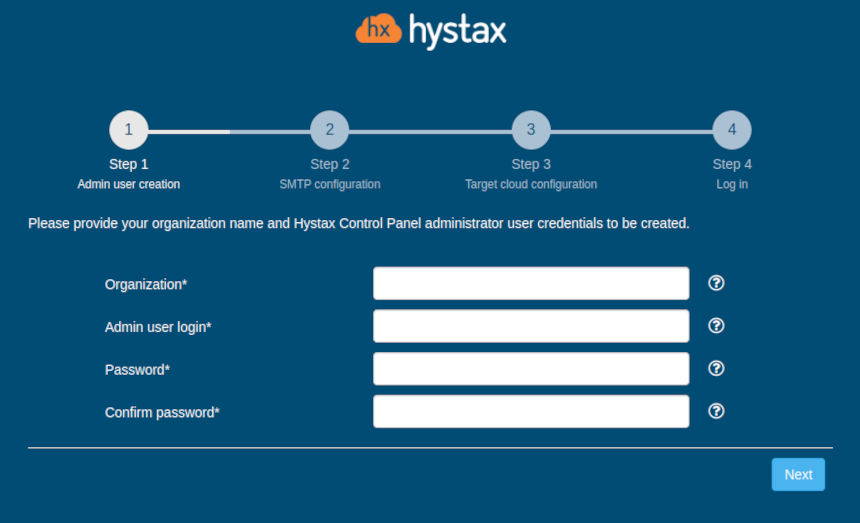
Step 1: Enter the organization name and new Hystax Admin User credentials into the Setup Wizard. This will be the user account for logging in to Hystax Acura Control Panel and managing the system. If there are any errors, the system will notify you.
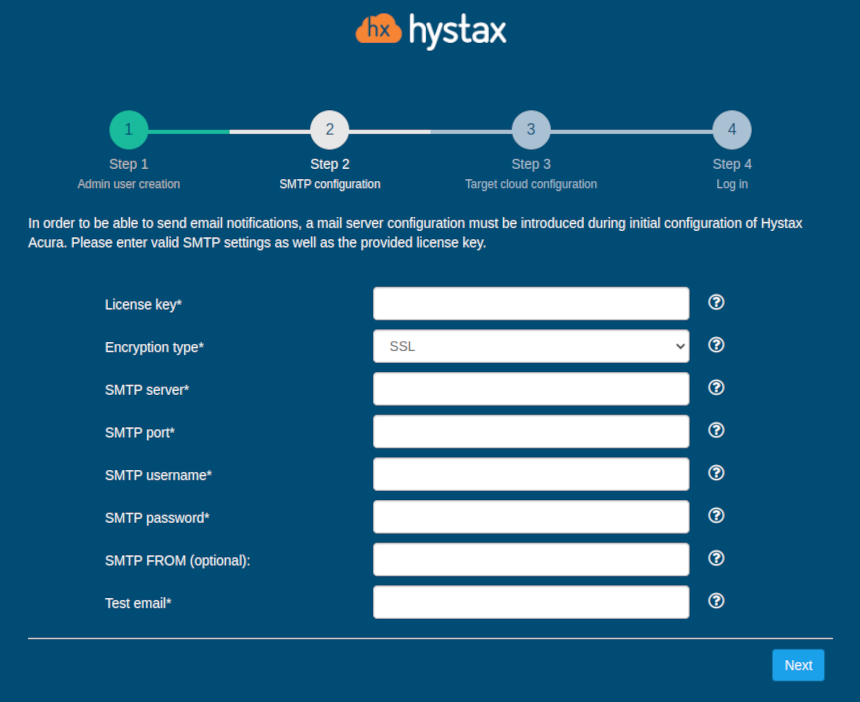
Step 2: Fill in your Hystax License key that was supposed to be shared with you in advance as well as the settings for accessing your mail server, which will be used to send notifications from Acura and generate periodic reports.
Warning
SMTP server with TLS/SSL encryption is required to proceed with deployment.
A sample notification will be sent to the specified "Test email" to verify the functionality when you click "Next".
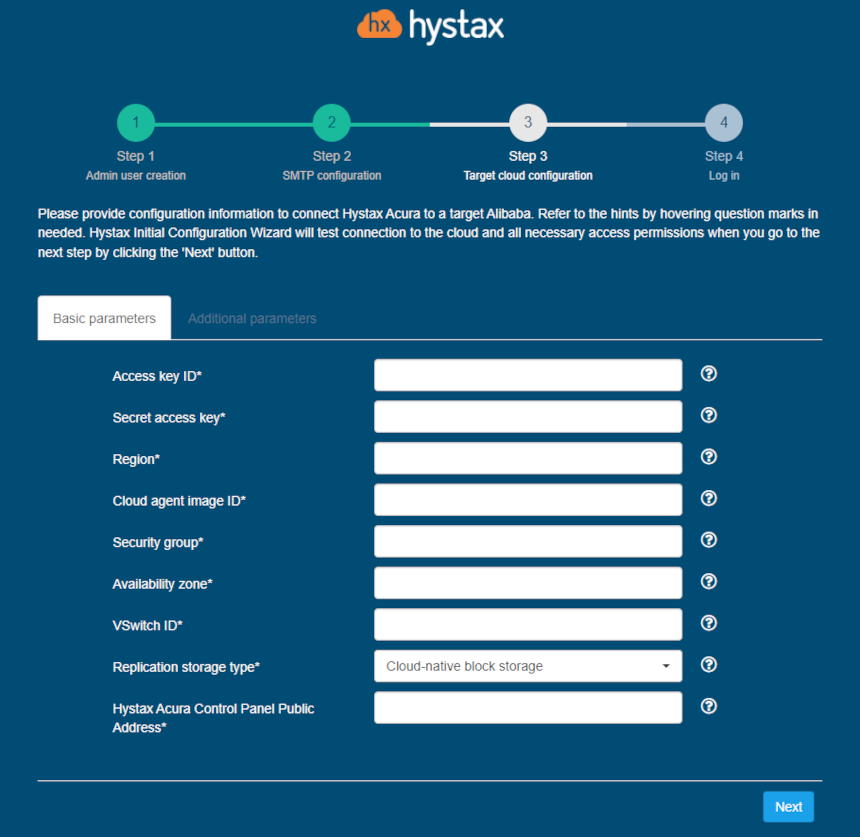
Step 3: Fill in all the fields by providing cloud configuration details. Use question mark icons to get hints on the fields. After you click "Next", the Setup Wizard will validate the entered data and notify you in case of an error.
| Field | Description | Example |
|---|---|---|
| Access key ID | Cloud API credentials. They can be obtained by hovering over your avatar in cloud interface and clicking “AccessKey”. | CBAI5tKqEMoixoZQRLRLYZXV |
| Secret Access Key | Cloud API credentials. They can be obtained by hovering over your avatar in cloud interface and clicking “AccessKey”. | CBAI5tKqEMoixoZQRLRLYZXV |
| Region | The region ID you’ve deployed Acura to. You can find a list of region IDs in Alibaba’s documentation. | eu-west-1a |
| Cloud Agent image ID | ID of Cloud Agent image | acura |
| Security group | The Acura security group ID you have created earlier. Cloud Agents will be created in this Security Group. Make sure that it allows Acura controller connect to Cloud Agent. | Default |
| VSwitch ID | The VSwitch ID Acura instance is connected to. Cloud Agents will be deployed with this network. | acura-vnet/default |
| Hystax Acura Control Panel Public IP | Public IP that will be used to access the Hystax Control Panel via web browser and by replication agents | 18.5.123.15 |
Other additional parameters:
| Field | Description |
|---|---|
| Cloud agent flavor | Flavor to use for the cloud agent instances |
| Cloud agent flavor requirements | Requirements for cloud agent flavor in JSON format, for example: {"cpu": "value", "ram": "value", "hdd": "value"} |
| Cloud agent security group | Security group used by Cloud Agents |
| Cloud site timeout | Cloud site creation timeout in minutes |
| Key pair name | Key pair name to access the cloud agent |
| Replicated volume performance level | Performance level for volumes of replicated VMs |
| Replicated volume type | Default volume type used to create volumes for replicated VMs |
| Use public IP for cloud agent | Cloud Agent will be created with public IP and Acura will use public IP to connect to Cloud Agent |
Click "Next" to start cloud validation.
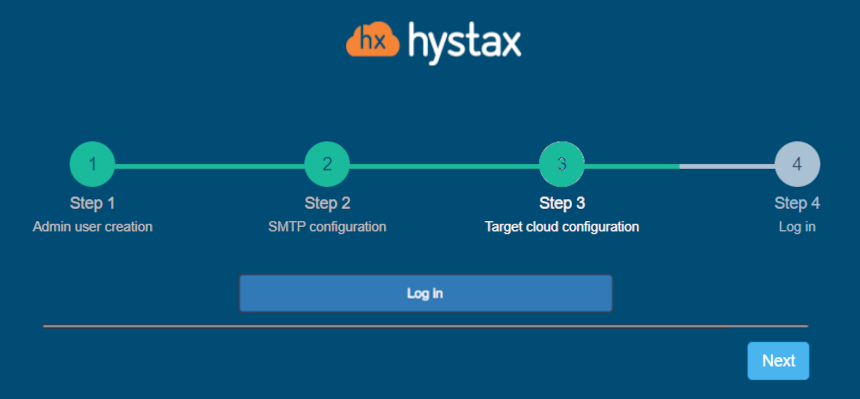
Step 4: Once the validation is complete, click on the "Log in" button, and log into Acura Control Panel. Accept the certificate warnings if needed.
Congratulations, you are now ready to use Acura! Just enter the administrator username and password specified on the first step of installation in the login page of the solution.
Amazon Web Services#
Installation requirements#
- Golden image with Hystax Acura (provided by request).
- Resources to launch a virtual machine with 8 vCPUs, 16GB RAM, 200GB disk created from the Hystax Acura Golden image.
- Resources to launch a VM with 2 vCPUs, 4GB RAM, 20GB disk for the Hystax Cloud Agent. Created in each target / failover project.
- SMTP server with TLS/SSL encryption.
-
Security groups allowing the following traffic:
-
- Hystax Acura host:
-
- Ingress -- tcp/443
-
- Ingress -- tcp/4443
-
- Ingress -- udp/12201
-
- Hystax Cloud Agent (spawned automatically in the Target
- Project):
-
- Ingress -- tcp/80
-
- Ingress - tcp/15000
-
Installation steps#
1. Create a stack from the provided link to a CloudFormation template with Hystax Acura.
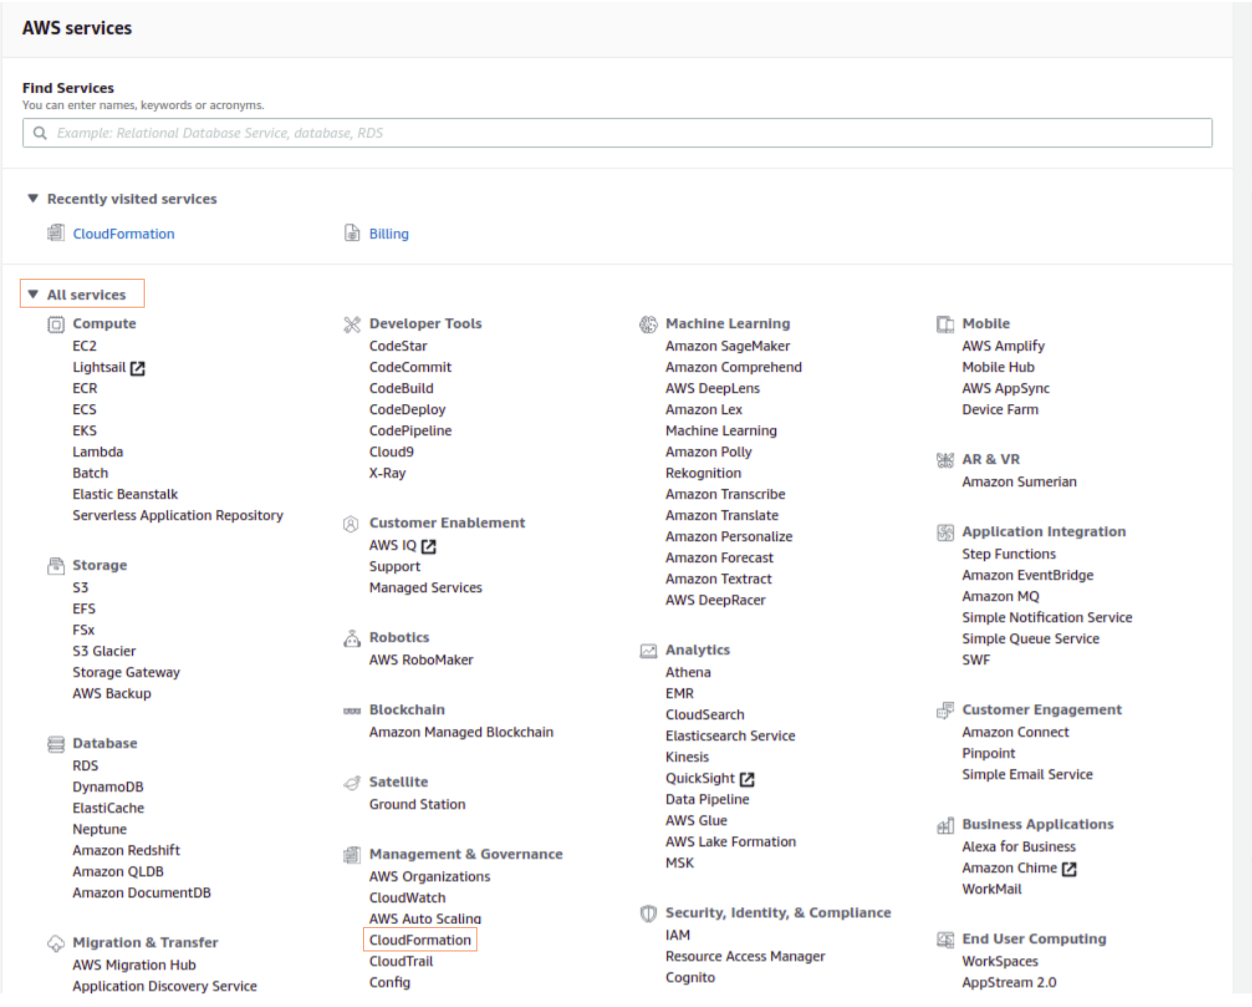
- Select the "All Service" tab. Select the "CloudFormation" tab in the "Management & Governance" section.
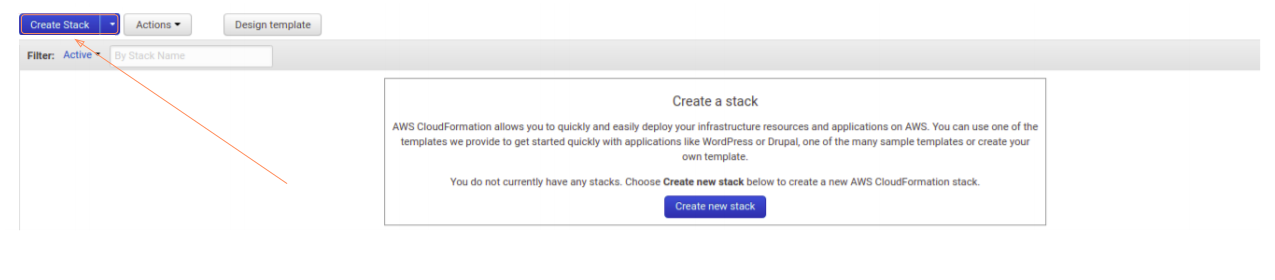
- To create a new stack, click on the "Create Stack" button.
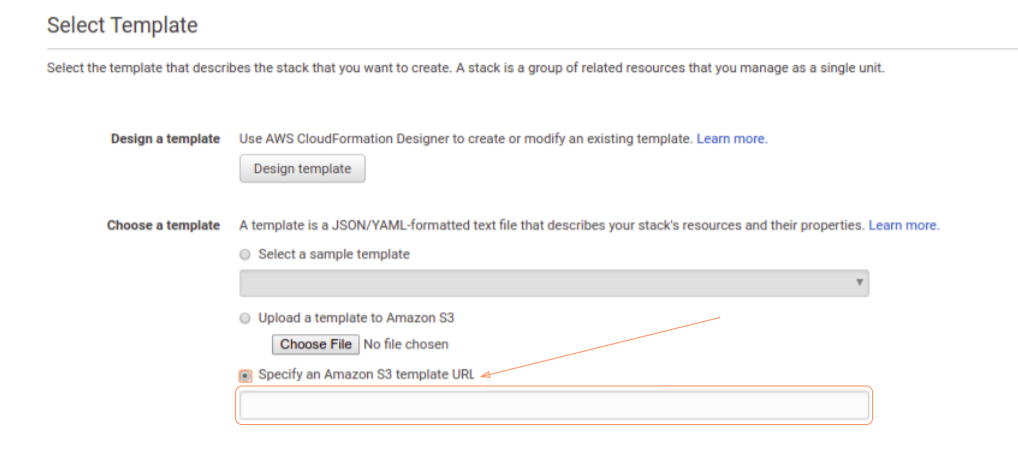
- Insert the provided link. Click on the "Next" button.
-
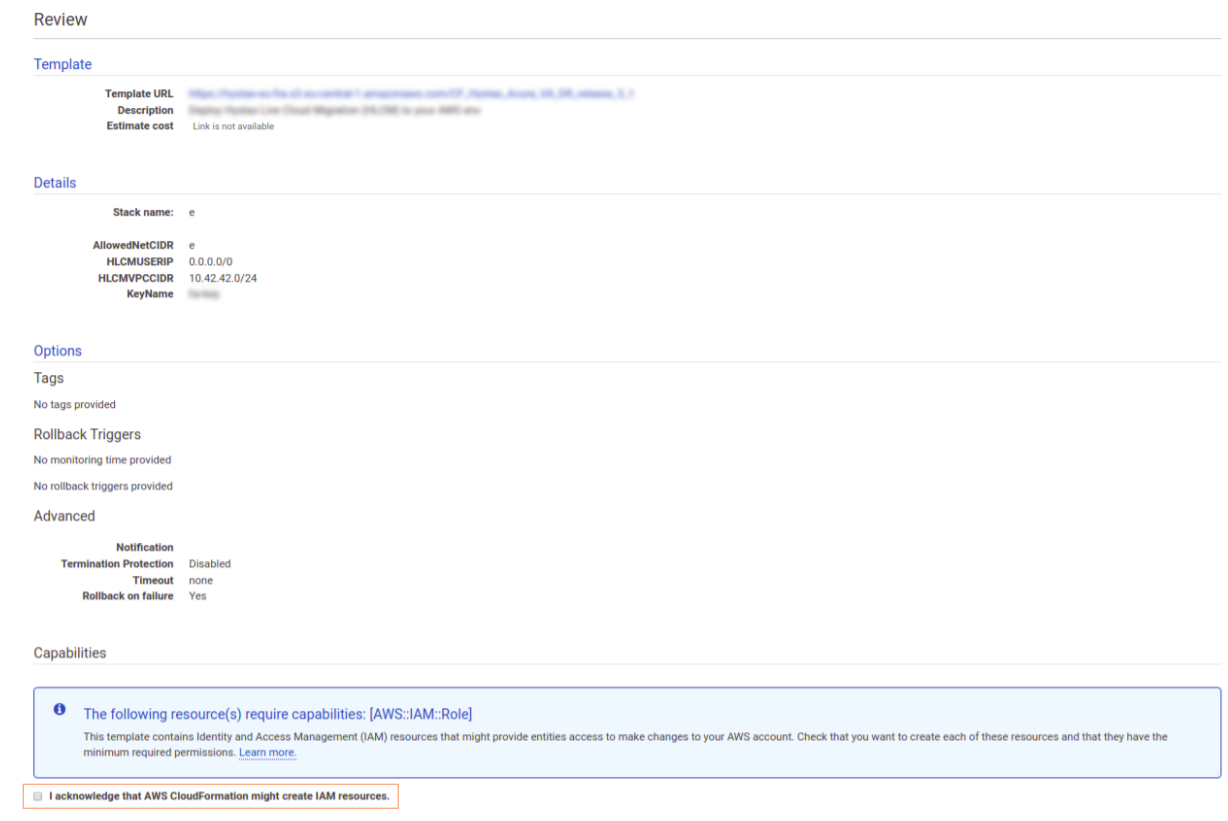
On the next page you will need to fill in the following fields:
- Enter a stack name.
- Enter an IP address from which access to HLCM's monitoring tools is allowed.
- Enter a network for opening ports 443, 4443, 80 & 12201 (0.0.0.0/0 = public address).
- Enter a network for VPC used by HLCM.
- Enter an appropriate key-pair.
Note
Adding a key pair during Acura's deployment is highly recommended to provide you with SSH access to the machine. Although Hystax Engineering team will be able to perform maintenance checks and troubleshooting (as long as the network is reachable and your security groups allow the corresponding traffic), it is better to have your own means of accessing the Acura instance. Please refer to AWS official documentation on using SSH public-private key pairs.
Click the "Next" button.

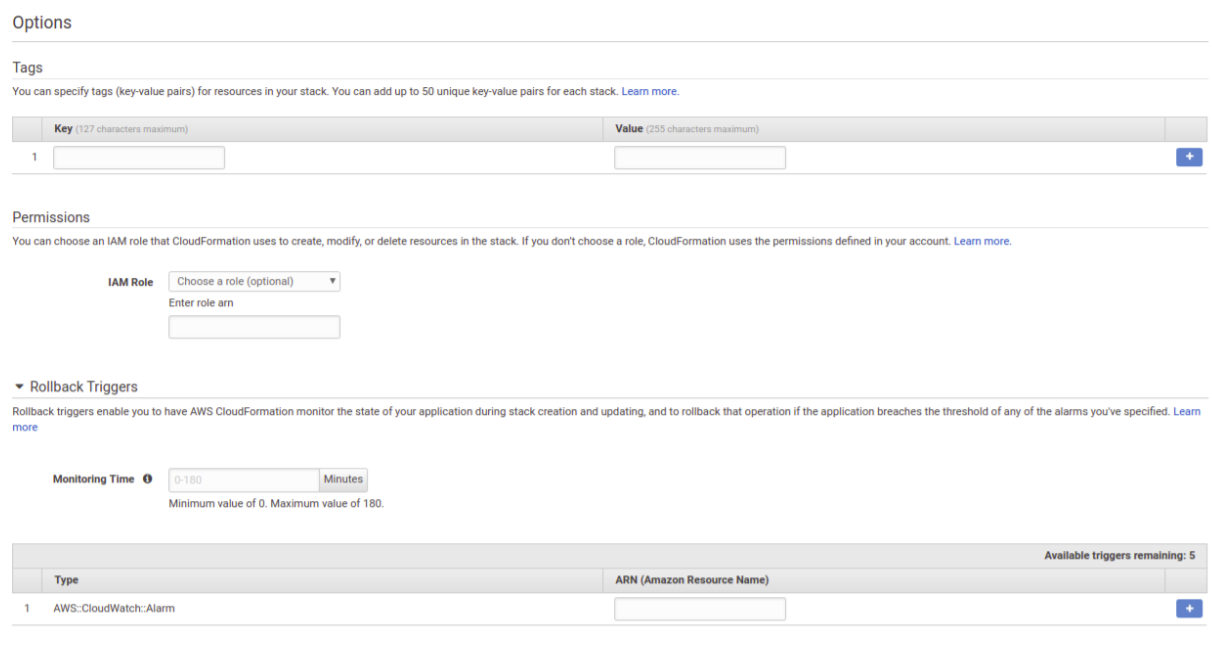
- On this page you do not need to specify anything, just click the "Next" button.
- Сheck the box to confirm that you are familiar with the fact that AWS CloudFormation might create IAM resources. Click the "Create" button.
- Please wait while the stack is being created. It may take up to 20 minutes.
2. Open a web browser and go to https://<ip_address_of_the_machine>/. You will be redirected to the Hystax Setup Wizard. After you perform all the steps, the installation will be complete, and you will be able to start using Hystax Acura.
3. Step 1: Enter the organization name and new Hystax Admin User credentials into the Setup Wizard. This will be the user account for logging in to the Hystax Acura Control Panel and managing the system. If there are any errors, the system will notify you.
4. Step 2: Fill in your Hystax License key that was supposed to be shared with you in advance as well as the settings for accessing your mail server, which will be used to send notifications from Acura and generate periodic reports.
Warning
SMTP server with TLS/SSL encryption is required to proceed with deployment.
If you prefer a public SMTP server associated with your email address (gmail, yahoo etc.), please find its settings online. In case of a private SMTP server, contact your network administrator for further details.
A sample notification will be sent to the specified "Test email" to verify the functionality when you click "Next".
5. Step 3: During the initial setup, the cloud will be configured automatically, you just need to click the "Next" button.
If you are adding a new cloud or decide to edit an automatically created one, you will see the following form:
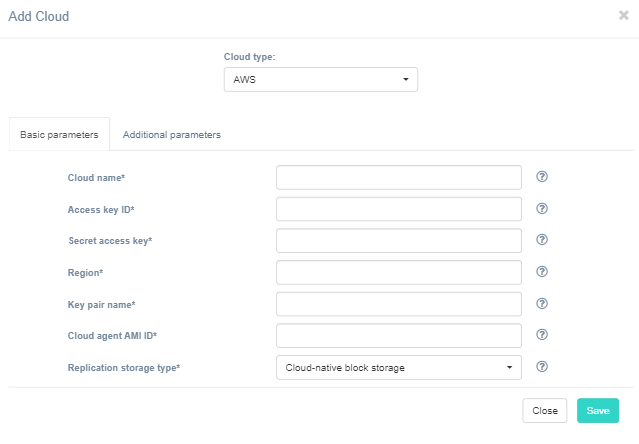
| Field | Description | Example |
|---|---|---|
| Access key ID | Access key ID | ABCAIZ5DMCH2LJPGPXYZ |
| Secret access key | Secret access key for the access key ID | aBCiGSq5GV88QahM8j8tfZVOw7Dvc8OLbatwUXYZ |
| Region | Target region name | eu-west-1 |
| Key pair name | Key pair name to access the cloud agent | key-pair |
| Cloud agent AMI ID | The image ID from which cloud agent instances will be spun up | default |
| Hystax Acura Control Panel Public IP | Public IP that will be used to access the Hystax Control Panel via via web browser and by replication agents | 192.168.0.10 |
Other additional parameters:
| Field | Description |
|---|---|
| Availability zone | Availability zone where all resources will be created |
| Cloud agent flavor | Flavor to use for the cloud agent instances |
| Cloud agent flavor requirements | Requirements for cloud agent flavor in JSON format, for example: {"cpu": "value", "ram": "value", "hdd": "value"} |
| Cloud agent security group | Security group used by Cloud Agents |
| Cloud site timeout | Cloud site creation timeout in minutes |
| Replicated volume type | Default volume type used to create volumes for replicated VMs |
| Security group | Name of the security group with all required ports opened |
| Subnet ID | Default subnet ID for instances |
| Use public IP for cloud agent | Cloud Agent will be created with public IP and Acura will use public IP to connect to Cloud Agent |
6. Step 4: Installation is complete, and you can now log in to the system using credentials entered in the first step.
Congratulations, you are now ready to use Acura! Just enter the administrator username and password specified on the first step of installation in the login page of the solution.
MS Azure#
Installation requirements#
- VHD with Hystax Acura (provided by request).
- Deploy Hystax Acura from this VHD with not less than a Standard D4s v3 (4 vCPUs, 16GB RAM and 100GB disk).
- Create an account for the application with Contributor rights, as described in the doc: https://docs.microsoft.com/en-us/azure/active-directory/develop/howto-create-service-principal-portal
- SMTP server with TLS/SSL encryption.
-
Security Groups allowing the following traffic:
-
- Hystax Acura host:
-
- Ingress -- tcp/443;
-
- Ingress -- tcp/4443;
-
- Ingress -- udp/12201.
-
- Hystax Cloud Agent (spawned automatically in the Target
- Project):
-
- Ingress -- tcp/80;
-
- Ingress - tcp/15000.
-
Installation steps#
1. Create a machine from the Hystax Acura VHD with key pair attached.
Note
Adding a key pair is highly recommended to provide you with SSH access to the machine. Although Hystax Engineering team will be able to perform maintenance checks and troubleshooting (as long as the network is reachable and your security groups allow the corresponding traffic), it is better to have your own means of accessing the Acura instance. Please refer to Microsoft's official documentation on adding an SSH public-private key pair for Linux VMs in Azure.
2. Associate a Public IP with the created machine.
3. Open a web browser and go to https://<ip_address_of_the_machine>/. You will be redirected to the Hystax Setup Wizard. After you perform all the steps, the installation will be complete, and you will be able to start using Hystax Acura.
4. Step 1: Enter the organization name and new Hystax Admin User credentials into the Setup Wizard. This will be the user account for logging in to Hystax Acura Control Panel and managing the system. If there are any errors, the system will notify you.
5. Step 2: Fill in your Hystax License key that was supposed to be shared with you in advance as well as the settings for accessing your mail server, which will be used to send notifications from Acura and generate periodic reports.
Warning
SMTP server with TLS/SSL encryption is required to proceed with deployment.
If you prefer a public SMTP server associated with your email address (gmail, yahoo etc.), please find its settings online. In case of a private SMTP server, contact your network administrator for further details.
A sample notification will be sent to the specified "Test email" to verify the functionality when you click "Next".
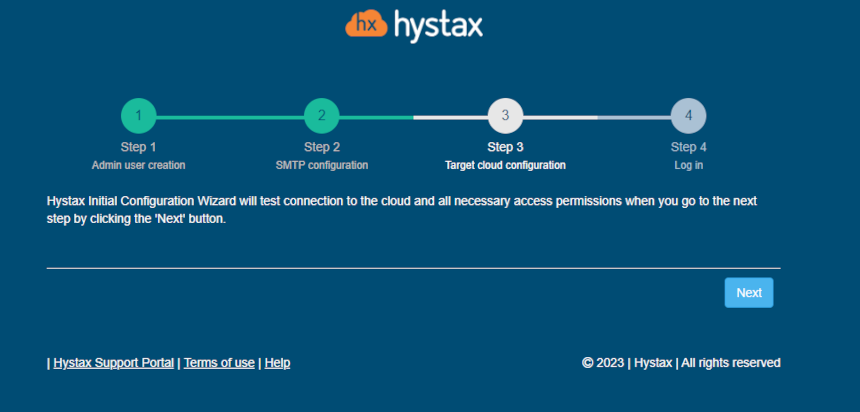
6. Step 3: Fill in all the fields by providing cloud configuration details. Use question mark icons to get hints on the fields. After you click "Next", the Setup Wizard will validate the entered data and notify you in case of an error.
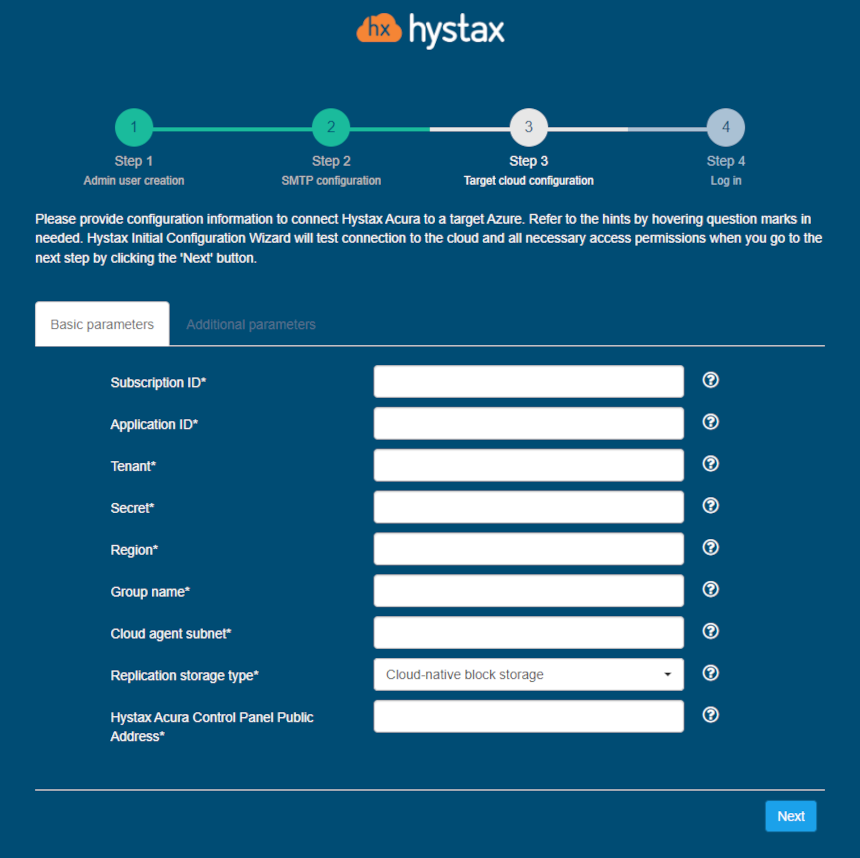
| Field | Description | Example |
|---|---|---|
| Subscription ID | ID of Azure subscription | f47b3e31-7c86-436b-baa1-a44938198b8e |
| Application ID | Application (client) ID of the registered application in Azure. See how to create this ID and secret here: https://docs.microsoft.com/en-us/azure/active-directory/develop/howto-create-service-principal-portal | 405b2a3f-6df5-4724-9a2b-e8061f560c89 |
| Tenant | Directory (tenant) ID (can be found in Azure Active Directory/Properties) | 1338dcc9-f703-4c56-b9d5-a6fe5493f757 |
| Secret | Secret string that the application uses to prove<br. its identity when requesting a token. Can also be referred to as an application password. | Err:501 |
| Region | Azure region name | westeurope |
| Group name | Target resource group name | acura |
| Cloud agent subnet | Subnet in format “<network_name>/<subnet_name>” | acura-vnet/default |
| Hystax Acura Control Panel Public IP | Public IP that will be used to access the Hystax Control Panel via web browser and by replication agents | 18.5.123.15 |
Other additional parameters:
| Field | Description |
|---|---|
| Availability zone | Availability zone where all resources will be created |
| Cloud agent flavor | Flavor to use for the cloud agent instances |
| Cloud agent flavor requirements | Requirements for cloud agent flavor in JSON format, for example: {"cpu": "value", "ram": "value", "hdd": "value"} |
| Cloud agent image ID | Id of the cloud agent image from the target cloud |
| Cloud agent image reference | Reference to image for cloud agent in JSON format, for example: {"publisher": "value", "offer": "value", "sku": "value", "version": "value"} |
| Cloud agent marketplace plan | Name of the marketplace plan used for the cloud agent |
| Cloud site timeout | Cloud site creation timeout in minutes |
| Replicated volume type | Default volume type used to create volumes for replicated VMs |
| Use public IP for cloud agent | Cloud Agent will be created with public IP and Acura will use public IP to connect to Cloud Agent |
7. Step 4: Installation is complete, and you can now log in to the system using credentials entered in the first step.
Congratulations, you are now ready to use Acura! Just enter the administrator username and password specified on the first step of installation in the login page of the solution.
Flexible Engine#
Installation requirements#
- Golden image with Hystax Acura (provided by request).
- Flexible Engine virtual machine with 8 vCPUs, 16GB RAM, 200GB disk created from the Hystax Acura Golden image.
- Resources to launch a VM with 2 vCPUs, 4Gb RAM, 40GB disk for the Hystax Cloud Agent. Created in each target / failover project.
- SMTP server with TLS/SSL encryption.
-
Security groups allowing the following traffic:
-
- Hystax Acura host:
-
- Ingress -- tcp/443
-
- Ingress -- tcp/4443
-
- Ingress -- udp/12201
-
- Hystax Cloud Agent (spawned automatically in the Target
- Project):
-
- Ingress -- tcp/80
-
Installation steps#
1. Deploy a virtual machine from the golden image with a key pair attached and launch it in the Flexible Engine cloud.
Note
Adding a key pair during Acura's deployment is highly recommended to provide you with SSH access to the machine. Although Hystax Engineering team will be able to perform maintenance checks and troubleshooting (as long as the network is reachable and your security groups allow the corresponding traffic), it is better to have your own means of accessing the Acura instance. Please refer to Flexible Engine's official documentation on using an SSH public-private key pair.
2. Upload the provided Cloud Agent image to your target project and rename it to Hystax_CATI.
3. Open a web browser and go to https://<ip_address_of_the_machine>/. You will be redirected to the Hystax Setup Wizard. After you perform all the steps, the installation will be complete and you will be able to start using Hystax Acura.
4. Step 1: Enter the organization name and new Hystax Admin User credentials into the Setup Wizard. This will be the user account for logging in to Hystax Acura Control Panel and managing the system. If there are any errors, the system will notify you.
5. Step 2: Fill in your Hystax License key that was supposed to be shared with you in advance as well as the settings for accessing your mail server, which will be used to send notifications from Acura and generate periodic reports.
Warning
SMTP server with TLS/SSL encryption is required to proceed with deployment.
If you prefer a public SMTP server associated with your email address (gmail, yahoo etc.), please find its settings online. In case of a private SMTP server, contact your network administrator for further details.
A sample notification will be sent to the specified "Test email" to verify the functionality when you click "Next".
6. Step 3: Fill in all the fields by providing cloud configuration details. Use question mark icons to get hints on the fields. After you click "Next", the Setup Wizard will validate the entered data and notify you in case of an error.
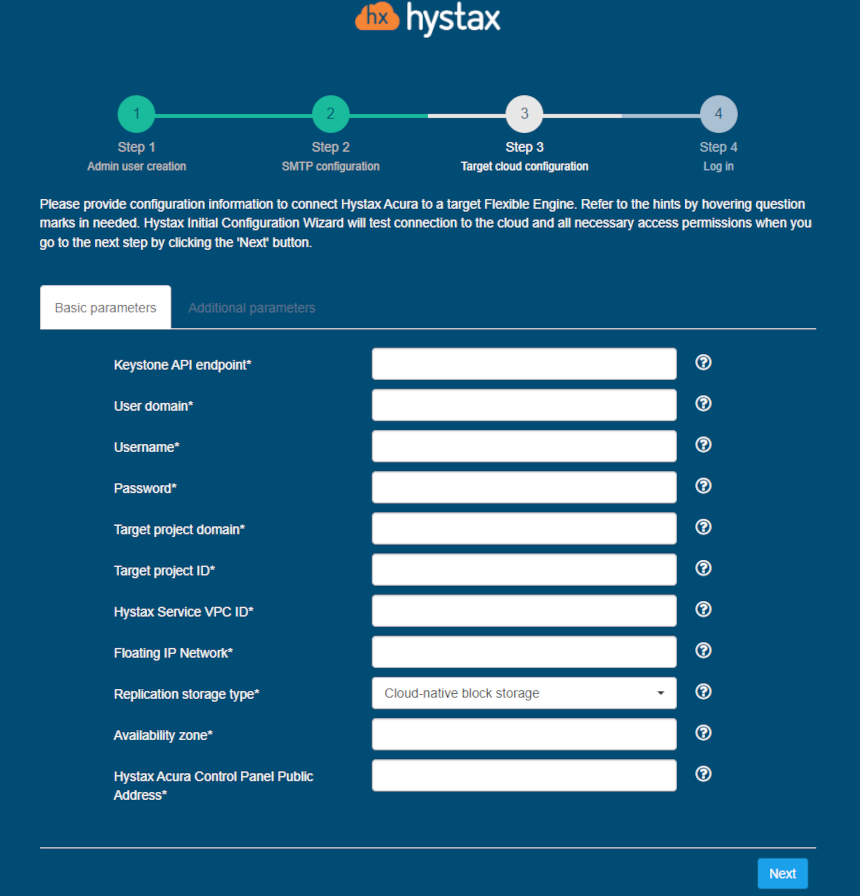
| Field | Description | Example |
|---|---|---|
| Keystone API Endpoint | Flexible Engine Keystone authentication URL | http://controller.dts.loc:35357/v3 |
| User Domain | User domain name to access Flexible Engine | default |
| Username | Username to access Flexible Engine | admin |
| Password | Password to access Flexible Engine | passw |
| Target Project Domain | Target Flexible Engine project domain name | default |
| Target Project Name | Target Flexible Engine project name where replicated workloads will be spun up | TargetProj |
| Hystax Service VPC ID | VPC ID that will be used for Hystax Cloud Agent machines. Should be the same or routable to the network in which a Hystax Acura instance is located | 2ed1d818-a744-4341-8172-2c5349c6418d |
| Floating IP Network | External network that will be used to attach Floating IPs to migrated machines. Most Flexible Engine clouds have “admin_external_net” | admin_external_net |
| Availability zone | Availability zone where all resources will be created | eu-west-0a |
| Hystax Acura Control Panel Public IP | Public IP that will be used to access the Hystax Control Panel via web browser and by replication agents | 192.168.0.10 |
Other additional parameters:
| Field | Description |
|---|---|
| API endpoint for block storage service | Override API endpoint for block storage service. Useful on clouds with broken service catalog |
| API endpoint for compute service | Override API endpoint for compute service. Useful on clouds with broken service catalog |
| API endpoint for image service | Override API endpoint for image service. Useful on clouds with broken latest API version |
| API endpoint for network service | Override API endpoint for network service. Useful on clouds with broken service catalog |
| API version for block storage service | Override API version for block storage service. Useful on clouds with broken latest API version |
| API version for compute service | Override API version for compute service. Useful on clouds with broken latest API version |
| API version for image service | Override API version for image service. Useful on clouds with broken latest API version |
| API version for network service | Override API version for network service. Useful on clouds with broken latest API version |
| Cloud agent flavor | Flavor to use for the cloud agent instances |
| Cloud agent flavor requirements | Requirements for cloud agent flavor in JSON format, for example: {"cpu": "value", "ram": "value", "hdd": "value"} |
| Cloud agent image ID | Id of the cloud agent image from the target cloud |
| Cloud agent security group | Security group used by Cloud Agents |
| Cloud agent volume type | Cloud agent volume type |
| Cloud site parallel resources limit | How many resources of the same type are allowed to be created in parallel during Cloud Site creation |
| Cloud site timeout | Cloud site creation timeout in minutes |
| Disable failback ports | Disable custom ports for failback (they will be created by the cloud automatically) |
| Disable failover ports | Disable custom ports for failover (they will be created by the cloud automatically) |
| Key pair name | Key pair name to access the cloud agent |
| Region | Target region name |
| Replicated volume type | Default volume type used to create volumes for replicated VMs |
| Save OS type in metadata | Save OS type in image volume metadata (only for Windows machines) |
| Security group | Name of the security group with all required ports opened |
| Use cloud agent image for replications | Use cloud agent image as a base for replication volumes instead of temporary automatically-created images |
| Use public IP for cloud agent | Cloud Agent will be created with public IP and Acura will use public IP to connect to Cloud Agent |
The specified Flexible Engine user should have the following rights for Hystax Acura to operate correctly:
- Import image
- Launch instance
- Create volume
- Attach volume to instance
- Detach volume from instance
- Create volume snapshot
- Create volume from snapshot
- Remove snapshot
- Remove volume
- Manage networks
7. Step 4: Installation is complete, and you can now log in to the system using credentials entered in the first step.
Congratulations, you are now ready to use Acura! Just enter the administrator username and password specified on the first step of installation in the login page of the solution.
OpenNebula#
Installation requirements#
-
Resources to run a virtual machine with 8 VCPUS, 16 GB of RAM, 200 GB of disk is based on the Acura Hystax Image.
-
Resources to run a virtual machine with 2 VCPUS, 4 GB of RAM, 20 GB of disk for the Hystax cloud agent. Created in every OpenNebula target/failover project.
-
Security groups that allow the following traffic:
-
- Hystax Acura Controller:
-
- Port -- tcp/443
-
- Port - tcp/4443
-
- Port - udp/12201
-
- Hystax Cloud Agent (automatically created in the Target Project):
-
- Port -- tcp/80
-
- Port - tcp/15000
More detailed requirements are available at the link.
Installation steps#
1. Deploy the virtual machine from the Image with the key pair attached and run it to the OpenNebula cloud.
Note
It is highly recommended to add a key pair to give you SSH access to the machine.
It takes from 10 to 20 minutes to start the service and gain access to the web interface.
2. Upload the cloud agent image named Hystax_CATI to the target project.
3. Open a web browser and navigate to https://<machine_ip>/. You will be redirected to the Hystax setup wizard. After completing all the steps, the installation will be completed. Once completed, you will be able to start using Hystax Acura.
4. Step 1: Enter the organization name and new Hystax Admin user credentials in the Setup Wizard . This will be the user account for logging in to the Hystax Acura control panel and system management. If any errors occur, the system will notify you.
5. Step 2: Fill in your Hystax license key you received in advance, as well as access settings for your mail server, which will be used to send notifications from Acura and generate periodic reports. If you prefer a public SMTP server associated with your email address (gmail, yahoo, etc.), please look it up online. For a private SMTP server, contact your network administrator for more details. Please note the only SMTP servers with SSL/TLS encryption are supported. A sample notification will be sent to the specified "Test email address" to test functionality.
6. Step 3: Complete all fields by providing cloud configuration details. You can click on the "?" for field tips. After clicking the "Next" button, the installation wizard will confirm the correctness of the entered data and notify you in case of an error.
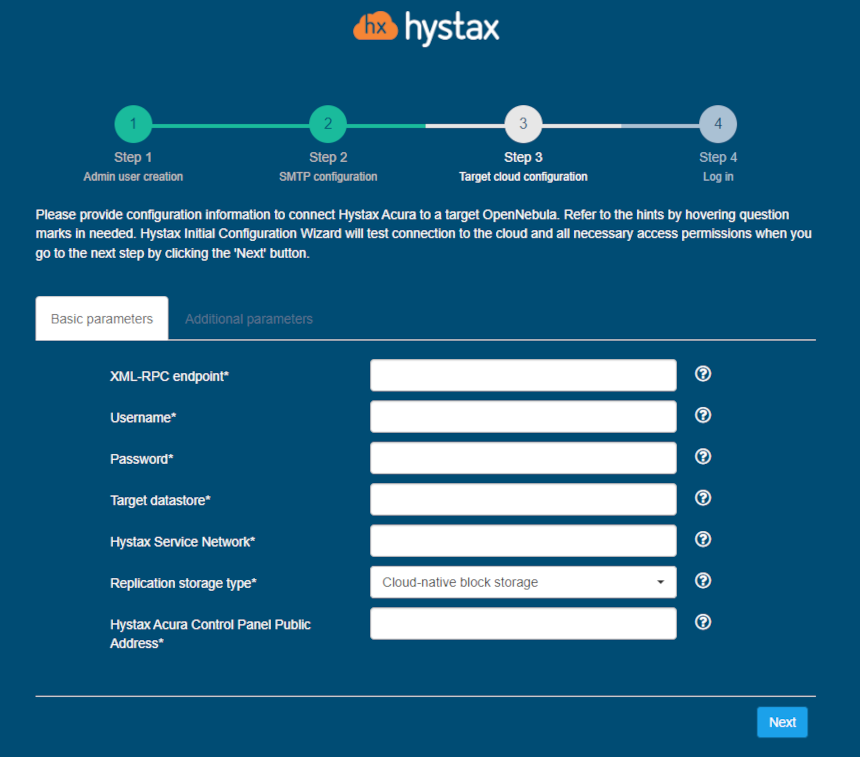
| Field | Description | Example |
|---|---|---|
| XML-RPC endpoint | URL for OpenNebula XML-RPC API | https://one.example.com:8443/RPC2 |
| Username | Username to access OpenNebula | admin |
| Password | Password to access OpenNebula | password |
| Target datastore | Default storage name for replicated disks in OpenNebula | datastore1 |
| Hystax Service Network | The network to be used for the cloud agent machines. Must be the same as, or routable to, the network where the Hystax Acura instance resides | vnet1 |
| Hystax Acura Control Panel Public IP | The public IP address that will be used to access the Hystax control panel through a web browser and replication agents | 192.168.0.10 |
Other additional parameters:
| Field | Description |
|---|---|
| Cloud agent flavor requirements | Requirements for cloud agent flavor in JSON format, for example: {"cpu": "value", "ram": "value", "hdd": "value"} |
| Cloud agent image ID | Id of the cloud agent image from the target cloud |
| Cloud agent security group | Security group used by Cloud Agents |
| Cloud site timeout | Cloud site creation timeout in minutes |
| CPU model | CPU model for created VMs |
| P2V type | In this field, you can specify a non-standard P2V - for example, for cloud "Virtuozzo, you need to specify "virtuozzo". |
| Security group | Name of the security group with all required ports opened |
The specified user must have the following rights for Hystax Acura:
-
Loading an image
-
Instance launch
-
Volume creation
-
Attaching a volume to an instance
-
Detaching a volume from an instance
-
Create a volume snapshot
-
Create a volume from a snapshot
-
Deleting a snapshot
-
Deleting a volume
-
Network management
7. Step 4. Installation completed. You can now sign in using the credentials entered in the first step.
Troubleshooting OpenNebula#
Hystax Acura automatically checks for cloud access and necessary permissions to ensure the operation is complete. It provides detailed error messages that describe possible causes of problems. In case of an error, please check the correctness of the entered data and the availability of the necessary permission. If you encounter difficulties during the installation process and have any questions, you can contact the Hystex support service using the contact information provided below. The Hystax Support Portal is available at https://support.hystax.com/. There you can find all articles from our Knowledge Base. You can also submit support requests in your personal account.
OpenStack#
Installation requirements#
- Mitaka+ version of OpenStack (Red Hat, Canonical, Suse, Mirantis, CentOS and Vanilla distributives are supported).
- Golden image with Hystax Acura (provided by request).
- Resources to launch a virtual machine with 8 vCPUs, 16GB RAM, 200GB disk created from the Hystax Acura Golden image.
- Resources to launch a VM with 2 vCPUs, 4GB RAM, 20GB disk for the Hystax Cloud Agent. Created in each target / failover OpenStack project.
- SMTP server with TLS/SSL encryption.
-
Security groups allowing the following traffic:
- Hystax Acura host:
-
- Ingress -- tcp/443
-
- Ingress -- tcp/4443
-
- Ingress -- udp/12201
- Hystax Cloud Agent (spawned automatically in the Target Project):
-
- Ingress -- tcp/80
-
- Ingress - tcp/15000
Installation steps#
1. Make sure that there is an access to the OpenStack Service Endpoints from the Hystax Acura network. Acura requires access to Keystone (or Identity), Compute, Volume, Image and Network Service Endpoints. Basically it is enough to specify the Keystone API endpoint on the third step of the installation. However if necessary add any of these parameters on the Additional parameters tab on the third step. To do this, select one from the list of available parameters and enter its value in the field that appears.
2. Deploy a virtual machine from the golden image with a key pair attached and launch it in the OpenStack cloud.
Note
Adding a key pair is highly recommended to provide you with SSH access to the machine. Although Hystax Engineering team will be able to perform maintenance checks and troubleshooting (as long as the network is reachable and your security groups allow the corresponding traffic), it is better to have your own means of accessing the Acura instance. Please refer to OpenStack's official documentation on adding an SSH public-private key pair to VMs.
It takes from 10 to 20 minutes for the services to start and the Web UI to become available.
3. Open a web browser and go to https://<ip_address of the machine>/. You will be redirected to the Hystax Setup Wizard. After you perform all the steps, the installation will be complete, and you will be able to start using Hystax Acura.
4. Step 1: Enter the organization name and new Hystax Admin User credentials into the Setup Wizard. This will be the user account for logging in to Hystax Acura Control Panel and managing the system. If there are any errors, the system will notify you.
5. Step 2: Fill in your Hystax License key that was supposed to be shared with you in advance as well as the settings for accessing your mail server, which will be used to send notifications from Acura and generate periodic reports.
Warning
SMTP server with TLS/SSL encryption is required to proceed with deployment.
If you prefer a public SMTP server associated with your email address (gmail, yahoo etc.), please find its settings online. In case of a private SMTP server, contact your network administrator for further details.
A sample notification will be sent to the specified "Test email" to verify the functionality when you click "Next".
6. Step 3: Fill in all the fields by providing cloud configuration details. Use question mark icons to get hints on the fields. After you click "Next", the Setup Wizard will validate the entered data and notify you in case of an error.
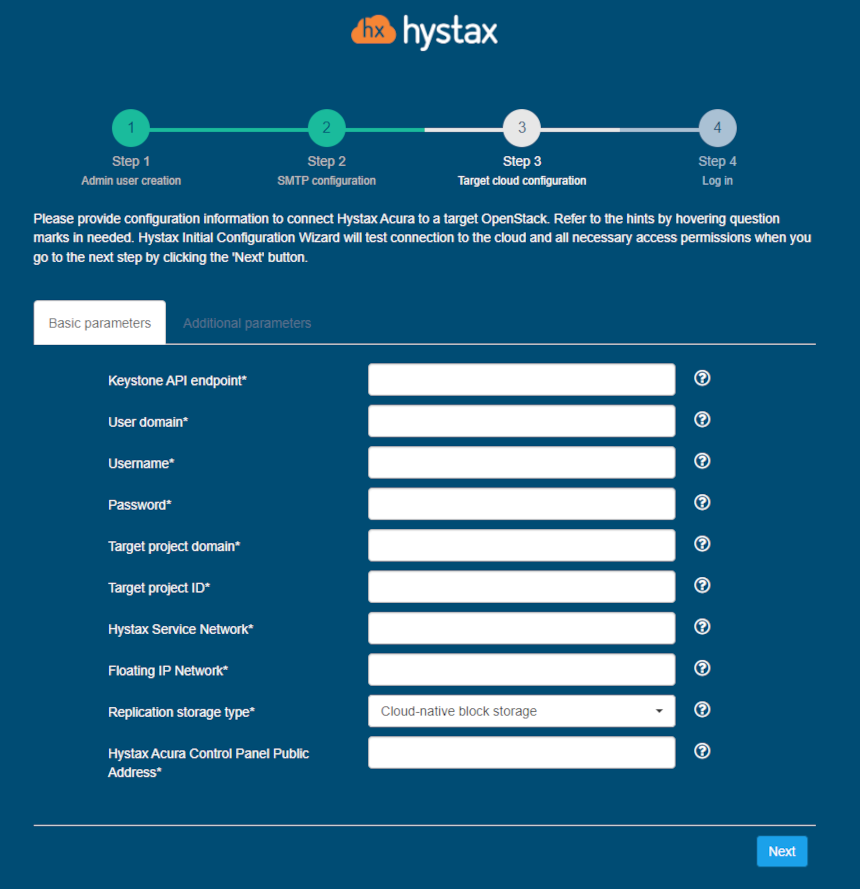
| Field | Description | Example |
|---|---|---|
| Keystone API Endpoint | OpenStack Keystone authentication URL | http://controller.dts.loc:35357/v3 |
| User Domain | User domain name to access OpenStack | default |
| Username | Username to access OpenStack | admin |
| Password | Password to access OpenStack | passw |
| Target Project Domain | Target OpenStack project domain name | default |
| Target Project Name | Target OpenStack project name where replicated workloads will be spun up | TargetProj |
| Hystax Service Network | Network that will be used for Hystax Cloud Agent machines. Should be the same or routable to the network in which a Hystax Acura instance is located | provider |
| Floating IP Network | External network that will be used to attach Floating IPs to migrated machines | provider |
| Hystax Acura Control Panel Public IP | Public IP that will be used to access the Hystax Control Panel via web browser and by replication agents | 192.168.0.10 |
Other additional parameters:
| Field | Description |
|---|---|
| API endpoint for block storage service | Override API endpoint for block storage service. Useful on clouds with broken service catalog |
| API endpoint for compute service | Override API endpoint for compute service. Useful on clouds with broken service catalog |
| API endpoint for image service | Override API endpoint for image service. Useful on clouds with broken latest API version |
| API endpoint for network service | Override API endpoint for network service. Useful on clouds with broken service catalog |
| API version for block storage service | Override API version for block storage service. Useful on clouds with broken latest API version |
| API version for compute service | Override API version for compute service. Useful on clouds with broken latest API version |
| API version for image service | Override API version for image service. Useful on clouds with broken latest API version |
| API version for network service | Override API version for network service. Useful on clouds with broken latest API version |
| Availability zone | Availability zone where all resources will be created |
| Cloud agent flavor | Flavor to use for the cloud agent instances |
| Cloud agent flavor requirements | Requirements for cloud agent flavor in JSON format, for example: {"cpu": "value", "ram": "value", "hdd": "value"} |
| Cloud agent image ID | Id of the cloud agent image from the target cloud |
| Cloud agent security group | Security group used by Cloud Agents |
| Cloud agent volume type | Cloud agent volume type |
| Cloud site parallel resources limit | How many resources of the same type are allowed to be created in parallel during Cloud Site creation |
| Cloud site timeout | Cloud site creation timeout in minutes |
| Disable failback ports | Disable custom ports for failback (they will be created by the cloud automatically) |
| Disable failover ports | Disable custom ports for failover (they will be created by the cloud automatically) |
| Flatten manager URL | URL of service which will be called for performing flatten operations on volumes of the detached machines |
| Key pair name | Key pair name to access the cloud agent |
| P2V type | In this field, you can specify a non-standard P2V - for example, for cloud "Virtuozzo, you need to specify "virtuozzo" |
| Region | Target region name |
| Replicated volume type | Default volume type used to create volumes for replicated VMs |
| Save OS type in metadata | Save OS type in image volume metadata (only for Windows machines) |
| Security group | Name of the security group with all required ports opened |
| Use public IP for cloud agent | Cloud Agent will be created with public IP and Acura will use public IP to connect to Cloud Agent |
The specified OpenStack user should have the following rights in order for Hystax Acura to operate correctly:
- Import image
- Launch instance
- Create volume
- Attach volume to instance
- Detach volume from instance
- Create volume snapshot
- Create volume from snapshot
- Remove snapshot
- Remove volume
- Manage networks
7. Step 4: Installation is complete, and you can now log in to the system using credentials entered in the first step.
Congratulations, you are now ready to use Acura! Just enter the administrator username and password specified on the first step of installation in the login page of the solution.
oVirt#
Installation requirements#
- Golden image with Hystax Acura (provided by request).
- Resources to launch a virtual machine with 8 vCPUs, 16GB RAM, 200GB disk created from the Hystax Acura Golden image.
- Resources to launch a virtual machine with 2 vCPUs, 4GB RAM, 20GB disk for the Hystax Cloud Agent. Created in each target / failover oVirt project.
- Resources to launch a virtual machine with 2 vCPUs, 4GB RAM, 20GB disk for the Hystax Replication Agent in case if a customer wants to use an external replication agent.
- SMTP server with TLS/SSL encryption.
-
Security groups allowing the following traffic:
-
- Hystax Acura host:
-
- Ingress -- tcp/443
-
- Ingress -- tcp/4443
-
- Ingress -- udp/12201
-
- Hystax Cloud Agent (should be downloaded and deployed manually):
-
- Ingress -- tcp/80
-
- Ingress - tcp/15000
-
Installation steps#
- Deploy a virtual machine with a key pair attached and launch it in the cloud.
Note
Adding a key pair is highly recommended to provide you with SSH access to the machine. Although Hystax Engineering team will be able to perform maintenance checks and troubleshooting (as long as the network is reachable and your security groups allow the corresponding traffic), it is better to have your own means of accessing the Acura instance. Please refer to oVirt's official documentation on adding an SSH public-private key pair to VMs.
It takes from 10 to 20 minutes for the services to start and the Web UI to become available.
2. Open a web browser and go to https://<ip_address of the machine>/. You will be redirected to the Hystax Setup Wizard. After you perform all the steps, the installation will be complete, and you will be able to start using Hystax Acura.
3. Step 1: Enter the organization name and new Hystax Admin User credentials into the Setup Wizard. This will be the user account for logging in to Hystax Acura Control Panel and managing the system. If there are any errors, the system will notify you.
4. Step 2: Fill in your Hystax License key that was supposed to be shared with you in advance as well as the settings for accessing your mail server, which will be used to send notifications from Acura and generate periodic reports.
Warning
SMTP server with TLS/SSL encryption is required to proceed with deployment.
If you prefer a public SMTP server associated with your email address (gmail, yahoo etc.), please find its settings online. In case of a private SMTP server, contact your network administrator for further details.
A sample notification will be sent to the specified "Test email" to verify the functionality when you click "Next".
5. Step 3: Fill in all the fields by providing cloud configuration details. Use question mark icons to get hints on the fields. After you click "Next", the Setup Wizard will validate the entered data and notify you in case of an error.
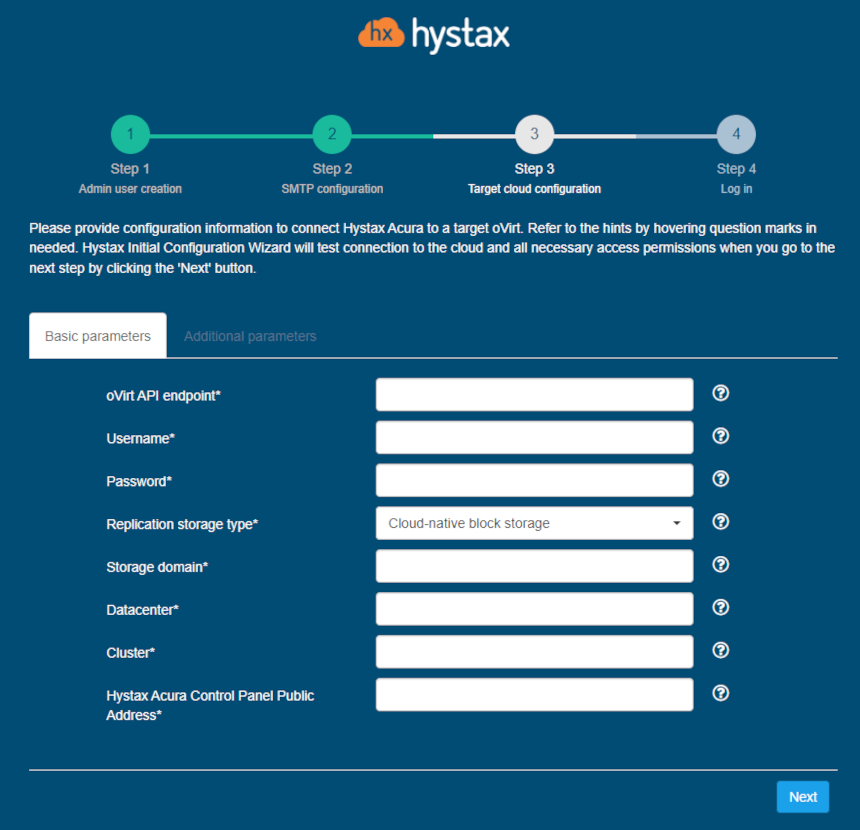
| Field | Description | Example |
|---|---|---|
| oVirt API endpoint | oVirt API Endpoint of target cloud | https://ovirtnode/ovirt-engine/api |
| Username | Username to access the target cloud | admin |
| Password | Password to access the target cloud | passw |
| Replication storage type | Choose storage type to use for replicated data | Cloud-native block storage |
| Storage domain | Storage domain ID or name that will be used for replication | domain |
| Datacenter | Target datacenter ID or name where replicated workloads will be spun up | datacenter |
| Host | Target host where replicated workloads will be spun up | host |
| Hystax Acura Control Panel Public Address | Public IP or DNS name which will be used to access the Hystax Control Panel via web browser and any replication agents | 192.168.0.10 |
Other additional parameters:
| Field | Description |
|---|---|
| Allocation policy | Allocation policy for disks thin or preallocated |
| Cloud site timeout | Cloud site creation timeout in minutes |
| Disk format | Override the default disk file format qcow2 or raw |
| Host | Override the default host |
| P2V type | In this field, you can specify a non-standard P2V - for example, for cloud "Virtuozzo, you need to specify "virtuozzo" |
| Use public IP for cloud agent | Cloud Agent will be created with public IP and Acura will use public IP to connect to Cloud Agent |
The specified user should have an unlimited number of active sessions for Hystax Acura to operate correctly.
6. Step 4: Installation is complete, and you can now log in to the system using credentials entered in the first step.
Congratulations, you are now ready to use Acura! Just enter the administrator username and password specified on the first step of installation in the login page of the solution.
VMware#
Installation requirements#
- OVA with Hystax Acura (provided by request)
- Hystax Acura Controller from the provided OVA with not less than 8 vCPUs and 16GB RAM and a 200GB disk
- Hystax Acura Cloud Agent requires at least 2 vCPUs and 4GB RAM
- A user with administrative permissions to operate VMware APIs
- SMTP server with TLS/SSL encryption
-
Security groups allowing the following traffic:
-
- Hystax Acura host:
-
- Ingress -- tcp/443;
-
- Ingress -- tcp/4443;
-
- Ingress -- udp/12201.
-
- Hystax Cloud Agent (launched manually in the target ESXi or
- vCenter cluster):
-
- Ingress -- tcp/80;
-
- Ingress - tcp/15000;
-
- Egress -- tcp/443 (from Cloud Agent to ESXi/vCenter)
-
- Egress -- tcp/udp 902 (from Cloud Agent to ESXi host).
-
-
Source network should have DHCP enabled to allow communication between Acura's components. If that is not possible, please assign static IPs for the instances by editing their network configuration as described in our example Knowledge Base article.
Installation steps#
1. Create a machine from the OVA with Hystax Acura and start it.
2. Open a web browser and go to https://<ip_address_of_the_machine>/. You will be redirected to the Hystax Setup Wizard. After you perform all the steps, the installation will be complete, and you will be able to start using Hystax Acura.
3. Step 1: Enter an organization name and the new Hystax Admin User credentials into the Setup Wizard. This will be the user account for logging in to the Hystax Acura Control Panel and managing the system. If there are any errors, the system will notify you.
4. Step 2: Fill in your Hystax License key that was supposed to be shared with you in advance as well as the settings for accessing your mail server, which will be used to send notifications from Acura and generate periodic reports.
Warning
SMTP server with TLS/SSL encryption is required to proceed with deployment.
If you prefer a public SMTP server associated with your email address (gmail, yahoo etc.), please find its settings online. In case of a private SMTP server, contact your network administrator for further details.
A sample notification will be sent to the specified "Test email" to verify the functionality when you click "Next".
5. Step 3: Fill in all the fields by providing cloud configuration details. Use question mark icons to get hints on the fields. After you click "Next", the Setup Wizard will validate the entered data and notify you in case of an error.
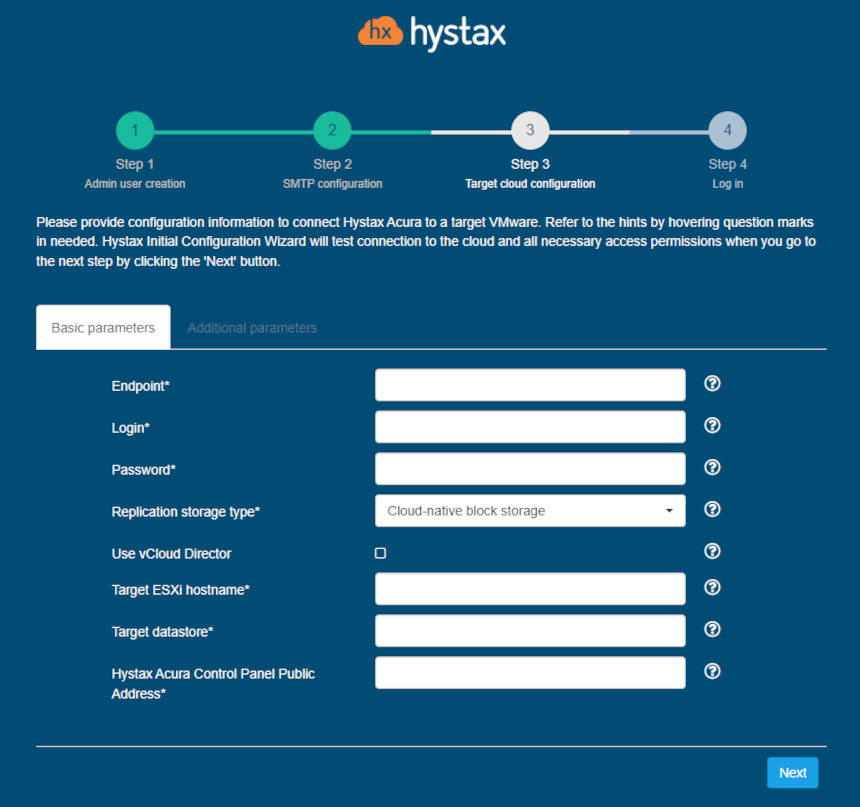
| Field | Description | Example |
|---|---|---|
| Endpoint | IP or FQDN of the target vCenter or ESXi host | my.vmware.loc |
| Login | User that will be used to work with Vmware APIs. In order for the solution to work properly, this user must have.Administrative permissions. | acura_admin |
| Password | Password for the provided user | mypass |
| Target ESXi hostname | Hostname of the ESXi host that the machines will be replicated to | localhost |
| Target datastore | Name of the datastore that the machines will be replicated to | Datastore1 |
| Hystax Acura Control Panel<br. Public IP | Public IP which will be used to access the Hystax Control Panel via web browser and by replication agents | 18.5.123.15 |
Other additional parameters:
| Field | Description |
|---|---|
| Cloud site timeout | Cloud site creation timeout in minutes |
| Resource pool | Override the default VMware resource pool |
| Use public IP for cloud agent | Cloud Agent will be created with public IP and Acura will use public IP to connect to Cloud Agent |
| vCloud Director API version | Provide a specific vCloud Director API version to use, for example "31.0" |
| VM hardware version | Override the default VM hardware version, example: vmx-12 |
6. Step 4: Installation is complete, and you can now log in to the Acura Control Panel (ACP) using credentials entered in the first step.
Congratulations, you are now ready to use Acura! Just enter the administrator username and password specified on the first step of installation in the login page of the solution.
Installation with vCloud Director#
In case of using vCD in your VMware setup, check the corresponding box at Step 3 and fill in the extra mandatory fields needed to access the target environment.
Warning
Acura requires at least Organization Admin credentials to operate with vCloud.
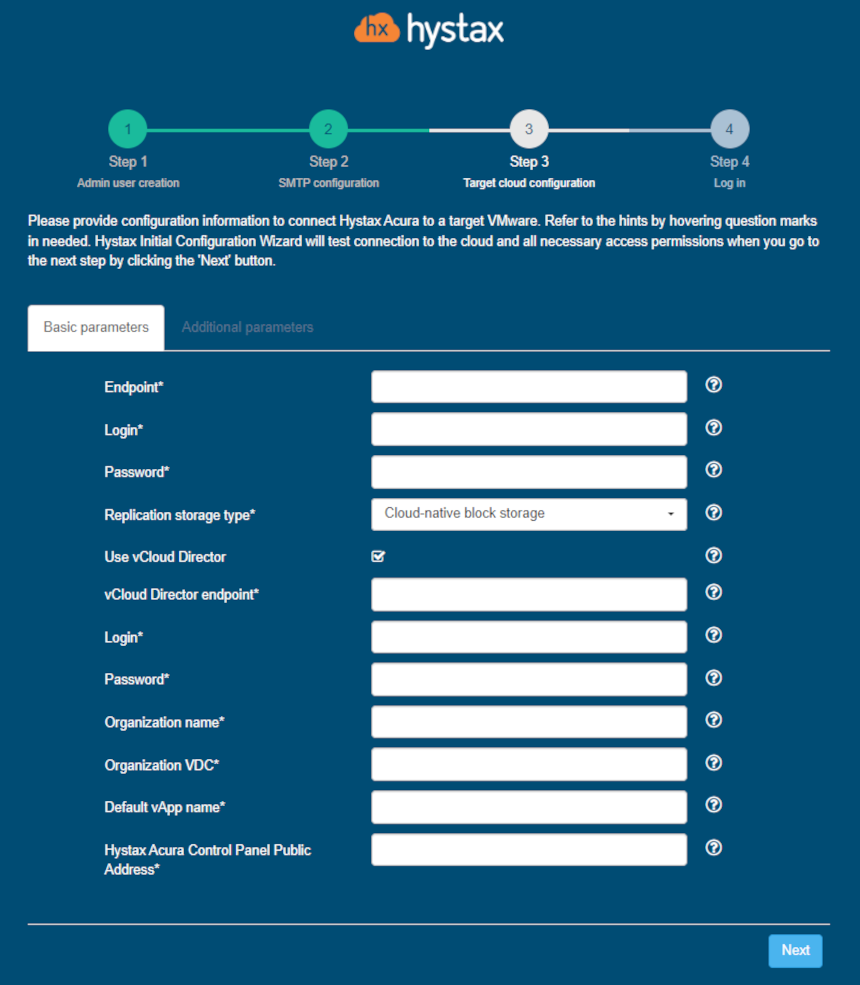
| Field | Description | Example |
|---|---|---|
| Endpoint | IP or FQDN of the target vCenter | my.vmware.loc |
| Login | User that will be used to work with VMware APIs. Administrative permissions are mandatory for the user | acura_admin |
| Password | Password for the provided vCenter user | mypass |
| vCloud Director endpoint | IP or FQDN of the vCloud Director to connect to | my.vmware.vcd |
| Login | Username to log into the vCloud Director | vcd_admin |
| Password | Password for the provided user | mypass |
| Organization name | Default organization for registering machines | Myorganization |
| Organization VDC | Default Virtual Data Center for the machines | Datastore1 |
| Default vApp name | Default vApp name to register machines | My_vAPP |
| Hystax Acura Control Panel Public IP | Public IP which will be used to access the Hystax Control Panel via web browser and by replication agents | 18.5.123.15 |
Other additional parameters:
| Field | Description |
|---|---|
| Cloud site timeout | Cloud site creation timeout in minutes |
| Resource pool | Override the default VMware resource pool |
| Use public IP for cloud agent | Cloud Agent will be created with public IP and Acura will use public IP to connect to Cloud Agent |
| vCloud Director API version | Provide a specific vCloud Director API version to use, for example "31.0" |
| VM hardware version | Override the default VM hardware version, example: vmx-12 |