Machines replication#
Machine replication consists of user-initiated and system-managed steps.
User Actions
1. Create a machine group to organize replicated machines.
2. Install and configure replication agents, including agent type selection and connection settings.
3. Configure replication settings, such as replication schedules and retention policies.
4. Start Protection to create the initial consistent machine snapshot.
System Actions
5. Retrieve machine snapshots and detect changes between consecutive snapshots.
6. Transfer changed data to the target storage using WAN optimization and deduplication technologies.
7. Store incremental backups according to the configured snapshot retention policies.
Create a machine group#
Machine groups help organize replicated machines and simplify protection management. Each group can contain machines that belong to the same environment, department, customer, application, or disaster recovery scenario.
Once a customer dashboard has been created as part of product's initial configuration for replicating machines, navigate to the main page and create machine group.
Use Cases
- Environment-based organization
Create separate groups for development, test, and production environments to manage replication settings independently.
- Application grouping
Place all machines that belong to the same application or service in a single group to simplify protection and recovery operations.
- Department-based management
Organize machines by business unit, such as Finance, HR, Engineering, or Sales, and delegate management responsibilities accordingly.
- Recovery planning
Group machines that participate in the same Recovery Plan to simplify failover and recovery operations.
- Geographical organization
Create groups for different sites, offices, or regions to manage replication according to location-specific requirements.
Getting started with replication agents#
Note
The replication agent requires a virtual machine with at least 2 vCPUs and 4 GB of RAM.
1. Download the replication agent in one of the following ways:
-
On the customer page, select Protect New Platform from the machine group's Actions menu. For the complete workflow, see Protect New Platform.
-
On the customer page, select Manage Clouds, locate the source cloud, and select Download Replication Agent from the cloud's Actions menu. For more information, see Manage Source and Failback Clouds.
-
Select Download Agents in the main menu.
2. Follow the wizard instructions:
-
Step 1. (Optional) Select a customer.
-
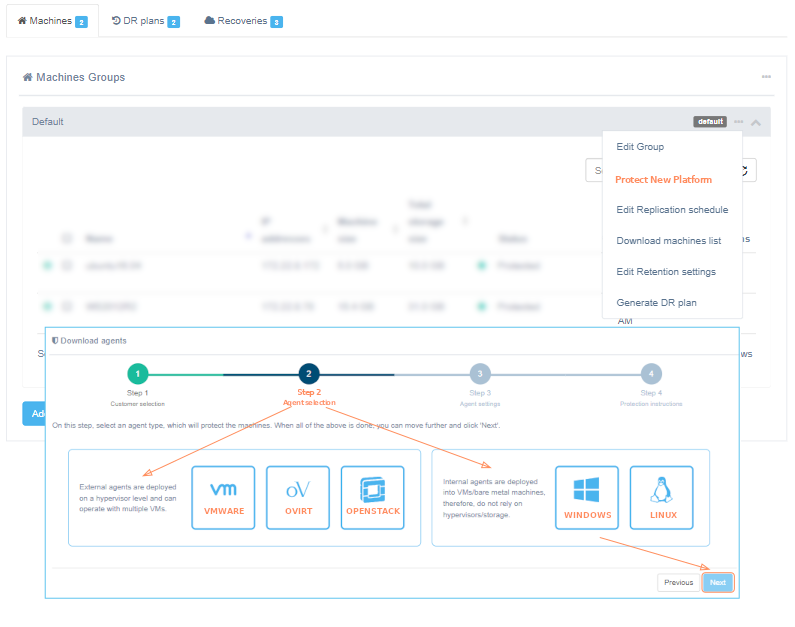
Step 2. Select the agent type:
- External agents: VMware, OpenStack, and oVirt.
- Internal agents: Windows and Linux (installed directly on the protected machine), and the PostgreSQL backup agent (available only for the Storage cloud type).
-
Step 3. Configure the agent settings. The available settings depend on the selected agent type and are described in the corresponding agent installation section. See Replication agent settings for details. To have detected machines automatically assigned to a group, select a previously created machine group.
-
Step 4. Download and install the agent.
Use case: add machines to a specific group#
Note
To add machines to a specific group, a Control Panel administrator must first create the group.
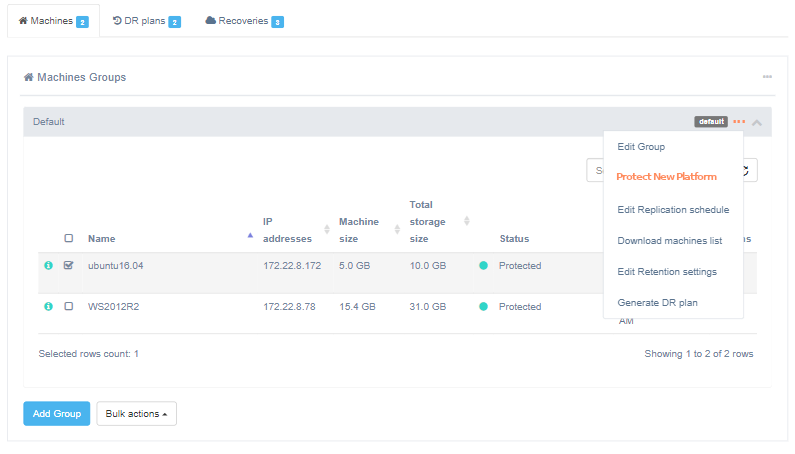
1. After the group is created, open the group's ... menu and select Protect New Platform
2. Select a supported agent type.
3. Configure the agent settings: select a previously created group and specify the required parameters. The available parameters depend on the selected agent type. For details, see the corresponding agent configuration section:
4. In Step 4, select Download agent and follow the generated deployment instructions.
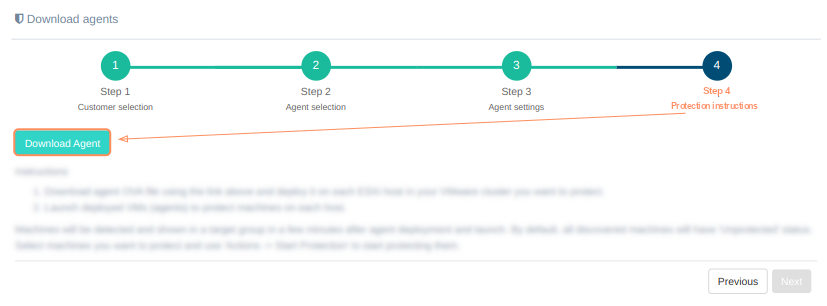
After the agent is downloaded and installed, all detected machines automatically appear in the machine group selected in the previous step. The machines are initially displayed in the Unprotected state.
Replication agent settings#
VMware Agent#
Client for VMware (VMware agent) - a Linux machine, supplied as an OVA file, that is deployed to each ESXi host or cluster and that replicates machines on these hosts. Standard VMware tools are used to detect changes and retrieve deltas on virtual machines via the Changed Block Tracking (CBT) API. These tools, in turn, trigger the operating system's mechanisms (such as quiesce) to ensure data consistency within the replicas.
An agent instance must have at least 2 vCPUs and 4 GB of RAM and must be deployed on each ESXi host or cluster containing machines designated for replication.
Note
An ESXi host or cluster detection depends on cloud configuration settings according to the discovery level.
Requirements#
To ensure the replication process is successful, it is necessary to set the appropriate permissions. The permissions can be set at a high level of the vCenter hierarchy or at least at the host/cluster level where the replication agent is deployed.
Note
If you set permissions at the host/cluster level, you should also add a read-only permission (empty role) at the datacenter level within the vCenter hierarchy. This permission should be set to propagate to children for HotAdd to work or without propagation for NBD mode, though some functionality may be limited (e.g., retrieving networks, storage information such as free space, etc.).
Additionally, set permissions if you want to use HotAdd transport mode.
VMware Replication Agent requires the following user permissions in vSphere (Role "VMware Consolidated Backup user" in vCenter):
- Datastore - Browse
- Datastore - FileManagement
- Virtual machine - Change Configuration -- Disc Lease
- Virtual machine - Interact -- Power On
- Virtual machine - Interact -- Power Off
- Virtual machine - Provisioning -- Allow read-only disk access
- Virtual machine - Provisioning -- Allow virtual machine files upload
- Virtual machine - Provisioning -- Allow virtual machine download
- Virtual machine - Snapshot management -- Create snapshot
- Virtual machine - Snapshot management -- Remove Snapshot
Permission to access CBT is necessary for the correct performance of the application. To enable CBT:
Virtual machine - Change Configuration - Disc change tracking
Additionally, it is recommended to include the following global permissions:
- Global - Disable methods
- Global - Enable methods
- Global - Licenses
A list of permissions for vCenter version 8.x:
| Privilege/Permission Name in the API | Privilege/Permission Name in the vSphere Client | Description |
|---|---|---|
| Datastore.Browse | Browse datastore | Allows browsing files on a datastore. |
| Datastore.FileManagement | Low level file operations | Allows performing read, write, delete, and rename operations in the datastore browser. |
| VirtualMachine.Config.DiskLease | Change Configuration → Acquire disk lease | Allows disk lease operations for a virtual machine. |
| VirtualMachine.Interact.PowerOn | Interaction → Power On | Allows powering on a powered-off virtual machine, and resuming a suspended virtual machine. |
| VirtualMachine.Interact.PowerOff | Interaction → Power Off | Allows powering off a powered-on virtual machine. This operation powers down the guest operating system. |
| VirtualMachine.Provisioning.DiskRandomRead | Provisioning→Allow read-only disk access | Allows opening a disk on a virtual machine for random read access. Used mostly for remote disk mounting. |
| VirtualMachine.Provisioning.PutVmFiles | Provisioning →Allow virtual machine files upload | Allows write operations on files associated with a virtual machine, including vmx, disks, logs, and nvram. |
| VirtualMachine.Provisioning.GetVmFiles | Provisioning →Allow virtual machine download | Allows read operations on files associated with a virtual machine, including vmx, disks, logs, and nvram. |
| VirtualMachine.State.CreateSnapshot | Snapshot management → Create snapshot | Allows creation of a snapshot from the virtual machine’s current state. |
| VirtualMachine.State.RemoveSnapshot | Snapshot management → Remove Snapshot | Allows removal of a snapshot from the snapshot history. |
| VirtualMachine.Config.ChangeTracking | Change Configuration → Toggle disk change tracking | Allows activating or deactivating of change tracking for the virtual machine's disks. Switching it on is necessary to access CBT. |
| Global.DisableMethods | Disable methods | Allows servers for vCenter Server extensions to deactivate certain operations on objects managed by vCenter Server. We highly recommend turning it on. |
| Global.EnableMethods | Enable methods | Allows servers for vCenter Server extensions to activate certain operations on objects managed by vCenter Server. We highly recommend turning it on. |
| Global.Licenses | Licenses | Allows viewing installed licenses and adding or removing licenses. We highly recommend turning it on. |
Note
In case of using vCloud, vCenter user requires one extra permission to operate: Profile-driven storage → Profile-driven storage view
-
- Ports for correct agent work:
-
- DR host - tcp/80, tcp/443
-
- vSphere host - tcp/443
-
- ESXi host(s) - tcp/udp/902
-
- Send logs to the Disaster Recovery cluster - udp/12201
VMware Replication Agent uses VMware snapshots and VMware CBT API in order to create consistent replicas of machines' data.
This implies the following considerations regarding the VMware storage:
- VMware snapshots consume storage to retain copy-on-write buffer, so it is recommended to have at least 10% free space available on VMware storage.
- VMware puts additional load on storage while creating snapshots or running machines with existing snapshots.
Please consider that storage performance warning thresholds need to be adjusted in order to meet this increased load during replication.
Warning
The source machine must have VMware Tools installed manually prior to any replication procedures for it to display its network information in the target VMware ESXi correctly.
Permissions for HotAdd#
Add permissions for using HotAdd transport mode either at the hierarchy level where the agent is deployed or directly on the agent itself, ensuring they are at the required level or higher:
-
Virtual machine - Change Configuration -- Add existing disk
-
Virtual machine - Change Configuration -- Advanced configuration
-
Virtual machine - Change Configuration -- Remove disk
Installation#
The first two steps that must be completed to successfully install the VMware replication agent are described in the section Machines replication and distribution between groups.
Step 3. Agent options#
Select the machine group that will contain the protected machines, configure the VMware cloud access settings, and select Next. To create a group first, see Create a machine group.
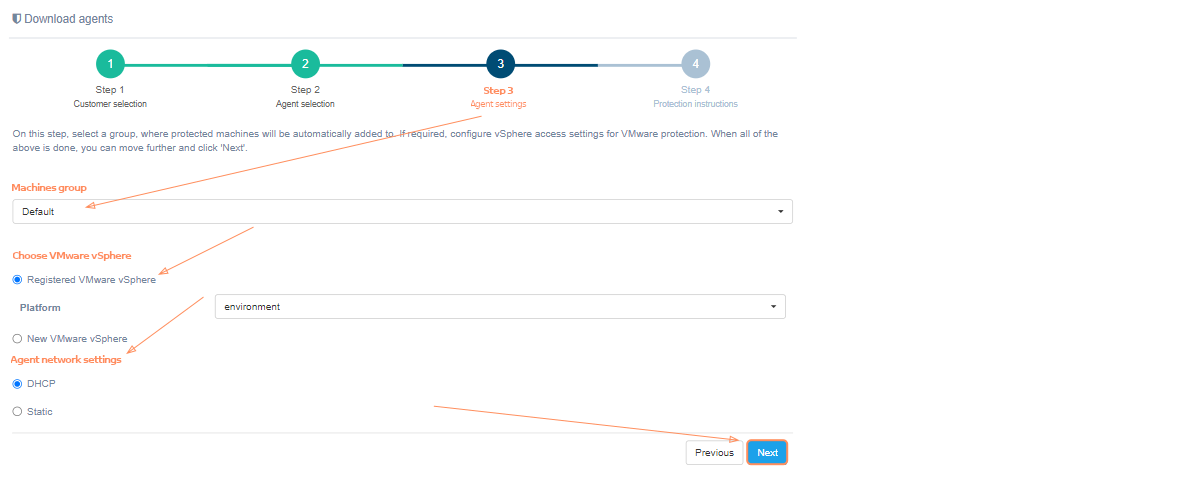
If the platform is not listed, select New VMware vSphere instead of Registered VMware vSphere, complete all fields, and select Next. Use the ? icons for field-specific help. The wizard validates the values before opening Step 4.
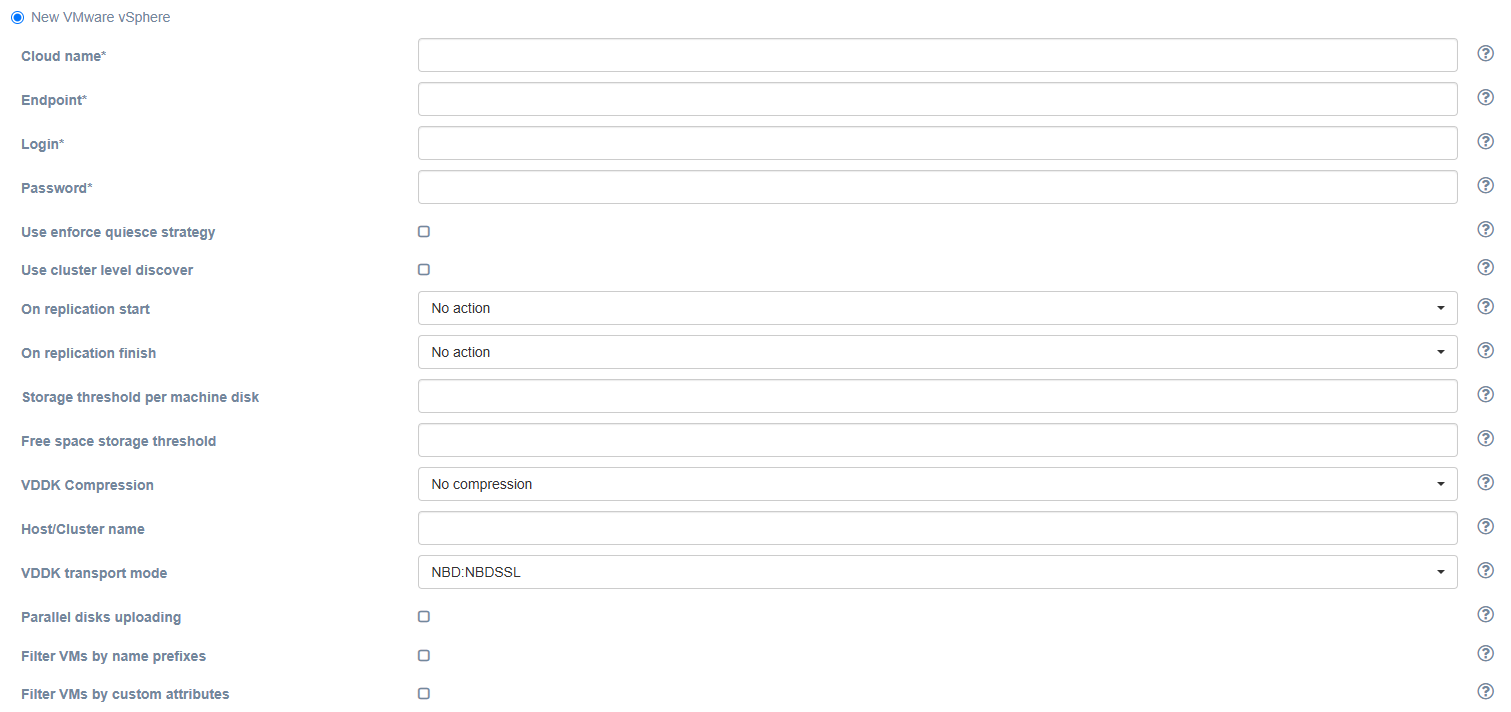
| Field | Description | Example |
|---|---|---|
| Cloud name | The name of the cloud which will be shown in the UI. The name must be unique. | cloud |
| Endpoint | Endpoint to connect to | cloud.example.org |
| Login | User login | username |
| Password | Password to access the target cloud | password |
| Use enforce quiesce strategy | By default, the agent will try to quiesce the machine, create non-quiesce snapshot in case if quiesce is falling. When the checkbox is checked, non-quiesce snapshot will not be created. | unchecked |
| Use cluster level discover | Enable devices discover on cluster level. If unchecked, devices discover will be performed on host level. Details. | unchecked |
| On replication start | Whether to change source machine power state on replication start. Details. | No action |
| On replication finish | Whether to change source machine power state on replication finish. Details. | No action |
| Storage threshold per machine disk | Run application on if datastore has free space X percent of total disk size (0 – unlimited) | 0 |
| Free space storage threshold | Run application on if datastore has X percent of total disk size (0 – unlimited) | 0 |
| VDDK Compression | Use VDDK compression. Select the option from the list: No compression, zlib, fastlz, skipz. | No compression |
| Host/Cluster name | Name of the Host or Cluster (multiple allowed, separated by commas). Enables advanced discover mode. This field is optional. Details. | Empty |
| VDDK transport mode | Select the VDDK transport mode. | NBD:NBDSSL |
| Parallel disks uploading | Enable parallel disk uploading. By default, source disks will be uploaded sequentially. If checked, source disks will be uploaded in parallel. Enabling this setting increases the RAM size requirements for the replication agent. | unchecked |
| Filter VMs by name prefixes | Check to discover only VMs with names that match the provided prefixes. Details. | unchecked |
| Name prefixes filter | Active only when the ‘Filter VMs by name prefixes’ option is enabled. A comma-separated list of name prefixes. Details. | WIN_,TEST_ |
| Filter VMs by custom attributes | Check to discover only VMs that match the provided custom attributes. Note that custom attributes are not available on ESXi: vCenter server endpoint is required. Details. | unchecked |
| Custom attributes filter | Active only when the ‘Filter VMs by custom attributes’ option is enabled. A comma-separated list of custom attributes in key=value format. Details. | TYPE=PROD,TYPE=TEST |
Machine discovery levels#
In the source cloud or replication agent settings, you can configure the level at which virtual machines are discovered for protection. To do this, two fields are provided: Use cluster level discover and Host/Cluster name.
The machine discovery level is determined by the Use cluster level discover setting. By default, this setting is disabled, which means that machine discovery is performed at the host level. When enabled, discovery is performed at the cluster level.
In the Host/Cluster name field, specify the hosts or clusters within which the search is performed. Rules:
-
Leave the field empty if only machines from the host or cluster where the replication agent is deployed should be included in the protection list.
-
If necessary, specify multiple hosts or clusters; use a comma as a separator.
-
Do not assign the same hosts or clusters to different replication agents.
-
To perform discovery and replication, the user specified in the source cloud settings must have sufficient permissions. Learn more.
Fields On replication start and On replication finish#
The On replication start and On replication finish settings
allow you to power off or power on the source virtual machine when replication starts/ends. The default
value is No action: the state of the machine will not be changed.

Filter fields#
Use Filter VMs by name prefixes and Filter VMs by custom attributes to filter machines. These filters are useful when you need to limit the number of replicating devices. You can use them either together or separately.
Typical cases and rules for using filters:
-
If you need to discover VMs with multiple prefixes, you can specify them as a comma-separated string.

-
If no filters are used (both checkboxes are unchecked), all VMs will be discovered according to the other settings.
-
If at least one filter is enabled but its input field is empty, no VMs will be discovered.
-
Filters cannot contain special characters such as commas (","), slashes ("/"), etc., and must not end with spaces.
-
Make sure to set keys and values correctly to get the expected result.
-
In the case of custom attributes, an exact match of both keys and values is required.
-
If both filters (prefixes and custom attributes) are set, only VMs that meet both criteria (i.e., in the intersection of the filtered sets) will be discovered.
-
The replication agent VMware retrieves updated settings for the corresponding source cloud on the next heartbeat after saving (approximately every 30 seconds by default).
To enable VM filtering by attributes, set them for the source VMs in vCenter:
1. Open the VM page.
2. Go to Actions → Tags & Custom Attributes → Edit Custom Attributes.
3. If the attribute already exists, set or change its value. Otherwise, add a new attribute (type: Virtual machine) by specifying its name and value.
Static settings#
Additionally, it is possible to specify static network settings. Set Agent network settings to Static and fill in the fields.
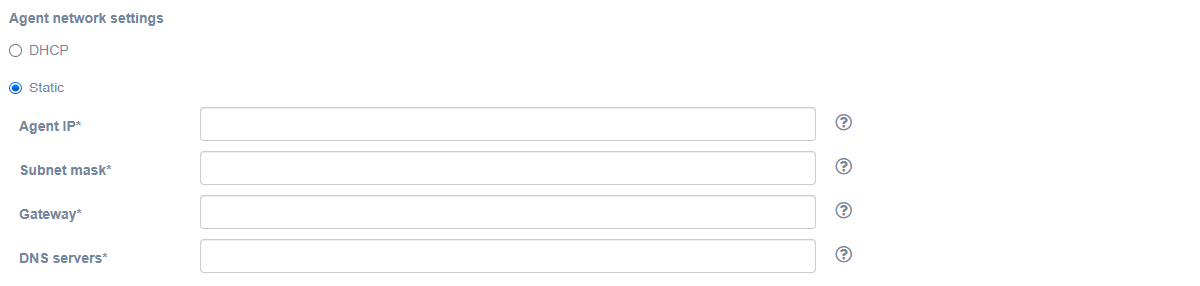
| Field | Description | Example |
|---|---|---|
| Agent IP | The IP address of the agent | 172.22.6.230 |
| Subnet mask | The subnet mask of the agent | 255.255.0.0 |
| Gateway | Agent gateway | 172.22.1.2 |
| DNS servers | DNS of the agent’s server. You can specify multiply addresses separated by commas. | 1.1.1.1, 2.2.2.2 |
Step 4. Protection instructions#
Step 4 displays Download agent and the deployment instructions:
- Select Download agent to download the OVA file, and deploy it on each ESXi host in your VMware cluster you want to protect.
- Launch deployed VMs (agents) to protect machines on each host.
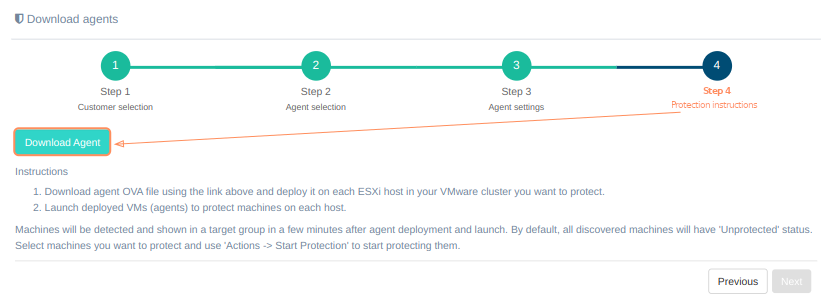
Machines will be detected and shown in a target group in a few minutes after agent
deployment and launch. The detected machines appear in the selected group with the Unprotected status. Select the machines and choose Actions → Start Protection.
Note
VMware vSphere can issue a warning about the presence of an unknown configuration parameter for the virtual machine. The service parameter "hvragent" is added deliberately and it is not a security risk.
VMware Agent configuration#
Use the shared external-agent TUI configuration. VMware agent logs are stored in /var/log/cabrio/cabrio.log.
oVirt Agent#
oVirt Agent is an external replication agent type that is deployed as a separate instance in the source environment.
Requirements#
Note
Replication Agent for oVirt requires superuser permissions for installation.
-
- Hardware:
-
- Memory: at least 4 GB RAM
-
- CPU: at least 2 vCPUs
-
- Disk space: at least 10 GB required. Disk will be downloaded with fix size = 10Gb. It is whole disk of new deployed VM.
-
- Ports for correct agent work:
-
- DR host - tcp/443
-
- Send logs to the Disaster Recovery cluster - udp/12201
An agent instance must be deployed on each project that has machines intended for replication.
Installation#
The first two steps that must be completed to successfully install the oVirt replication agent are described in the section Machines replication and distribution between groups.
Step 3. Agent settings#
Select the machine group that will contain the protected machines, configure the oVirt cloud access settings, and select Next. To create a group first, see Create a machine group.
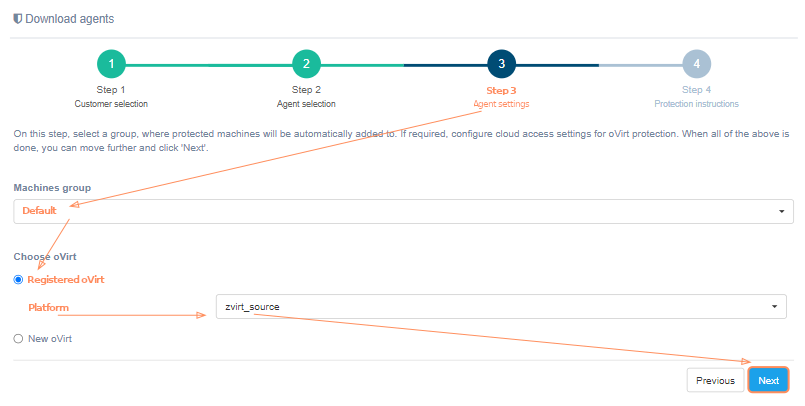
If the platform is not listed, select New oVirt instead of Registered oVirt, complete all fields, and select Next. Use the ? icons for field-specific help. The wizard validates the values before opening Step 4.
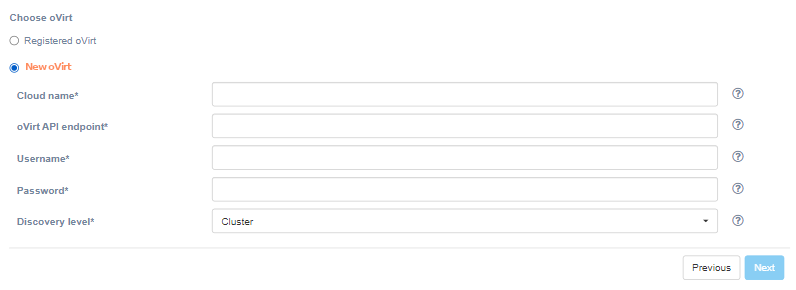
| Field | Description | Example |
|---|---|---|
| Cloud name | The name of the cloud which will be shown in UI. The name must be unique | ovirt_source |
| oVirt API endpoint | oVirt API endpoint of target cloud | https://ovirtnode/ovirt-engine/api |
| Username | Username to access the target cloud | [email protected] |
| Password | Password to access the target cloud | password |
| Discovery level | Configures the level on which replication agents discover machines | Cluster |
| On replication start | Whether to change source machine power state on replication start. Details. | No action |
| On replication finish | Whether to change source machine power state on replication finish. Details. | No action |
The Discovery level field configures the level on which
replication agents discover virtual machines. This could be the cluster, host, data center
or entire cloud level. For example, setting the value to Cluster means that one (and only one)
instance of replication agent has to be deployed on each cluster. Each agent instance discover
machines only from the corresponding cluster. Likewise for other levels.

Step 4. Protection instructions#
Step 4 displays Download agent and the deployment instructions:
-
Select Download agent to download the RAW file, and deploy one or more VMs on oVirt, according to chosen discovery level.
-
Start deployed VMs (agents) to protect machines.
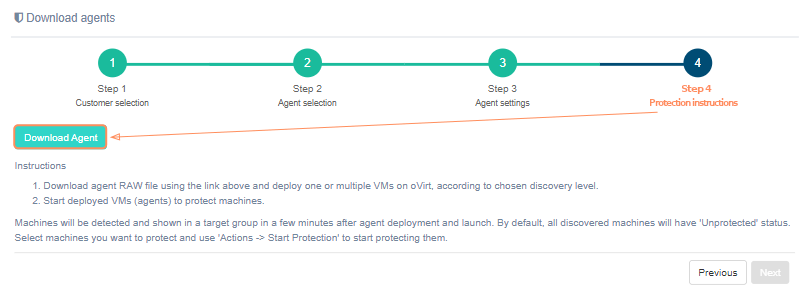
Machines will be detected and shown in a target group in a few minutes after agent deployment
and launch. The detected machines appear in the selected group with the Unprotected status. Select the machines and choose Actions → Start Protection.
Alternatively, select Actions → Download Replication Agent on Manage Clouds to get the agent's file.
oVirt Agent configuration#
Use the shared external-agent TUI configuration. oVirt agent logs are stored in /var/log/orca/orca.log.
OpenStack Agent#
OpenStack Agent is an external replication agent type that is deployed as a separate instance in the source environment.
Requirements#
Note
Replication Agent for OpenStack requires superuser permissions for installation.
-
- Hardware:
-
- Memory: at least 4 GB RAM
-
- CPU: at least 2 vCPUs
-
- Disk space: at least 10 GB required. Disk will be downloaded with fix size = 10Gb. It is whole disk of new deployed VM.
-
- Ports for correct agent work:
-
- DR host - tcp/443
-
- Send logs to the Disaster Recovery cluster - udp/12201
An agent instance must be deployed on each project that has machines intended for replication.
Installation#
The first two steps that must be completed to successfully install the OpenStack replication agent are described in the section Machines replication and distribution between groups.
Step 3. Agent settings#
Select the machine group that will contain the protected machines, configure the OpenStack cloud access settings, and select Next. To create a group first, see Create a machine group.
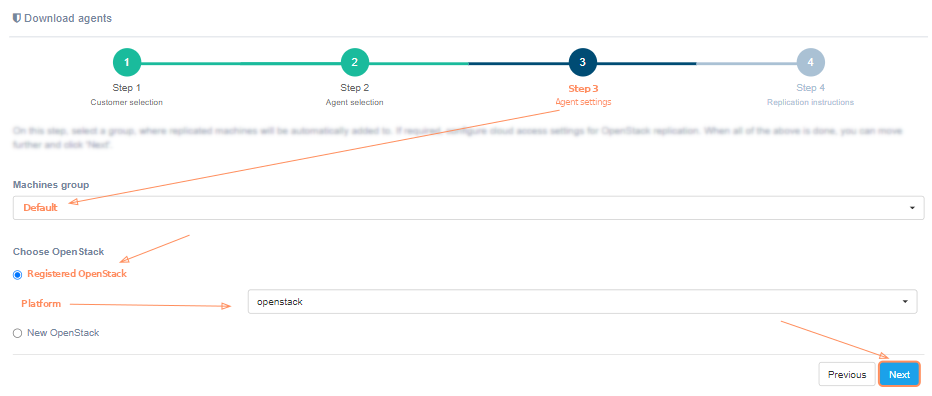
If the platform is not listed, select New OpenStack instead of Registered OpenStack, complete all fields, and select Next. Use the ? icons for field-specific help. The wizard validates the values before opening Step 4.
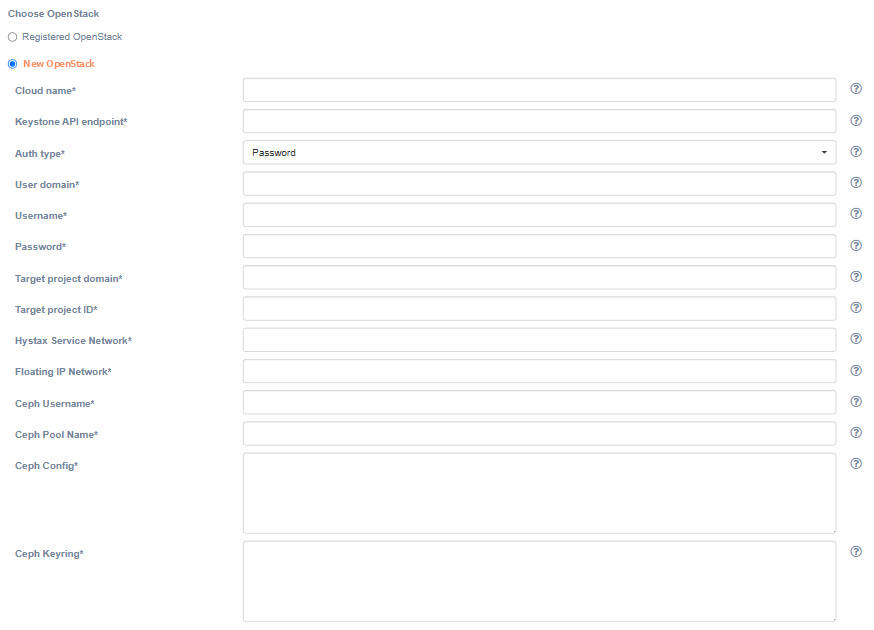
| Field | Description | Example |
|---|---|---|
| Cloud name | The name of the cloud which will be shown in the UI. The name must be unique. | openstack_source |
| Keystone API endpoint | Keystone authentification URL | http://ovh-os.example.com:5000/v3 |
| Auth type | Select the Keystone authentication type | Password |
| User domain | User domain name to access the target cloud | default |
| Username | Username to access the target cloud | username |
| Password | Password to access the target cloud | password |
| Target project domain | Target project domain where failback workloads will be spun up | default |
| Target project ID | Target project ID where failback workloads will be spun up | 28bfd… |
| Hystax Service Network | Network which will be used for Hystax failback machines | internal |
| Floating IP Network | External network which will be used to attach Floating IPs to failback machines | provider |
| Source storage type | Choose source storage type for external agents. Not all agent types require or use storage credentials. Note: OpenStack Replication Agent requires Bitmap Manager for incremental replication when source storage is not provided. With Ceph storage, Bitmap Manager is required for incremental replication of ephemeral boot volumes. | Not provided |
| Use Bitmap Manager | Select to enable Bitmap Manager support. Bitmap Manager is an external service deployed on hypervisor nodes to track disk changes of replicated machines. Due to QEMU limitations, changes are only tracked when machines are powered on. | checked |
| Bitmap Manager URLs | A newline-separated list of Bitmap Manager URLs. The replication agent will query them all to search for replicated VMs. | http://bitmap-manager.example.com |
| Bitmap Manager token | Bitmap Manager authentication token. | token |
| On replication start | Whether to change source machine power state on replication start. Details. | No action |
| On replication finish | Whether to change source machine power state on replication finish. Details. | No action |
| Discovery level | Select the level on which replication agents discover machines. For example, Availability zone means one replication agent instance per availability zone in the project. | Entire project |
Step 4. Protection instructions#
Step 4 displays Download agent and the deployment instructions:
-
Select Download agent to download the RAW file, and deploy one or more VMs on OpenStack, according to chosen discovery level.
-
Start deployed VMs (agents) to protect machines.
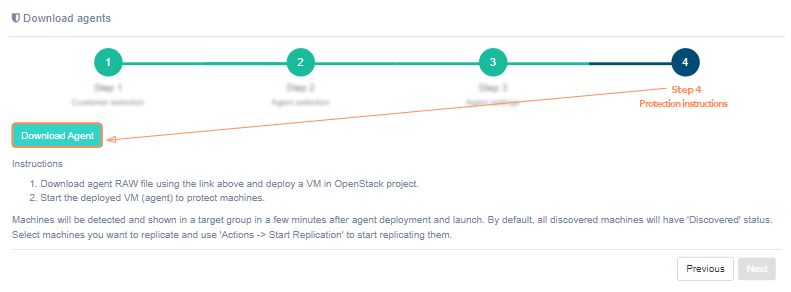
Machines will be detected and shown in a target group in a few minutes after agent deployment
and launch. The detected machines appear in the selected group with the Unprotected status. Select the machines and choose Actions → Start Protection.
Alternatively, select Actions → Download Replication Agent on Manage Clouds to get the agent's file.
OpenStack Agent configuration#
Use the shared external-agent TUI configuration. OpenStack agent logs are stored in /var/log/orca/orca.log.
Linux Agent#
Requirements#
-
Replication Agent for Linux requires sudo permissions for installation
-
- Hardware:
-
- Memory: 500 MB RAM
-
- Disk space: 100 MB required for product installation and not less than 15% free space of the disk size for snapshots creation
-
- Ports needed for the correct work:
-
- Send data to Disaster Recovery host - tcp/443
-
- Send logs to Disaster Recovery - udp/12201
Limitation#
Installation and operation on systems with Secure Boot are not supported.
Installation#
The first two steps that must be completed to successfully install the Linux replication agent are described in the section Machines replication and distribution between groups.
Step 3. Agent settings#
Disaster Recovery offers a choice between replication agent builds that depends on customer's preferences and the actual use case.
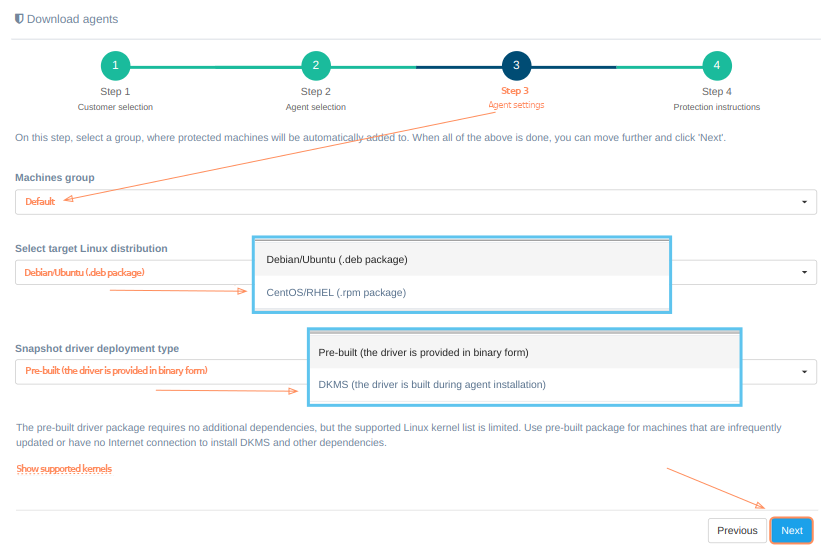
Select the previously created machine group, the target distribution (Debian/Ubuntu or CentOS/RHEL), and the snapshot driver deployment type. Then select Next.
Select Show supported kernels in Step 3 of the Download agents wizard to view the full list of natively included versions.
Pre-built and DKMS Agent types#
There are two driver deployment types to choose from: pre-built and DKMS.

-
The pre-built driver package (available both for Debian/Ubuntu and CentOS/RHEL distributions) requires no additional dependencies, but the supported Linux kernel list is limited. Use pre-built package for machines that are infrequently updated or have no Internet connection to install DKMS and other dependencies.
-
The DKMS driver package will build the driver on installation. It has a broad Linux kernel support and will rebuild the driver on kernel updates. It requires DKMS, build tools and kernel headers to be installed on the machine. Use DKMS package for machines that are frequently updated or not supported by the pre-built package.
Select Next. Depending on the type of driver deployment you choose, the protection instructions on step four vary:
Step 4. Protection instructions#
On the fourth step there is a Download agent button and protection instructions. An agent with a pre-built package and DKMS has different protection instructions. Follow the instructions for the selected package type:
Protection instructions for an agent with a pre-built package#
-
Download a deb/rpm agent installer package file using the link above or copy
 the command below to run it in a terminal.
curl -k -o hlragent.deb 'automatically generated link'
-
Copy the package to the Linux machine you would like to protect. Use deb package for Ubuntu/Debian machines and rpm package for RHEL/CentOS machines.
-
Install the agent using the following commands (superuser privileges required):
- for Ubuntu/Debian machines: dpkg -i hlragent.deb
- for RHEL/CentOS machines: rpm -i hlragent.rpm
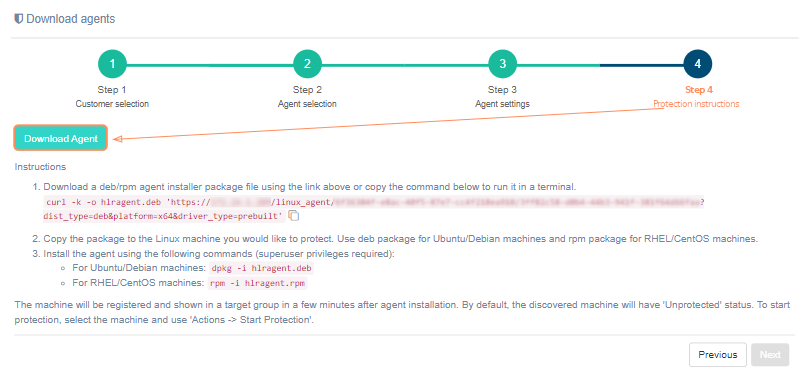
The machine appears in the selected group with the Unprotected status. Select it and choose Actions → Start Protection.
Protection instructions for an agent with DKMS#
-
Install DKMS, build requirements and Linux header files for current kernel and future updates on the machine (superuser privileges required):
- for Ubuntu machines: apt-get update && apt-get install dkms perl make gcc libelf-dev linux-headers-$(uname -r) linux-headers-generic
- for Debian machines: apt-get update && apt-get install dkms perl make gcc libelf-dev linux-headers-$(uname -r) linux-headers-amd64
- for RHEL/CentOS machines: add EPEL repository and run yum install dkms perl make gcc elfutils-libelf-devel kernel-devel-$(uname -r) kernel-devel
-
Download a deb/rpm agent installer package file using the link above or copy
the command below to run it in a terminal.curl -k -o hlragent.deb 'automatically generated link'
-
Copy the package to the Linux machine you would like to protect. Use deb package for Ubuntu/Debian machines and rpm package for RHEL/CentOS machines.
-
Install the agent using the following commands (superuser privileges required):
- for Ubuntu/Debian machines: dpkg -i hlragent.deb
- for RHEL/CentOS machines: rpm -i hlragent.rpm
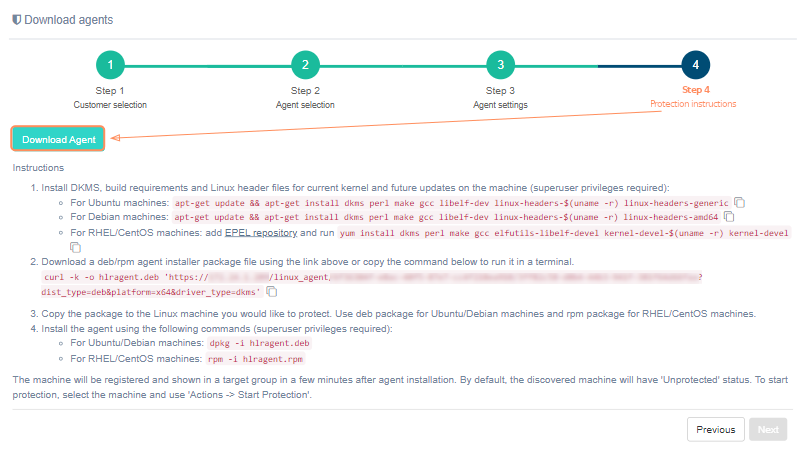
The machine appears in the selected group with the Unprotected status. Select it and choose Actions → Start Protection.
Windows Agent#
Requirements#
-
Replication Agent for Windows requires administrative permissions for installation
-
- Hardware:
-
- Memory: 2 GB RAM
-
- CPU: x64 processor
-
- Disk space: 100 MB required for product installation and not less than 15% free space of the disk size for VSS snapshots creation
-
- Software:
-
- Microsoft .NET Framework 4.0
Warning
Windows replication agent must be installed by the System Administrator or using Administrator privileges. Otherwise, it will not have enough permissions to use API or create snapshots and the replication will fail.
Installation#
The first two steps that must be completed to successfully install the Windows replication agent are described in the section Machines replication and distribution between groups.
Step 3. Agent settings#
Select the machine group that will contain the protected machine, and select Next.
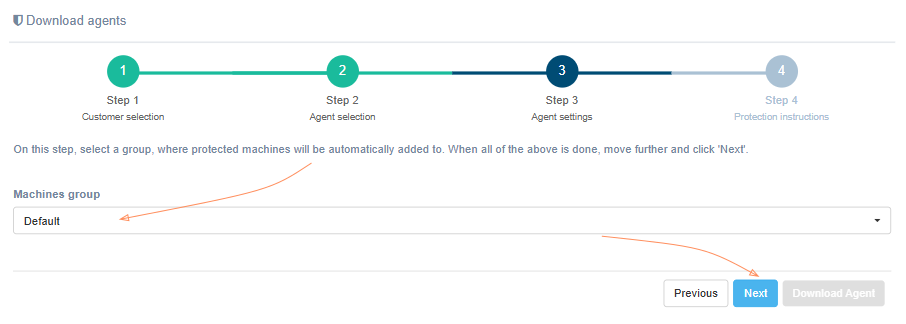
To create a group first, see Create a machine group.
Step 4. Protection instructions#
Step 4 displays Download agent and the installation instructions:
- Download the zipped agent installer package using the Download agent button.
- Copy the archive to a Windows machine that is intended for replication.
- Unzip the archive and run
hwragent.msito install replication services.
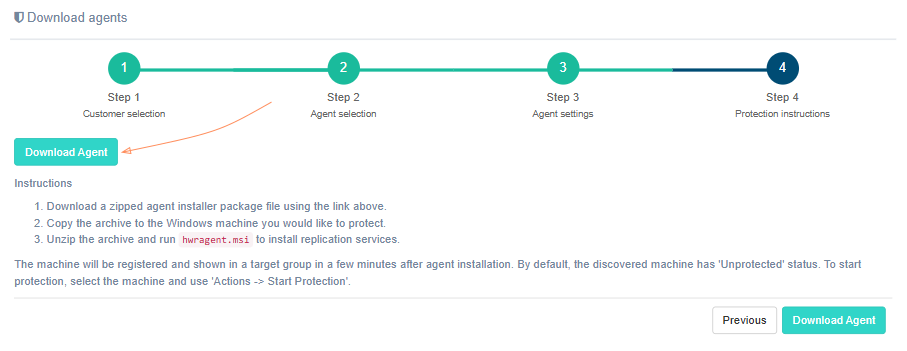
The machine will be registered and shown in a target group in a few
minutes after the agent installation. By default, the discovered machine
will have the Discovered status. To start replication, select the
machine and use Actions → Start Replication.
PostgreSQL backup agent#
Requirements#
-
PostgreSQL backup agent is available only for Storage-type target clouds.
-
- Supported OS versions:
-
- RHEL 9+
-
- Ubuntu 21.10+
Installation#
The first two steps that must be completed to successfully install the PostgreSQL backup agent are described in the section Machines replication and distribution between groups.
Step 3. Agent settings#
Select the previously created machine group and the target distribution (Debian/Ubuntu or CentOS/RHEL). Then select Next.
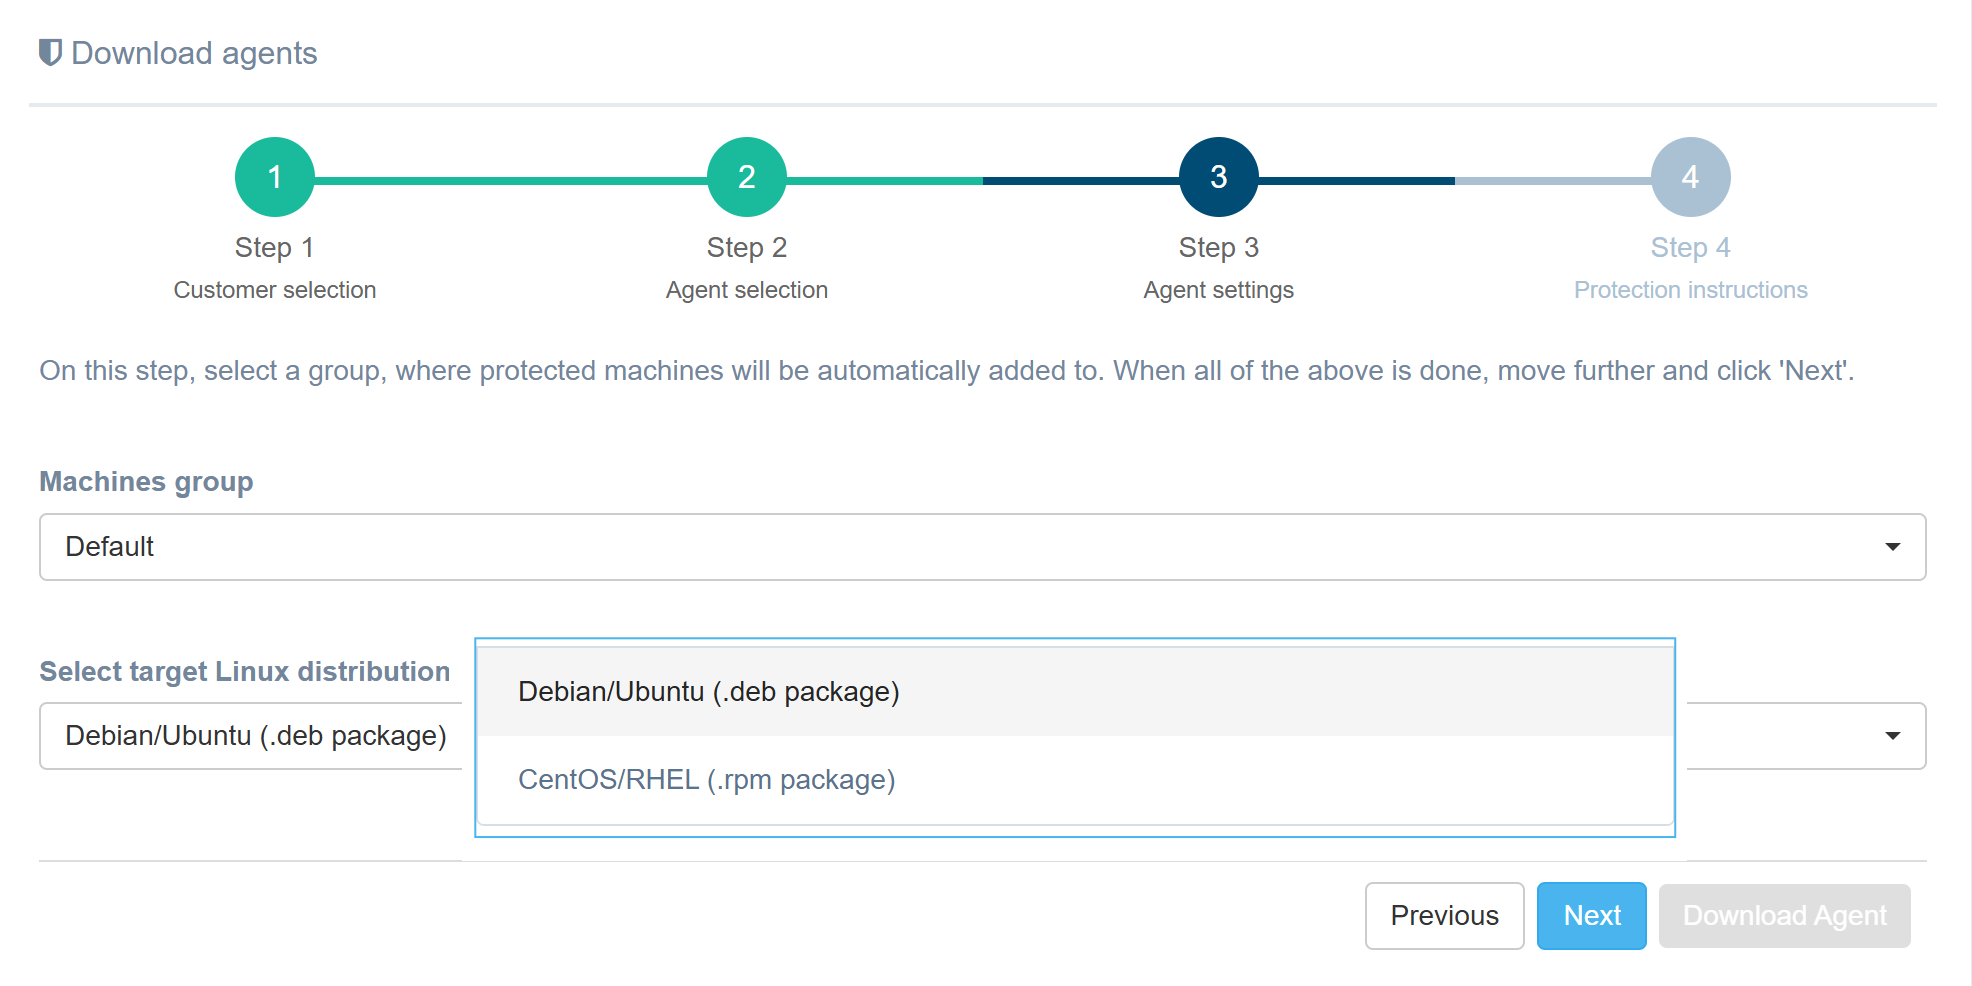
Step 4. Protection instructions#
Step 4 displays Download agent and installation instructions generated for the selected settings. Use the on-screen commands and values exactly as shown. After installation completes and the agent connects, the detected machine appears in the selected machine group.
External-agent TUI configuration#
VMware, oVirt, and OpenStack replication agents use this TUI to change network settings, IP addresses, and configuration files. The main window displays the agent ID in the format AGENT_ID(CLOUD_ID)@CUSTOMER_ID, status information, and logs. It provides To console and Agent options.
Agent logs are stored at the following paths:
- VMware agent:
/var/log/cabrio/cabrio.log - oVirt agent:
/var/log/orca/orca.log - OpenStack agent:
/var/log/orca/orca.log
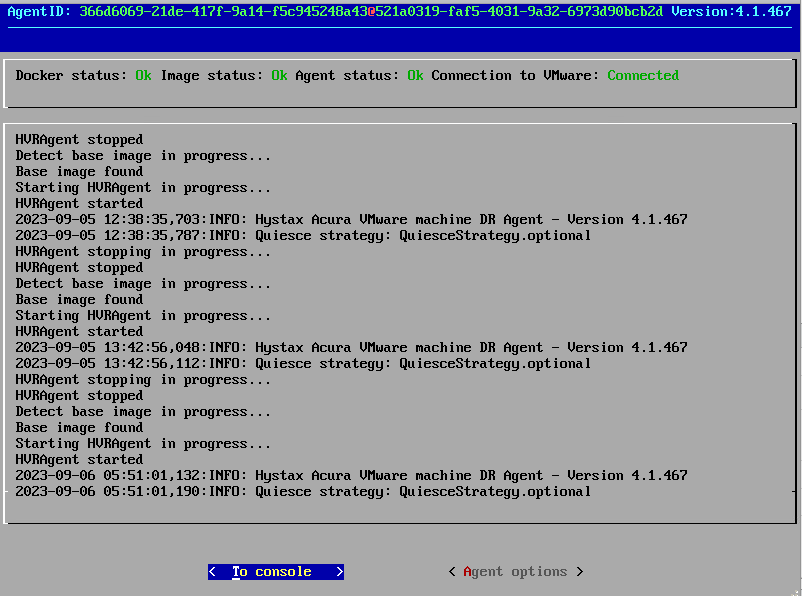
Select To console to configure the agent from the command line, or select Agent options to use the recommended menu.
Note
Use Agent options for the recommended configuration workflow.
You can also access the TUI through SSH. Use username user and password px%96jA-8zX{ to log in, or use the SSH key configured in the cloud. Select Exit console to close the SSH session.
Console#
Select To console to open the console. Use the displayed command list to configure parameters. Enter exit to return to the TUI.
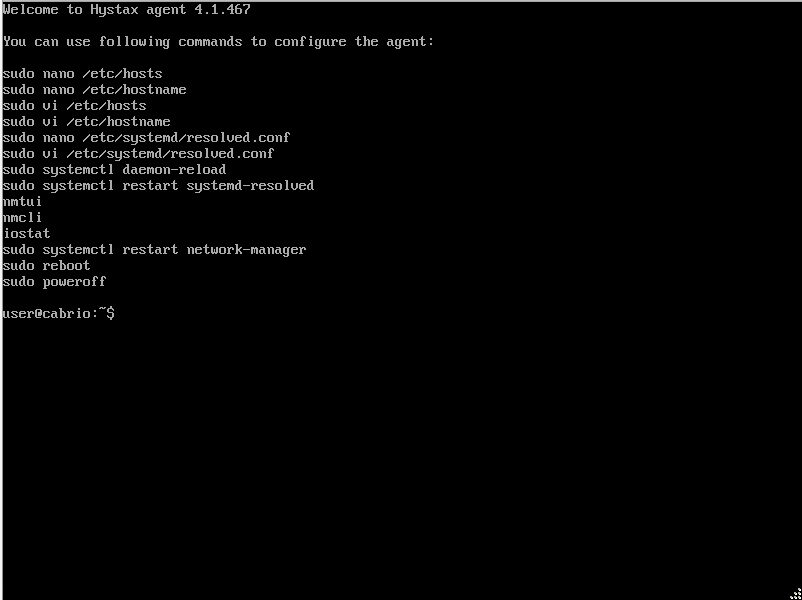
To edit the machine hostname, run sudo vi /etc/hostname or sudo nano /etc/hostname.
Note
Restart the machine to apply the changes.
Agent options#
Note
Select Agent options to open the menu.
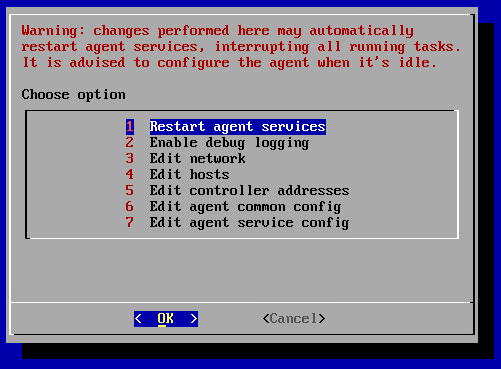
Warning
Changes made here may automatically restart agent services, interrupting all running tasks. Configure the agent when it's idle.
- Restart agent services restarts the services after confirmation. Confirm the restart in the main-window logs.
- Enable/disable debug logging adds or removes debug information from the log. By default debug information is disabled.
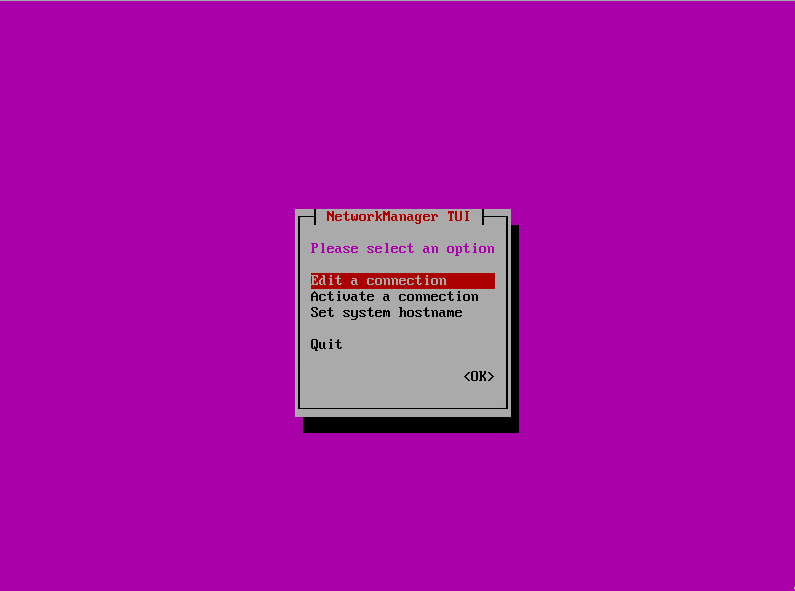
- Edit network opens the NetworkManager TUI.
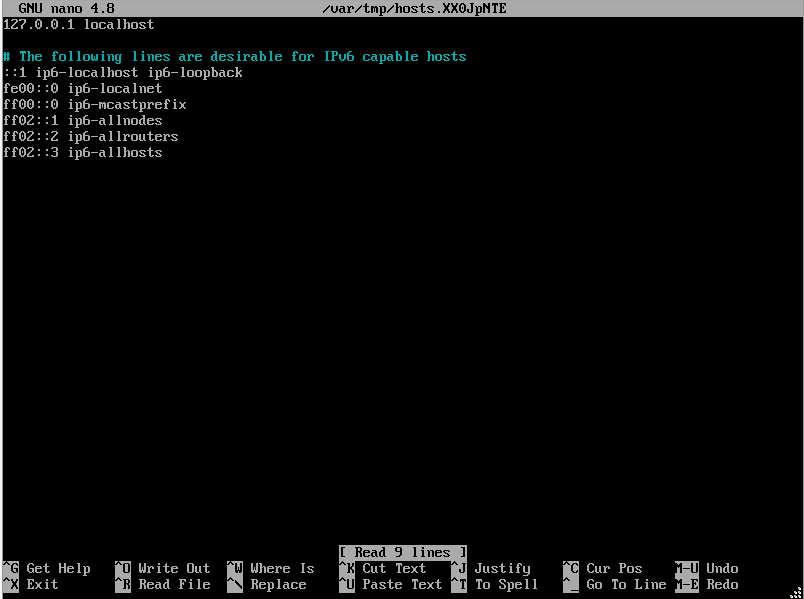
- Edit hosts opens GNU nano to edit
/etc/hosts. Use it to specify DNS names manually.
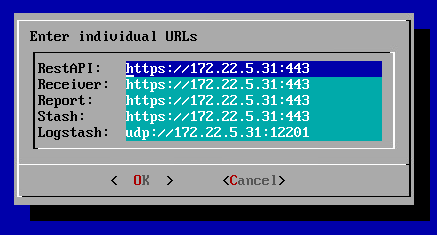
- Edit controller addresses opens the address menu for updating IP addresses and ports.
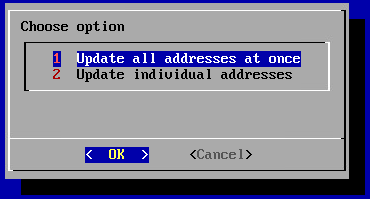
Select Update all addresses at once to update the controller address:
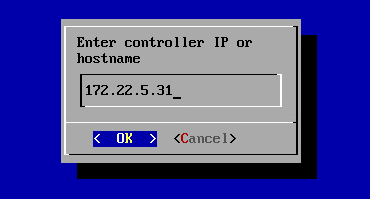
Select Update individual addresses to configure the REST API, receiver, report, stash, or Logstash address separately:
- Edit agent common config opens GNU nano to edit the common configuration file. Update certificates, users, agent IDs, or controller addresses as needed.
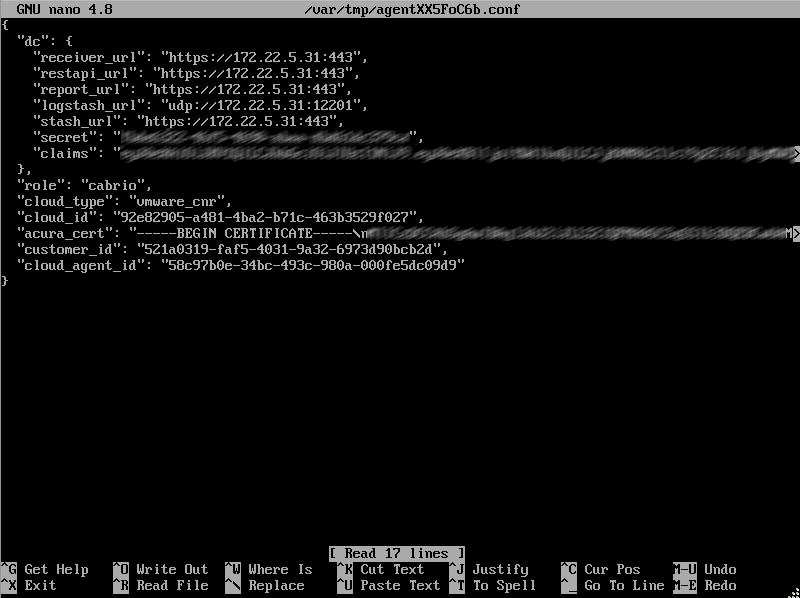
Warning
Do not update role and cloud_type fields.
- Edit agent service config opens GNU nano to edit the service configuration file.
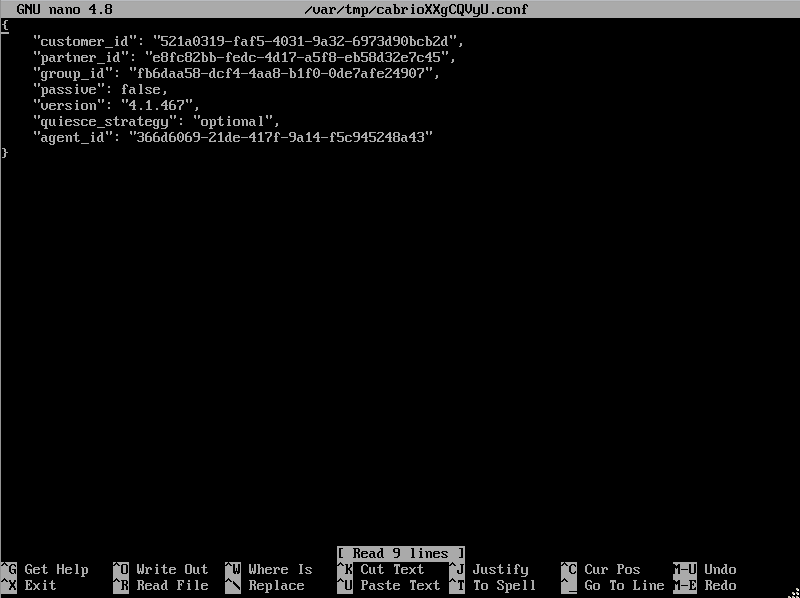
Note
File content depends on the agent type.
Configure replication settings#
This action is available for machines that have already been detected.
Once machines have appeared in the list and replication has been enabled for the specified machines, it is necessary to set replication schedules and snapshot storage policies. This is described in the sections Edit replication schedule and Edit retention settings.
For a Storage cloud type set backup and recovery location parameters in the Edit machine settings menu.
Create the initial consistent snapshot#
A snapshot is a point-in-time representation of a protected machine. The initial snapshot serves as the baseline for all subsequent replication operations. After protection is started, the platform creates a consistent snapshot of the machine and transfers the data to the target storage. Once the initial snapshot is completed, subsequent replication cycles transfer only the detected changes, unless otherwise specified in the replication settings. This approach reduces network traffic and storage consumption while maintaining up-to-date recovery points.
Go to the Machines tab, select all machines in the group using the check box, and then select Bulk Actions → Start Protection.
Retrieve machines snapshots and detecting changes#
Depending on the initial virtualization platform, it is possible to obtain consistent snapshots of machines in one of the following ways:
- in case of replicating machines on VMware, getting snapshots of Windows and Linux machines is done with standard tools of VMware (VMware CBT API), leveraging a chain of internal API calls and snapshots as well as the means of the machine's OS itself.
- in the case of replicating machines from oVirt, getting snapshots of the machines is done using standard oVirt tools. oVirt takes a snapshot at the start of replication, at the end of replication it deletes the snapshot from the previous replication, leaving a new one, an incremental replica is taken based on the definition of new blocks between two snapshots. In this regard, it is not recommended to delete the latest snapshot of the source machines. The oVirt API is used to create snapshots, and the oVirt-imageio API is used to read data.
- in the case of replicating machines from OpenStack, getting instance images with volume snapshots on each disk is done using OpenStack API. Old images (agent-created only), except the latest one from successful replication, will be removed. Reading and getting changed areas will be performed by using the Ceph RBD client for each volume snapshot. In this regard, it is not recommended to delete related images and the latest agent-created volume snapshot of the source machines to continue the replication process as incremental restore points.
- for Windows machines, consistent snapshots are acquired by means of Volume Shadow Storage (VSS) calls and tracking changes between two Application-consistent snapshots
- for Linux machines, consistent snapshots are acquired by implementation of the VSS snapshot analog for block devices and sending changes to the snapshot store.
Warning
In case of a VMware infrastructure replication, VMware Tools must be installed on your virtual machines.
Transfer deltas to storage and data deduplication#
Deltas are the accumulated changes since the last replication.
Sending changes to the DC is done using the customer agent secure HTTPS protocol. This constitutes the deduplication process - the customer application only sends data that is not yet stored for the given customer allowing to significantly save the amount of transferred items, reduce load on the network and, at times, accelerate replication of machines.
In addition to WAN deduplication, optimization also includes compression of the network traffic.