KubeVirt#
Installation requirements#
- Golden image with Hystax Acura Controller and Hystax Cloud Agent.
-
Resources to launch a virtual machine instance created from the Hystax Acura Golden image:
- 8 vCPUs,
- 16GB RAM,
- 250GB SSD disk.
-
Resources to launch a virtual machine for the Hystax Cloud Agent. Created in each target / failover namespace:
- 2 vCPUs,
- 4GB RAM,
- 20GB disk.
-
Network connectivity between source site and Hystax Acura VM instance via ports tcp/443 and udp/12201.
- Network connectivity for Acura user via tcp/443 (UI/API) and tcp/4443 (Initial configuration UI, closes after).
Installation steps#
Cloud configuration#
KubeVirt includes a service called the Containerized Data Importer (CDI), which can either download a VM image from a provided URL or accept image data directly from a client. Below is an example of the latter:
1. Forward port.
In the first terminal, forward the CDI Upload Proxy to your local machine:
kubectl port-forward --namespace kubevirt deployment/cdi-uploadproxy 8443:8443
If the command fails, verify that the namespace is correct. Run kubectl get deployment -A to list all deployments across all namespaces and find where cdi-uploadproxy is located.
2. Upload image.
In the second terminal, upload the controller and Cloud Agent images as new Persistent Volume Claims:
virtctl image-upload pvc acura-controller-pvc --size=200Gi --storage-class=<STORAGE-CLASS> --volume-mode=block --access-mode=ReadWriteOnce --image-path=<CONTROLLER-IMAGE-PATH> --uploadproxy-url=https://127.0.0.1:8443 --insecure
virtctl image-upload pvc acura-cloudagent-pvc --size=10Gi --storage-class=<STORAGE-CLASS> --volume-mode=block --access-mode=ReadWriteMany --image-path=<AGENT-IMAGE-PATH> --uploadproxy-url=https://127.0.0.1:8443 --insecure
Replace:
<CONTROLLER-IMAGE-PATH>with the controller image file name (including extension).<AGENT-IMAGE-PATH>with the Cloud Agent image file name (including extension).<STORAGE-CLASS>with one of the available storage classes. Runkubectl get scto list them.
3. Deploy instance.
Save the following configuration as acura-controller.yaml and run kubectl apply -f acura-controller.yaml to create the controller VM.
Sample Acura VM config:
apiVersion: kubevirt.io/v1
kind: VirtualMachine
metadata:
  name: acura-controller
spec:
  runStrategy: Always
  template:
    metadata:
      name: acura-controller
    spec:
      domain:
        cpu:
          cores: 4
        resources:
          requests:
            memory: "16Gi"
        devices:
          disks:
          - name: rootdisk
            disk:
              bus: virtio
          - disk:
              bus: virtio
            name: cloudinitdisk
          interfaces:
          - name: default
            masquerade: {}
      networks:
      - name: default
        pod: {}
      volumes:
      - name: rootdisk
        persistentVolumeClaim:
          claimName: acura-controller-pvc
      - name: cloudinitdisk
        cloudInitNoCloud:
          userData: |-
            #cloud-config
Notes:
-
Do not deploy the Cloud Agent instance manually. Acura automatically creates Cloud Agent instances with ephemeral disks, using the Cloud Agent PVC as a template.
-
In this example, Acura ports are not exposed to the outside world. Use an appropriate method of exposing ports to allow connections from the source site and for user operations.
Pass Acura initial configuration#
Once the VM is started, wait approximately 20 minutes for it to boot up, then open its EIP in a web browser. Please accept the certificate warnings to be redirected to the initial configuration page.
If the solution is inaccessible, refer to this instruction.
Step 1. Admin user creation.
Enter the organization name and new Hystax Admin User credentials into the Setup Wizard. This is the user account for logging in to Hystax Acura Control Panel and managing the system. If there are any errors, the system notifies you.

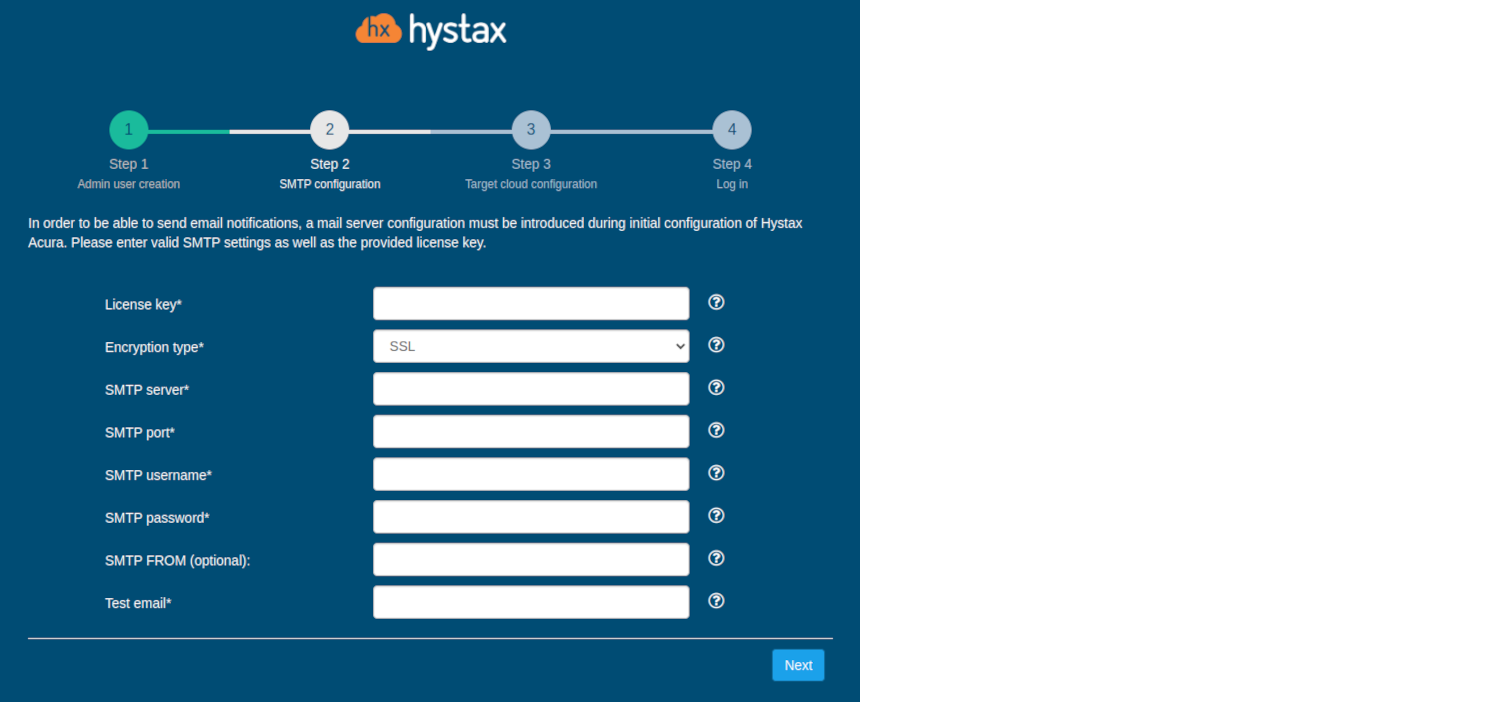
Step 2. SMTP configuration.
Fill in your Hystax License key that was supposed to be shared with you in advance as well as the settings for accessing your mail server used to send notifications from Acura and generate periodic reports.
Warning
SMTP server with TLS/SSL encryption is required to proceed with deployment.
A sample notification is sent to the specified "Test email" to verify the functionality when you click "Next".
Step 3. Target cloud configuration.
Fill in all the fields by providing cloud configuration details. Use question mark icons to get hints on the fields. After you click "Next", the Setup Wizard validates the entered data and notifies you in case of an error.
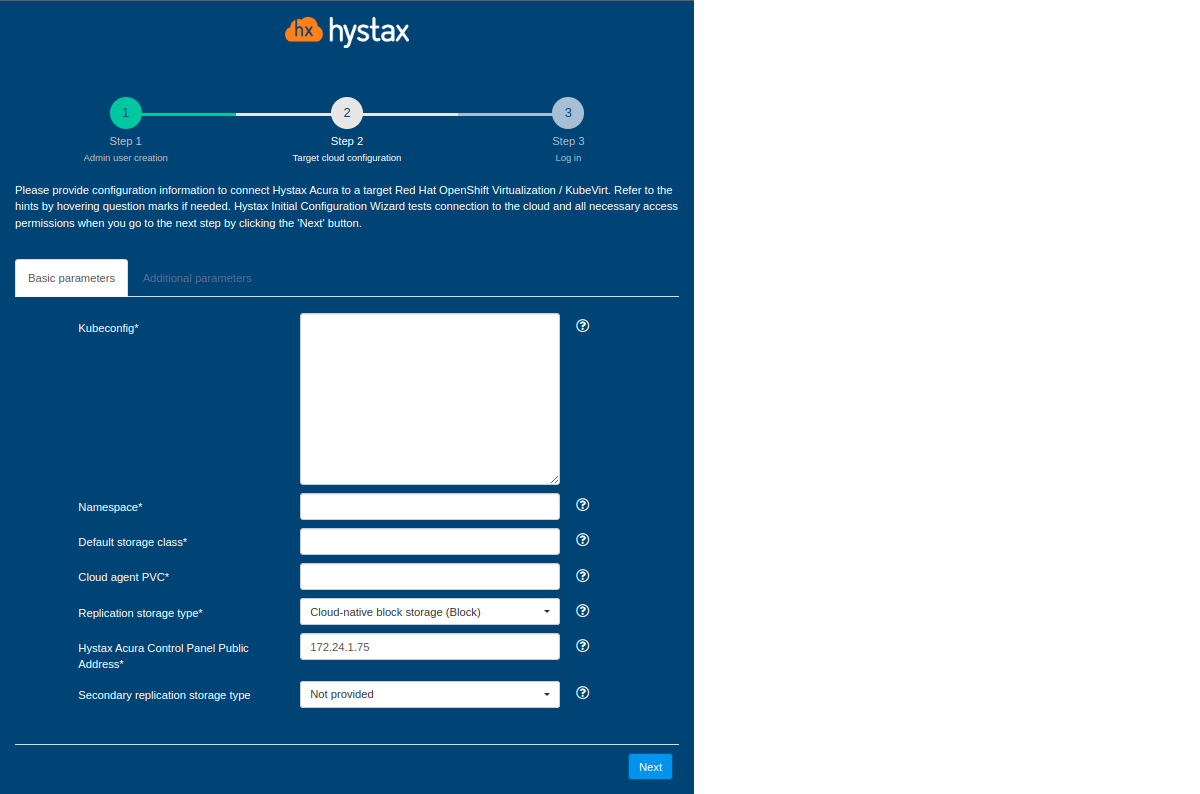
Detailed description of the fields.
Click "Next" to start cloud validation.
Step 4. Log in.
Once the validation is complete, click on the "Log in" button, and log into Acura Control Panel. Accept the certificate warnings if needed.
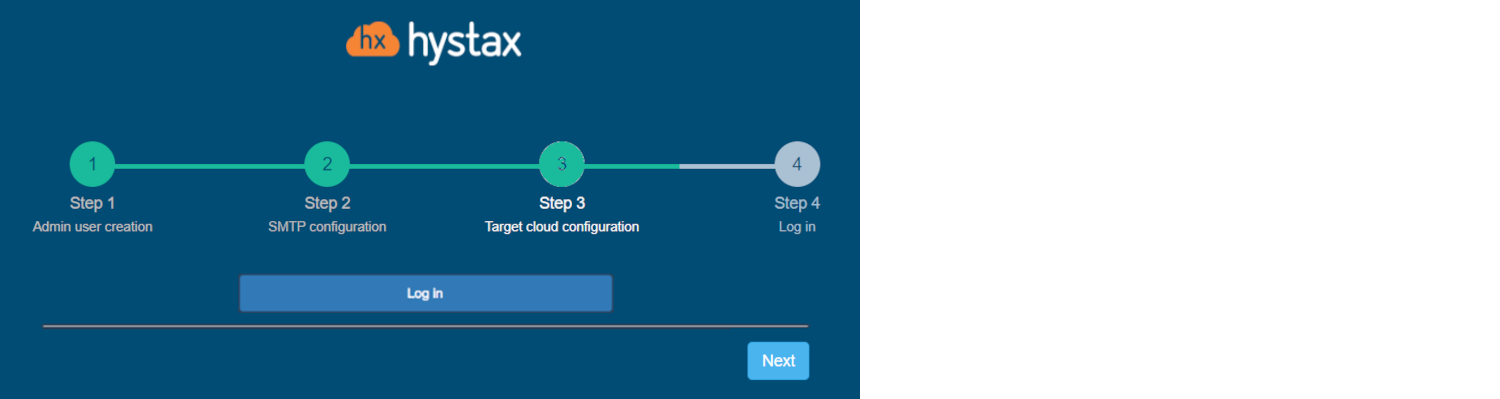
Congratulations, you are now ready to use Acura! Just enter the administrator username and password specified on the first step of installation in the login page of the solution.
Operational details and limitations#
Resource IDs and names
To simplify resource identification, Acura generates its own unique IDs and stores them in the hxreplica/resource-id label for every resource it creates.
These IDs are appended as a name suffix for all created resources, except for migrated VMs: it is allowed to specify any name in the DR plan, and Acura uses that exact name without a suffix. Note that the resource ID labels are still present on migrated VMs.
Flavor names
KubeVirt flavor names in Acura are synthetic – in {cpu}-{ram} format (just like on VMware).
For example, flavor 2-4 creates a VM with 2 CPU cores and 4 GiB of RAM.
The flavor is configured using the parameter of the same name in the DR plan; see the section Syntax of machine description for details.
Snapshot support
The solution always runs in snapshot-less mode, with the usual limitations:
-
Only one restore point is kept.
-
The machine is blocked if there are active recoveries.
-
The next replication after recovery is full.
-
No automated failbacks or failover downloads (failback as reverse migration is possible, though).
Cloud volumes
Warning
Turn on DeclarativeHotplugVolumes or HotplugVolumes to enable working with cloud volumes.
Cloud volumes created by Acura are PVCs. Configure which storage class is used for PVCs:
- at the cloud level — via the “Default Storage Class” parameter in the target cloud settings,
- at the virtual machine level — via the “Storage Class” parameter in the “Edit replication settings” menu.
Rules for configuring storage classes:
- the storage class is specified as a string;
- the value is case-sensitive;
- the name must exactly match
metadata.name; -
multiple storage classes can be specified, separated by commas:
- the order of the classes matters;
- the first disk of a migrated VM uses the first storage class, the second disk uses the second class, and so on;
- if there are more disks than storage classes, the last class in the list is used for the remaining disks.
Additionally, configure the disk bus for migrated VMs using the disk_bus parameter in the DR plan device. The default is virtio, but scsi can set if needed.
Cloud Agent disks always use the scsi disk bus (both the boot disk and attached disks). This allows for a very high number of attached disks. However, for Cloud Agents, the attachment count is currently limited to 30 disks.
Resource tagging
Kubernetes calls tags “labels”. Acura uses labels to store resource IDs and for several other purposes. Set the “Set default tag” cloud parameter (available in the list of additional parameters for the target cloud) to label all resources created by Acura with a tag name.