Recovery process#
The recovery process consists of the following stages: preparing a Recovery Plan , configuring and launching the Cloud Site , verifying service availability and functionality on the running VMs, optionally downloading failover images of virtual machines, performing Failback to production, and completing the process by deleting the Cloud Site.
Perform regular Cloud Site testing to ensure that recovery processes actually work and meet expectations. Regular testing helps identify configuration issues, network misconfigurations, and dependency problems before a real disaster occurs, and increases confidence in service availability and compliance with RTO and RPO targets. As a result, the risks of downtime and data loss during an actual failure are reduced.
Available recovery scenarios#
The scenarios below describe recovery actions for machines that are discovered in Hystax Disaster Recovery and replicated (protecting machines).
Recovery as a Virtual Machine#
The Recovery as a Virtual Machine scenario is used when you need to start a virtual machine from a specific recovery point using a Recovery Plan and a Cloud Site.
The recovery workflow consists of the following steps:
-
Execute the Recovery Plan using one of the following options:
-
the Launch button on the Plans tab
-
the Recover option in the left-hand navigation menu
-
Wait for the Cloud Site to be created.
-
If required, launch a Failback scenario.
Restore Files and Folders#
The Restore Files and Folders scenario is used when you need to view and download individual files and folders from a specific recovery point without performing a full virtual machine recovery. For more information, see File and Folder Recovery.
The recovery workflow consists of the following steps:
-
Open the recovery point list for the selected machine.
-
Select the recovery point to use.
-
Open a File and Folder connection to browse the recovery point.
-
Download the required files and folders.
Disk Attach#
The Disk Attach scenario is used when you need to recover files and folders using an existing virtual machine, or recover a database from transaction logs. It can be used together with the Recovery as a Virtual Machine scenario to attach disks from an additional recovery point. For more information, see Disk Attach.
The recovery workflow consists of the following steps:
-
Navigate to the protected machine.
-
Select the recovery point.
-
Run the Attach Disks action.
-
Select the disks to attach and the target VM.
-
Wait for the disks to be attached to the target VM on the Cloud Site.
Download a Failover Image#
The Download a Failover Image scenario is used when you need to download backup disks as RAW images after a failover. For more information, see Failover Image Download.
The recovery workflow consists of the following steps:
-
Navigate to the Cloud Site.
-
Run the Download action.
-
Configure the TTL.
-
Download the generated RAW image files.
Failback#
The Failback scenario is used when you need to automatically create a VM on the source site from a failover VM and perform periodic incremental synchronizations. This option is available for VMware, Flexible Engine, and OpenStack source clouds, and requires downloading and deploying the Failback agent. For more information, see Failback to Production.
The recovery workflow consists of the following steps:
-
Select the source cloud type.
-
Configure credentials for the Failback agent.
-
Select the failover VM and configure the machine size and network settings.
-
Create the Failback operation on the Cloud Site.
-
Perform synchronization from the failover VM.
Download a Virtual Machine Image#
The Download a Virtual Machine Image scenario is used when you need to recover a virtual machine on the source site from recovery point disk images. For security and cleanup purposes, image downloads have a configurable TTL. For more information, see Download Image of a Replicated Machine.
The recovery workflow consists of the following steps:
-
Navigate to the protected machine.
-
Select the recovery point.
-
Run the Download Image action.
-
Configure the image download settings and TTL.
-
Download the generated image files.
Recover PostgreSQL Files#
Important
Before starting protection or recovery, ensure that all backup and recovery paths are configured correctly and that the source machine has sufficient free disk space. We recommend allocating at least 2× the size of the protected data as temporary free space.
-
Create a new target cloud with the Storage type. For instructions, see Configure a Storage Cloud.
-
Create a customer and select the cloud created in the previous step in the Cloud field. For instructions, see Add new customer.
-
Download and install the PostgreSQL backup agent on the source machine. See Getting Started with Replication Agents for the installation workflow and PostgreSQL backup agent for configuration details.
-
Prepare the required backup and recovery scripts on the source virtual machine. The scripts are located in
/usr/bin/filecbt/scripts/. A total of six scripts are used: four for backup operations and two for recovery operations. The scripts are extensively commented and include recommendations and examples that can be used as a starting point for implementation. -
Wait until the machine is detected.
-
Click Edit machine settings in the Actions menu next to the detected machine and complete the required fields in the Edit machine settings form.
-
Click Start Protection to start the initial replication process.
-
Wait until replication is complete.
-
Click Restore files and folders to start the PostgreSQL file recovery process.
-
Recover the required PostgreSQL files using the Recover button on the File and folder connections page. For navigation instructions, see Access and Download Files and Folders.
Create and prepare Recovery Plans#
Recovery Plans define recovery scenarios for protected machines. They specify the machines to recover, their configuration (such as the number of vCPUs, RAM, and recovery order), and the network settings required for the recovery process.
To view Recovery Plans, open the Plans tab on the customer page.
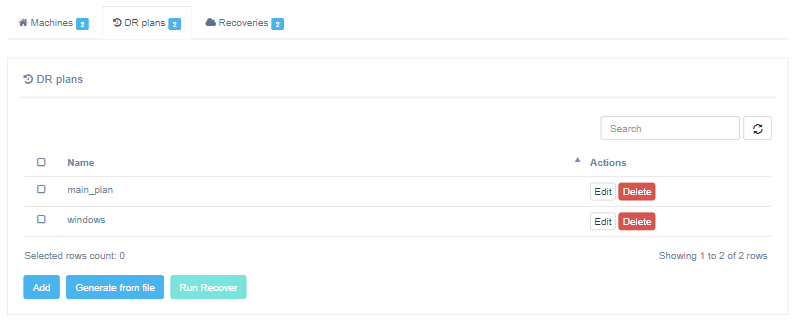
The sheer existence of an up-to-date Recovery Plan is enough for a quick recovery in case of disaster.
Create a Recovery Plan#
To create a Recovery Plan, just click Add on the Customer page.
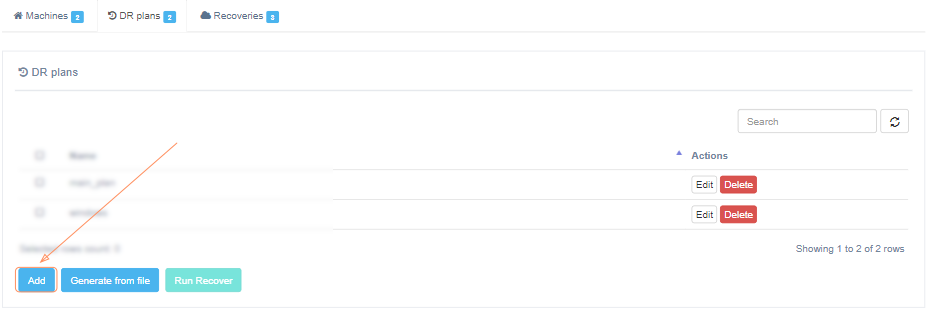
When adding a new plan, specify its name and the contents of the plan. Recovery Plan name must be unique within the customer.
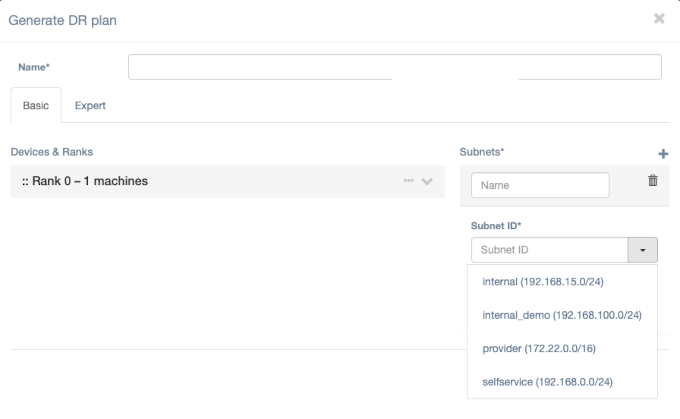
There are two modes for creating or editing a plan: Basic and Expert. To switch between them, choose the corresponding tab on the "Generate Recovery Plan" page.
In the Basic mode, the user can either paste/enter network specifications for a failover machine manually or pick the networks from the list that Disaster Recovery gets directly from the target cloud. The list of networks can be received automatically from the following platforms - VMware, OpenStack, Flexible Engine, AWS, Azure.
The Expert mode allows for a more detailed configuration that should be provided in the JSON format.
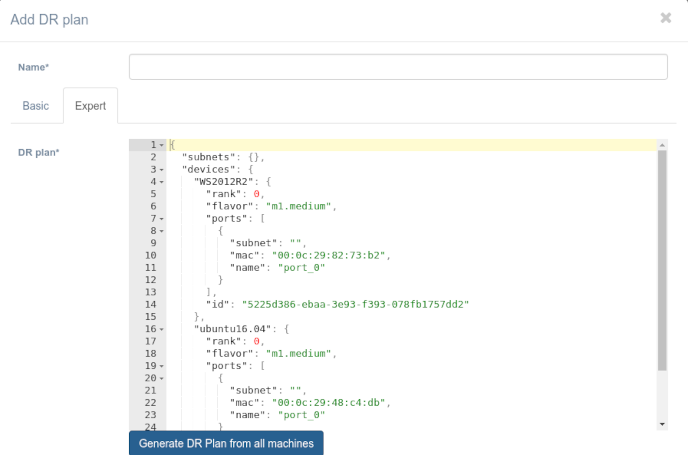
The body of a Recovery Plan is a JSON instruction for restoring the infrastructure and the business application in a DC. To generate a plan based on all customer machines, click on the link Generate Recovery Plan from all machines.
Recovery Plan for a group of machines#
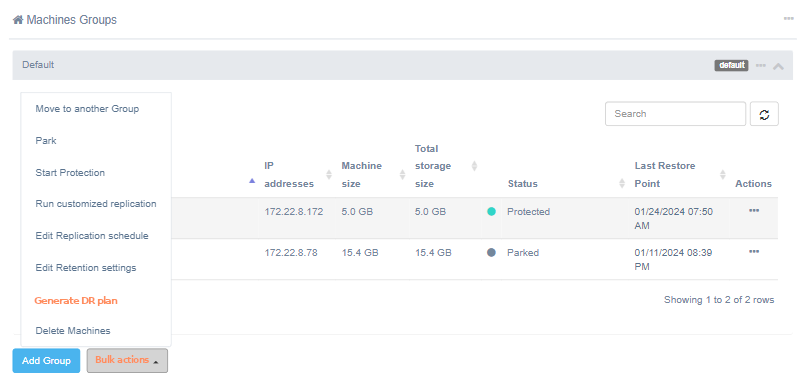
To generate a Recovery Plan for several machines and just click Create Recovery Plan in the Bulk Actions menu after selecting them
for the group machines click Create Recovery Plan in the group properties
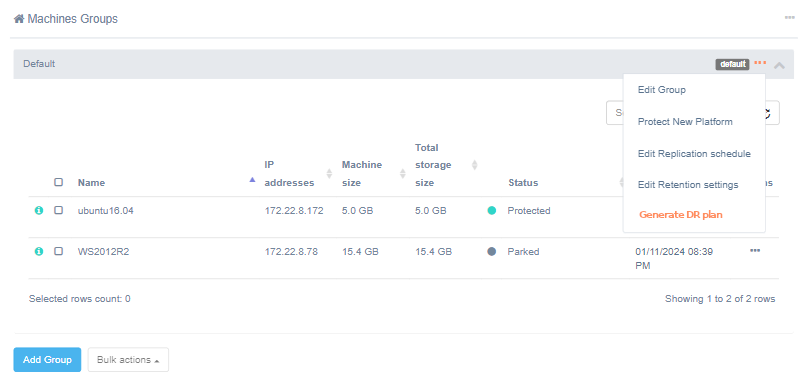
The form Create Recovery Plan opens. The plan is assigned a default name, which you can change. The plan name must be unique within the customer. The plan content is generated based on the settings of the selected machines.
Generate a Recovery Plan from a file#
This tool is best used for machines that have already been protected. It is highly efficient for multiple machines as it saves a significant amount of time when creating a plan for them.
To get started, download the machines list.
In the machines_list.csv file some fields will be automatically filled based on the replication data. Update the information in the "flavor" field, enter the "cidr" of the network in which the machine should be installed, and add information about the ports in the columns starting with "ports".
Once you have updated the file, upload it. To begin creating the Recovery Plan, click on the Apply button.
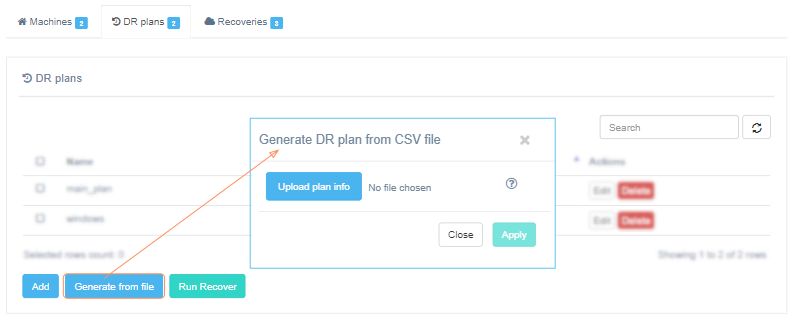
It will take some time to create the Recovery Plan, after which a window will open. In this window, you can edit the plan name and other fields if needed.
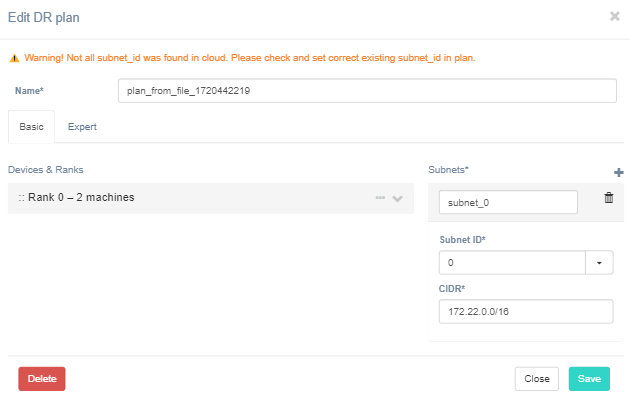
Pay close attention to the orange warning text at the top of the window, as it indicates potentially problematic areas that could cause recovery issues. Make any necessary corrections on the form.
Once you are satisfied with the plan, click on the Save button to save the Recovery Plan.
Recovery Plan syntax#
Recovery Plan body is a JSON instruction for restoring infrastructure and business application in a backup DC.
Example of a Recovery Plan:
{
    "devices": {
        "IIS-Demo": {
            "rank": 1,
            "id": "52ce9361-b282-72b6-425a-f67347c5b79a",
            "scheduler_hints": {
                "group": "0c1b2901-7687-470e-a82c-6f69e92d5245"
            },
            "ports": [
                {
                    "name": "port_0",
                    "ip": "192.168.15.112",
                    "subnet": "main_subnet"
                },
                {
                    "name": "port_1",
                    "subnet": "external"
                }
            ]
        },
        "rhel7.2": {
            "id": "522f3448-6a56-aa45-2131-207f7dda6664",
            "ports": [
                {
                    "name": "port_0",
                    "ip": "192.168.15.100",
                    "subnet": "main_subnet"
                }
            ],
            "rank": 0,
            "boot_condition": {
                "delay_seconds": 120,
                "type": "wait"
            }
        }
    },
    "subnets": {
        "main_subnet": {
            "cidr": "192.168.15.0/24",
            "subnet_id": "eda47a07-d1dd-4aca-ae8f-c652e997008e"
        }
    }
}
Basetags#
devices -- contains a description of each machine. It is necessary to list all the machines that should be recreated in the Cloud Site:
{
    "devices": {
        "rhel7.2": {
            "id": "522f3448-6a56-aa45-2131-207f7dda6664",
            "ports": {
                "port_0": {
                    "ip": "192.168.15.100",
                    "subnet": "main_subnet"
                },
                "scheduler_hints": {
                    "group": "0c1b2901-7687-470e-a82c-6f69e92d5245"
                }
            },
            "rank": 0,
            "boot_condition": {
                "delay_seconds": 120,
                "type": "wait"
            }
        }
    }
}
subnets -- contains a description of networks that need to be recreated in a backup DC:
{
    "subnets": {
        "main_subnet": {
            "cidr": "192.168.15.0/24",
            "subnet_id": "eda47a07-d1dd-4aca-ae8f-c652e997008e"
        }
    }
}
Syntax of machine description#
Machine description consists of a number of parameters describing machine properties, such as machine name, network settings, rank and conditions for loading the machines to maintain the sequence and orchestration for the launching process of the Cloud Site:
{
    "rhel7.2": {
        "id": "522f3448-6a56-aa45-2131-207f7dda6664",
        "custom_image_metadata": {
            "hw_qemu_guest_agent": "no",
            "os_require_quiesce": "no",
            "my_os_type": "linux-custom",
            "hw_disk_bus": "scsi",
            "hw_scsi_model": "virtio-scsi",
            "my_custom_image_tag": "linux"
        },
        "security_groups": [
            "sg-1",
            "sg-2"
        ],
        "availability_zone": "zone-1",
        "user_data": "#!/bin/bash\nrpm -e hlragent\nrm -rf /etc/hystax\n",
        "ports": {
            "port_0": {
                "ip": "192.168.15.100",
                "subnet": "main_subnet"
            }
        },
        "rank": 0,
        "scheduler_hints": {
            "group": "0c1b2901-7687-470e-a82c-6f69e92d5245"
        },
        "boot_condition": {
            "delay_seconds": 120,
            "type": "wait"
        }
    }
}
Machine description parameters:
| Parameter | Description | Required field |
|---|---|---|
| machine_name | Base tag for machine description. Name will be used to identify machine in the Cloud Site. | Yes |
| fix_dev_prefix | Enter the prefix to automatically update Linux target disk names during P2V. Possible values: - ‘sd’ (for names like /dev/sda1), - ‘vd’ (for names like /dev/vda1), - ‘xvd’ (for names like /dev/xvda1). Disk names are replaced as a part of Linux P2V in the following files (non-existing files are skipped): - /etc/fstab, - /boot/grub/grub.cfg (also /grub/grub.cfg in case /boot is a separate partition), - /boot/grub2/grub.cfg (also /grub2/grub.cfg in case boot is a separate partition). Example: { "devices": { "ds-debian10-sda": { "fix_dev_prefix": "vd", ... } } } |
No |
| id | Internal id of customer machine that is generated with Recovery Plan pre-generation. Can also be found by moving the mouse pointer to the machine name in the machine list on the Customer page. | Yes |
| ports | List of machine's network interfaces configurations. There can be one or more interfaces. Interfaces will be added in the same order in which they are described. Interface parameters description and example see below. | Yes |
| scheduler_hints | Specific scheduler options for failovers. Use group parameter to specify server group for OpenStack failover instances.Example: "scheduler_hints": { "group": "0c1b2901-7687-470e-a82c-6f69e92d5245" } |
No |
| rank | Order in which a group of machines will be launched. For example machines with rank 2 will be launched only after all machines with rank 1 are started and those in turn only after all machines with a rank 0 are started. | Yes |
| boot_conditions | Condition in which a machine is considered to be running. Delay in time is supported after its expiration the machine is considered to be running. The condition extends across the whole rank. If there are several machines with a delay in time the rank is considered fulfilled after waiting for the longest time. Syntax: "boot_condition": { "delay_seconds": number of seconds to wait, "type": "wait" } Example "boot_condition": { "delay_seconds": 120, "type": "wait" } |
No |
| flavor | Name or ID of an existing flavor in the target cloud. For VMware and KubeVirt target clouds, flavor is specified as vCPU-RAM, e.g. 2-4 that stands for 2vCPU and 4GB RAM Example: “flavor”: “2-4” |
Yes |
| disk_bus (KubeVirt only) | Disk controller type. Allowed values: “scsi”, “virtio”. Default, “virtio”. | No |
| config_drive | False by default. Set it as true to use the configuration drive. Example: "config_drive": "true" |
No |
| security_groups | List of security groups to use for the the machine. This will overwrite the default group(s). | No |
| availability_zone | Name of Availability Zone to use for the machine. This will overwrite the availability_zone that is specified in the cloud config settings. | No |
| user_data | Script to be executed on the target machine. To use the key “user_data”, the source machine must have cloud_init installed, otherwise, it will be ignored. This key can be used only for OpenStack target cloud. | No |
| firmware (VMware, oVirt, GCP) | Parameter that specifies the firmware used to boot the recovered machine. Supported values are BIOS, EFI, and EFI_SB (oVirt only). If not specified, BIOS is used by default.- Use BIOS for operating systems installed in BIOS mode, including legacy versions of Windows (such as Windows 7 and Windows Server 2008 R2) and older Linux distributions.- Use EFI for operating systems installed in UEFI mode, including Windows 10, Windows 11, Windows Server 2016 and later, and most modern Linux distributions.- Use EFI_SB only when recovering to an oVirt environment that requires UEFI with Secure Boot enabled.The selected firmware must match the operating system installation mode and bootloader configuration. Otherwise, the recovered machine may fail to boot. Example: "firmware": "EFI" |
No |
| guest_id | Guest operating system identifier. Refer to VMware’s official documentation Example: “guest_id”: “ubuntu64Guest” | No |
| hardware_ver | Virtual machine hardware version. Refer to VMware’s official documentation The following format is required “vmx- Example: “hardware_ver”: “vmx-11” |
No |
| byol (AWS only) | If byol is false (or not set), AWS ImportImage is used (AWS does its own P2V). If byol is true, AWS RegisterImage is used and we do our own P2V. Example: "devices": { "sd_small_ubuntu": { "rank": 0, "byol": true, } } |
No |
| ntp_server (Windows only) | Specify the protocol used by Windows operating systems to synchronize. Example: "devices": { "im-WS2019-ntp": { "flavor": "m1.medium", "ports": [ { "name": "port_0", "subnet": "provider-subnet" } ], "id": "52eef058-012b-70dd-9271-28ee5f56d171", "rank": 0, "ntp_server": "ntp6.ntp-servers.net" }, "subnets":{ "provider-subnet": { "name": "provider-subnet", "subnet_id": "6129317f-4987-4bf3-bfd0-c0edc3bc4bba", "cidr": "172.24.1.0/24" } } } |
No |
| hostname (Windows machines in OpenStack clouds only) | New hostname of the Windows machine. Can be set to: - true (default) – use machine name from plan as hostname. - false – do not modify hostname. - any string – set hostname to this string. Example: "devices": { "ds2012test": { "id": "9f51d0de-b6cb-400e-b223-5e748cc39d01", "flavor": "m1.medium", "hostname": "my-super-long-custom-hostname", "rank": 0, "ports": [ { "name": "port_0", "subnet": "DS-internal-2" } ] } }, "subnets": { "DS-internal-2": { "name": "DS-internal-2", "subnet_id": "76377dae-4e35-4183-bafa-b06eef69249e", "cidr": "172.22.0.0/16" } } |
No |
| rclocal_script | Script that runs when Linux boots. Example: "rclocal_script": "#!/bin/bash\ndate > date.txt\n" |
No |
| copy_efi_bootloader | False by default. Set it as true to use a stock bootloader. Example: "copy_efi_bootloader": true |
No |
| key_name | Key pair for a device. Example: "key_name": "yv-key" |
No |
| meta | A list of instance meta tags. OpenStack, OpenNebula. Example: "devices": { "rhel7.2": { ... "meta": { "Image Name": "Hystax_CATI_...", "Image ID": "f389c03b-...", "Image": "image", "Key Name": "username" } } |
No |
| custom_image_metadata | Set custom image metadata for replicated machines. OpenStack only. Example: "custom_image_metadata": { "hw_qemu_guest_agent": "no", "os_require_quiesce": "no", "my_os_type": "linux-custom", "hw_disk_bus": "scsi", "hw_scsi_model": "virtio-scsi", "my_custom_image_tag": "linux" }, It is possible to set the parameter as a string with a JSON object: "custom_image_metadata": "hw_qemu_guest_agent=no,os_require_quiesce=no,my_os_type=linux-custom,hw_disk_bus=scsi,hw_scsi_model=virtio-scsi,yv_custom_image_tag=Linux". Alternatively, this parameter can be set as an additional option during the initial configuration step or when adding a cloud. Note that if the parameter is set both during initial configuration/cloud addition and in the Recovery Plan, the Recovery Plan settings take priority and will be applied to the cloud, even if the value is an empty string. |
No |
Ports' interface description has the following parameters:
| Parameter | Description | Required parameter |
|---|---|---|
| name | Interface name | Yes |
| ip | Interface IP address. Windows adapters will be configured as DHCP by default. If you want to set static configuration, use this field in conjunction with mac field. |
No |
| mac | Interface mac address. Ignored for AWS target cloud. | No |
| subnet | Subnet name that the interface will belong to | Yes |
| routing_allowed | Allows machine to be a router (has “true” or “false” values, default value is “false”). Ignored for AWS target cloud. | No |
| floating_ip | Adds floating_ip for port (has “true” or “false” values, default value is “false”). Using this parameter with the “true” value limits the machine to have only one port. “floating_ip”: “ |
No |
| mtu (Windows only) | The largest size of a packet that can be sent in a network connection without needing to be fragmented. Use in conjunction with a mac address. Example: "devices": { "DS2012R2MULMBR": { "id": "9f51d0de-b6cb-400e-b223-5e748cc39d01", "flavor": "m1.medium", "rank": 0, "ports": [ { "name": "port_0", "ip": "172.22.8.249", "mac": "08:00:27:46:79:29", "gateway_ip": "172.22.1.2", "dns_nameservers": [ "172.22.1.2", "8.8.4.4" ], "mtu": 1511, "subnet": "DS-internal-2" } ] } }, "subnets": { "DS-internal-2": { "name": "DS-internal-2", "subnet_id": "76377dae-4e35-4183-bafa-b06eef69249e", "cidr": "172.22.0.0/16" } } |
No |
| interface (KubeVirt only) | Interface type. Allowed values: “masquerade” or “bridge”. Default: “masquerade”. | No |
Examples:
"ports": [
    {
        "name": "port_0",
        "ip": "192.168.15.100",
        "subnet": "main_subnet"
    }
]
Ports, subnets, mac, ip, gateway, and dns. To set static - use mac (windows failover):
{
    "devices": {
        "sd_small_ubuntu": {
            "rank": 0,
            "ports": [
                {
                    "name": "port_0",
                    "ip": "172.22.8.144",
                    "mac": "08:00:27:46:79:27",
                    "gateway_ip": "172.22.1.2",
                    "dns_nameservers": [
                        "172.22.1.2",
                        "172.22.1.3"
                    ],
                    "subnet": "subnet_1"
                }
            ],
            "id": "5260881c-c921-f037-df78-6105f018a9c2",
            "flavor": "m1.medium"
        }
    },
    "subnets": {
        "subnet_1": {
            "name": "subnet_1",
            "cidr": "172.22.0.0/16"
        }
    }
}
In the case of floating IP:
{
    "devices": {
        "centos": {
            "ports": [
                {
                    "name": "port_0",
                    "floating_ip": true,
                    "subnet": "subnet_0"
                }
            ]
        <...>
        }
    }
}
Syntax of network description#
Network description consists of a number of parameters, such as network name, its CIDR and the address of DNS servers.
Example:
{
    "subnets": {
        "main_subnet": {
            "cidr": "192.168.15.0/24",
            "subnet_id": "eda47a07-d1dd-4aca-ae8f-c652e997008e"
        }
    }
}
Network description parameters:
| Parameter | Description | Required parameter |
|---|---|---|
| network name | network identifier name is a base tag for network description | Yes |
| cidr | network CIDR | Yes |
| subnet_id | existing subnet ID in the target cloud. | Yes |
Warning
Specified subnet_id must be available for the used Availability Zone.
Edit existing Recovery Plan#
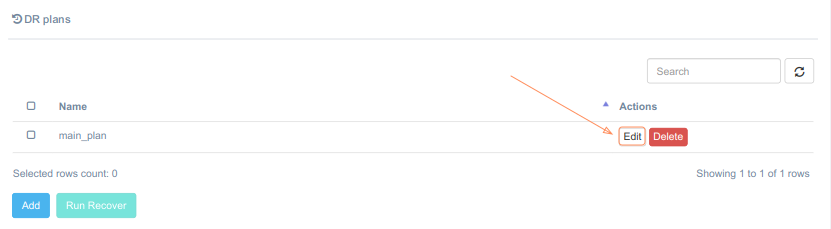
To edit an existing Recovery Plan, open the Plans tab on the customer page and click Edit for the required plan.
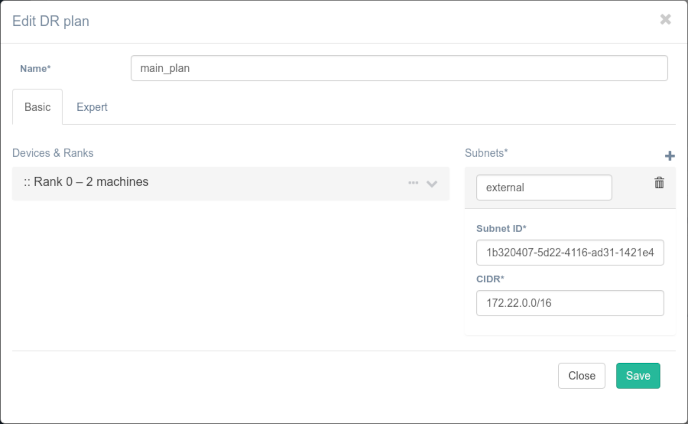
The Edit Recovery Plan form opens. Modify the required settings.
Failure Preparation. Recovery Plans testing#
To prepare for failures in advance and minimize associated risks, we recommend performing testing at least once every 3–4 weeks. To do this:
-
Create or update a test suite to verify the functionality of the recovered test VMs. Note that this test suite should be prepared as part of the disaster recovery strategy and adapted to the customer’s infrastructure; both the customer and the disaster recovery service provider share responsibility for its preparation.
-
Start the Cloud Site creation process. There are several ways to do this — choose the most convenient one:
- Use the Launch button on the Plans tab.
- Use the Recover button in the left-hand menu.
For more details, see the Cloud Site creation article.
-
Run the test suite prepared in step 2 on the machines of active Cloud Site.
-
Delete the Cloud Site.
-
Update the recovery plan (for example, add descriptions of new machines or remove outdated ones) and the test suite if necessary. Repeat steps 3–6.
Recovery at the time of an accident#
During recovery in the event of an accident, it is important not only to maintain availability and minimize data loss, but also to restore services as quickly as possible. We recommend perform a set of steps:
-
Create Cloud Site. At the second step of the wizard, create a custom Recovery Plan if existing plans do not meet your needs.
Note
The process takes time, and its duration depends on the complexity of the Recovery Plan structure and the orchestration and dependency levels between application components. Once all components reach the Active status, the business application is ready for operation, proceed to the next stage.
-
Use a simplified set of tests executed in the Cloud Site before switching production traffic to the new target.
-
Transfer the main traffic to the backup site and configure individual components.
Warning
Redirecting the main traffic to a data center (DC) is not part of the platform’s current functionality and should be coordinated with the service provider in advance.
-
Perform Failback to the production.
- Delete the Cloud Site.
Failback to production#
Failback is the process of restoring a system or business application from a backup (disaster recovery) site to the primary site once the issue has been resolved.
The procedure is carried out step by step and includes the following:
1. A Cloud Site is used for Failback. See how to launch a Cloud Site.
2. Download the Failback agent and deploy it to the destination site.
3. Initiate the Failback process. The application supports Failback for three cloud types: VMware, Flexible Engine, and OpenStack. For other cloud environments, use the reverse migration procedure.
4. Once synchronization is finished, launch the machines in the production environment and redirect user traffic.
5. Set up protection for the updated production environment by ensuring proper backup and disaster recovery configurations.
After completing these steps, the business application resumes normal operation with all changes accumulated since traffic was switched to the backup site.
Failback to VMware#
VMware Failback Agent requirements#
- Ports for correct agent work:
-
- Communicate with the Disaster Recovery host - egress tcp/443
-
- vSphere host - egress tcp/443
-
- ESXi host(s) - egress tcp/udp/902
-
- Send logs to the Disaster Recovery cluster - egress udp/12201
But please note, there is a number of host permissions that the agent requires for a successful failback. For ESXi 6.0 - 6.5 the list of permissions is as follows:
- VirtualMachine.Inventory.Create
- VirtualMachine.Inventory.Delete
- VirtualMachine.Config.Rename
- VirtualMachine.Config.UpgradeVirtualHardware
- VirtualMachine.Configuration.Add New Disk
- VirtualMachine.Configuration.Raw Device
- Resource.Assign VirtualMachine to Resource Pool
- Datastore.Allocate Space
- Network.Assign Network
- VirtualMachine.Interact.PowerOn
- VirtualMachine.Interact.PowerOff
- VirtualMachine.Config.AdvancedConfig
- VirtualMachine.Provisioning.DiskRandomAccess
- VirtualMachine.Provisioning.DiskRandomRead
- VirtualMachine.State.Create Snapshot
- VirtualMachine.State.Revert Snapshot
- VirtualMachine.State.Remove Snapshot
- VirtualMachine.Configuration.CPUCount
- VirtualMachine.Configuration.Memory
- VirtualMachine.Config.AddRemoveDevice
- VirtualMachine.Config.Settings
For ESXi 6.5 and higher, create a role with the following privileges:
-
Datastore → Allocate space
-
Global → Enable methods
-
Network → Assign network
-
Resource → Assign Virtual machine to resource pool
-
Virtual machine → Change Configuration
- Acquire disk lease
- Add new disk
- Add or remove device
- Advanced configuration
- Configure Raw device
- Toggle disk change tracking
- Change CPU count
- Memory
-
Virtual machine → Edit Inventory
- Create from existing
- Create new
-
Virtual machine → Interaction
- Backup operation on virtual machine
- Power off
- Power on
-
Virtual machine → Provisioning
- Allow disk access
- Allow read-only disk access
- Allow virtual machine download
-
Snapshot management
- Create snapshot
- Remove snapshot
- Revert to snapshot
VMware Failback Agent installation#
To ensure a successful Failback operation, first download and deploy the Failback agent: go to the client page → Manage Clouds. If the migration is being performed to a new cloud, add it first. Then open Actions and select Download Failback Agent. Follow the deployment instructions:
- Download the OVA file from the link above and deploy it on each ESXi host in the target VMware cluster.
- Start the virtual machines (agents) from the OVA file on each ESXi host. This is required to enable data transfer from the running Cloud Site.
A few minutes after installation and startup, the ESXi hosts appears in the list of available hosts. Use them to recreate virtual machines during the Failback operation. Update the datastore for each machine according to the selected host.
VMware Failback Process#
Failback process includes five (for the partner) or four (for the customer) steps. It starts from the Failback button of the menu
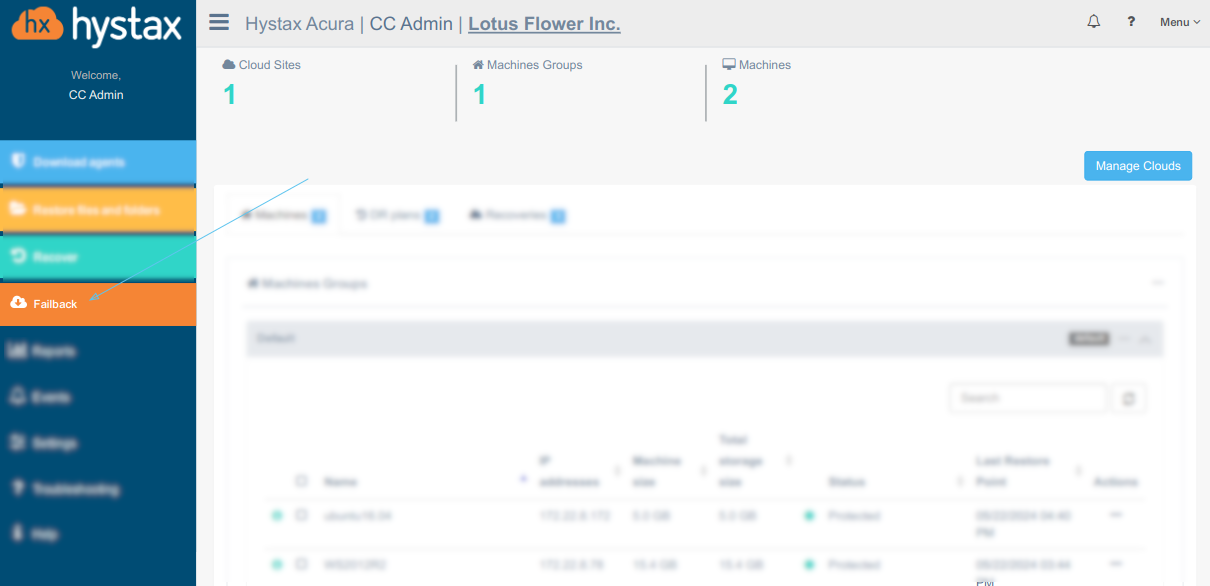
Failback consists of five steps for the partner or four steps for the customer.
Let’s review the sequence for the partner.
Step 1. Select customer
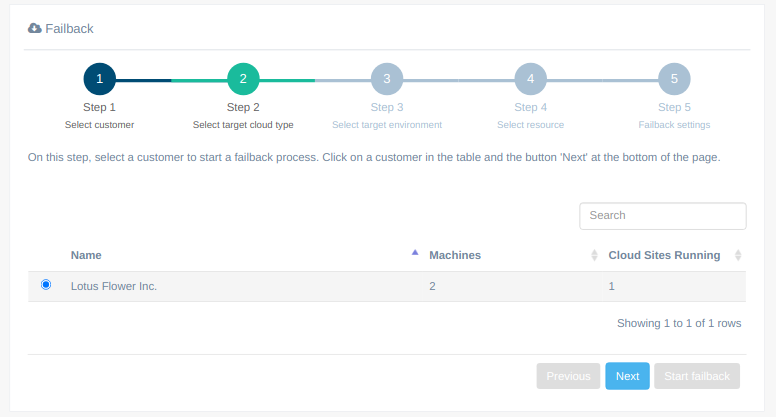
Step 2. Select target cloud type
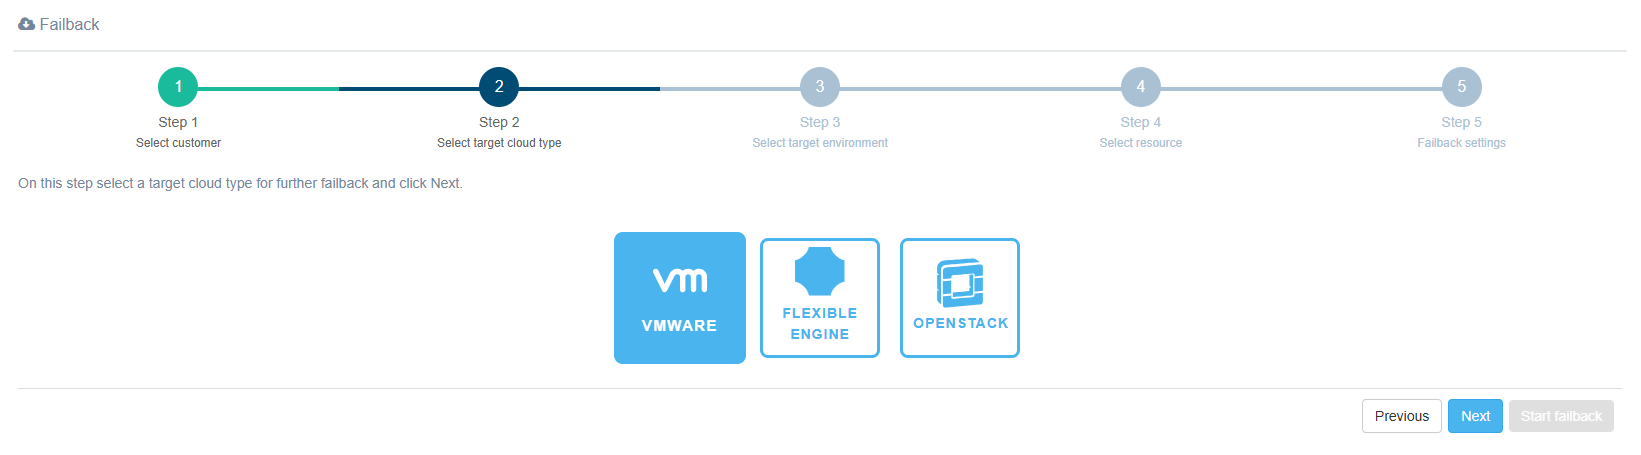
Step 3. Select target environment
Select a VMware vSphere from the list or add a new one.
Note
This guide outlines the steps for configuring a new cloud during Failback. However, it is recommended to configure it in advance, before initiating the Failback process.
When registering a new cloud, fill in only four fields.
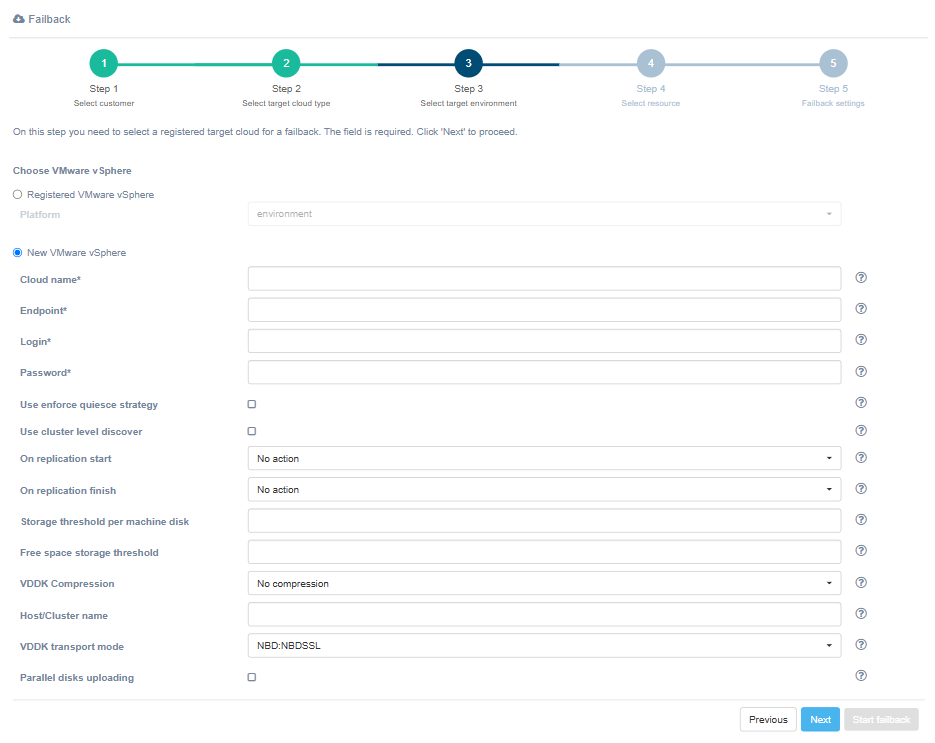
Note
The remaining fields do not affect the Failback agent configuration. Leave them unchanged.
| Field | Description | Example |
|---|---|---|
| Cloud name | The name of the cloud shown in the UI. The name must be unique. | Failback cloud |
| Endpoint | Endpoint to connect to | 192.168.5.2 |
| Login | User login | user |
| Password | Password to access the target cloud | passw |
Warning
When using DVS, it is recommended to configure vCenter as the endpoint instead of an ESXi host, as the vCenter metadata service is utilized.
Ensure that the user account used for access has the necessary permissions for DVS.
Step 4. Select resource
Select the Cloud Site and machines for Failback, fill in the Flavor and Target network name fields, and the Next button becomes active.
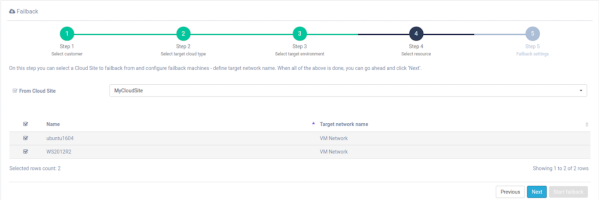
Step 5. Failback settings
Specify a name for the Failback. The RAM and CPU fields are filled in automatically based on the parameters defined in step 4. Select the Target ESXi hostname and Target datastore from the lists. These lists are generated based on data received from the Failback agent, so it is important to install it beforehand.
Note
If the Failback agent has not been installed beforehand, download it at step 5 and deploy a virtual machine from it. Do not start the Failback process until the agent is installed.
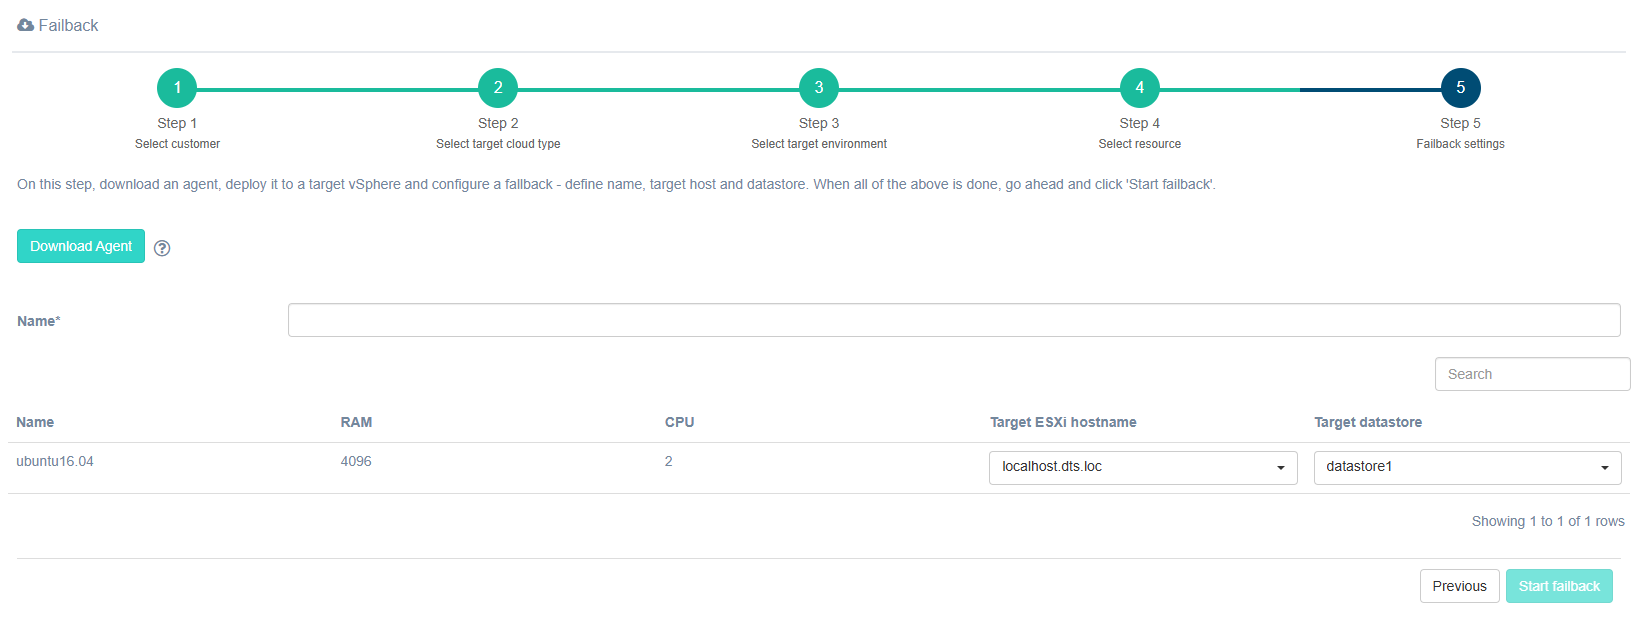
The Start Failback button becomes available after all fields are filled in.
Custom Recovery Plan parameters for VMware#
For VMware, Failback parameters can be provided via the API.
Example of a VMware Recovery Plan:
{
"devices": {
   "ubuntu-small": {
      "id": "52560751-12ca-9b0e-db00-02cb718a138a",
      "guest_id": "centos64Guest",
      "hardware_ver": "vmx-11",
      "flavor": "1-2",
      "rank": 0,
      "ports": [
      {
         "name": "port_0",
         "mac": "de:ad:be:ef:15:89",
         "subnet": "net"
      }
      ]
   }
},
"subnets": {
   "net": {
      "name": "net",
      "subnet_id": "VM Network",
      "cidr": "172.22.0.0/16"
   }
}
}
When compiling a recovery plan, a User can specify the following custom parameters: Guest operating system identifier and Hardware version. The respective lines would be "guest_id" and "hardware_ver". Since these parameters are inherent to VMware, please refer to their official documentation for the full list of approved types and versions.
Failback to Flexible Engine#
Flexible Engine Failback Agent requirements#
- Ports for correct agent work:
-
- Communicate with the Disaster Recovery host - egress tcp/443
-
- Send logs to the Disaster Recovery cluster - egress udp/12201
-
- Ports to communicate with the cloud API, e.g. tcp/5000 for keystone
Flexible Engine Failback Agent installation#
To ensure a successful Failback operation, first download and deploy the Failback agent: go to the client page → Manage Clouds. If the migration is being performed to a new cloud, add it first. Then open Actions and select Download Failback Agent. Follow the deployment instructions:
- Download the RAW file of the Failback agent and create a new image from it in the target project.
- Create a new VM from this image and start it.
Note
To allow access to Disaster Recovery, open tcp/443 and udp/12201 for the Failback agent.
Flexible Engine Failback Process#
Failback process includes five (for the partner) or four (for the customer) steps. It starts from the Failback button of the menu
Failback consists of five steps for the partner or four steps for the customer.
Let’s review the sequence for the partner.
Step 1. Select customer
Step 2. Select target cloud type
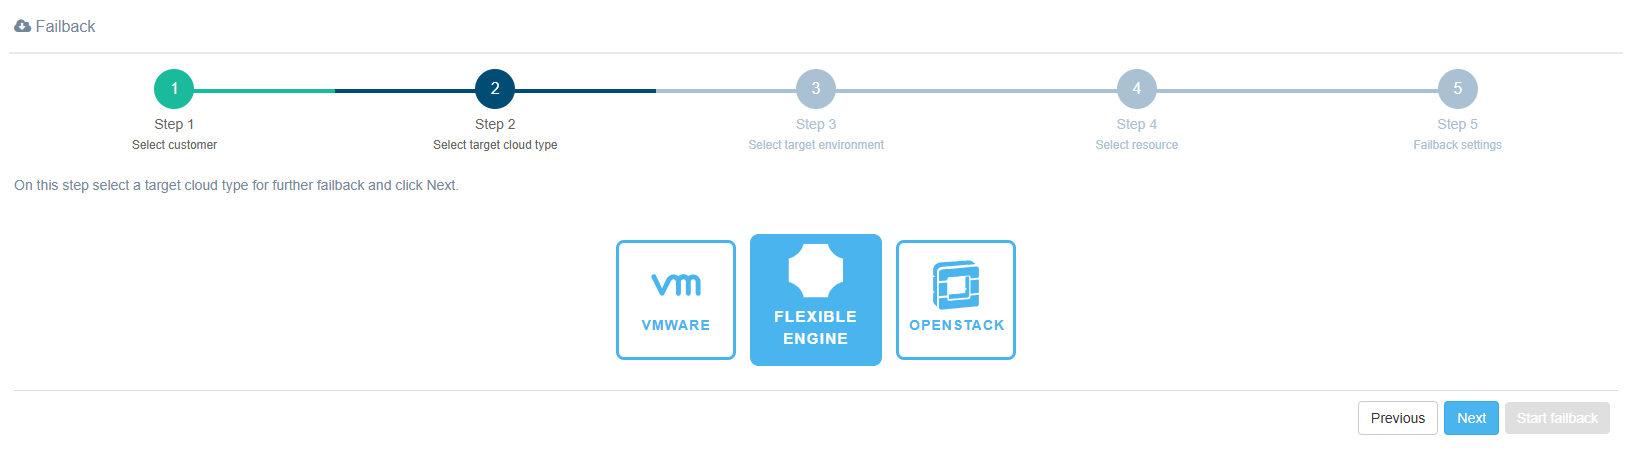
Step 3. Select target environment
Select an already registered Flexible Engine instance from the list or add a new one.
Note
This guide outlines the steps for configuring a new cloud during Failback. However, it is recommended to configure it in advance, before initiating the Failback process.
When registering a new cloud, fill in fields.
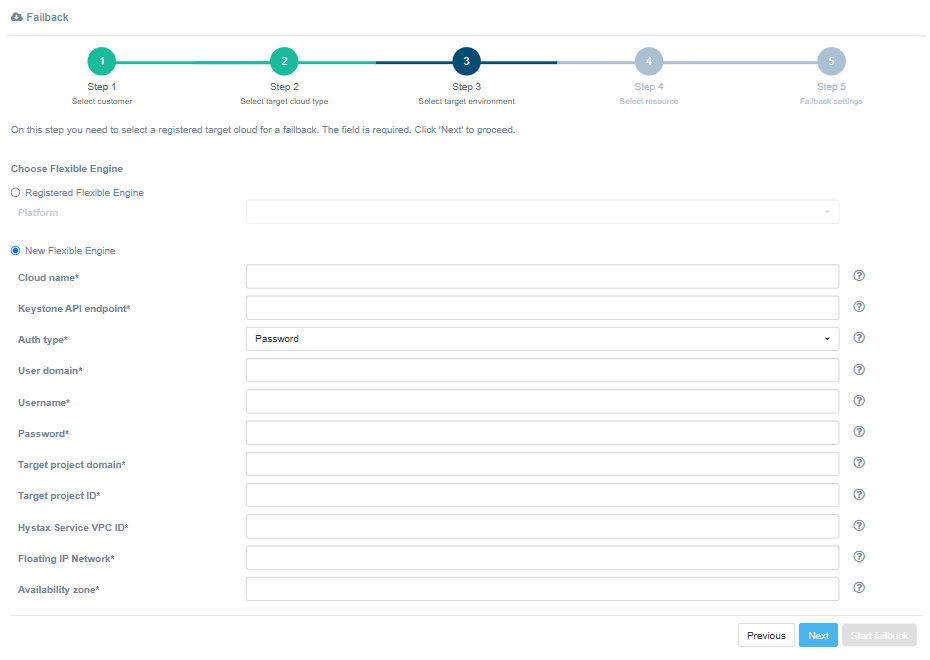
| Field | Description | Example |
|---|---|---|
| Cloud name | The name of the cloud which will be shown in UI. The name must be unique | Failback cloud |
| Keystone API endpoint | Keystone authentication URL | http://controller.dts.loc:35357/v3 |
| Auth type | Select the Keystone authentication type | Password |
| User domain | User domain name to access the target cloud | default |
| Username | Username to access the target cloud | user |
| Password | Password to access the target cloud | passw |
| Target project domain | Target project domain where failback workloads will be spun up | default |
| Target project ID | Target project ID where failback workloads will be spun up | 39aa9af2e620404984f6d53a964386ef |
| Hystax Service VPC ID | VPC ID which will be used for Hystax failback machines | 6a61f859-ad2c-4092-826f-ee2ed85a3ec9 |
| Floating IP Network | External network which will be used to attach Floating IPs to migrated machines. Most Huawei clouds have “admin_external_net” | admin_external_net |
| Availability zone | Availability zone where all resources will be created | zone-1 |
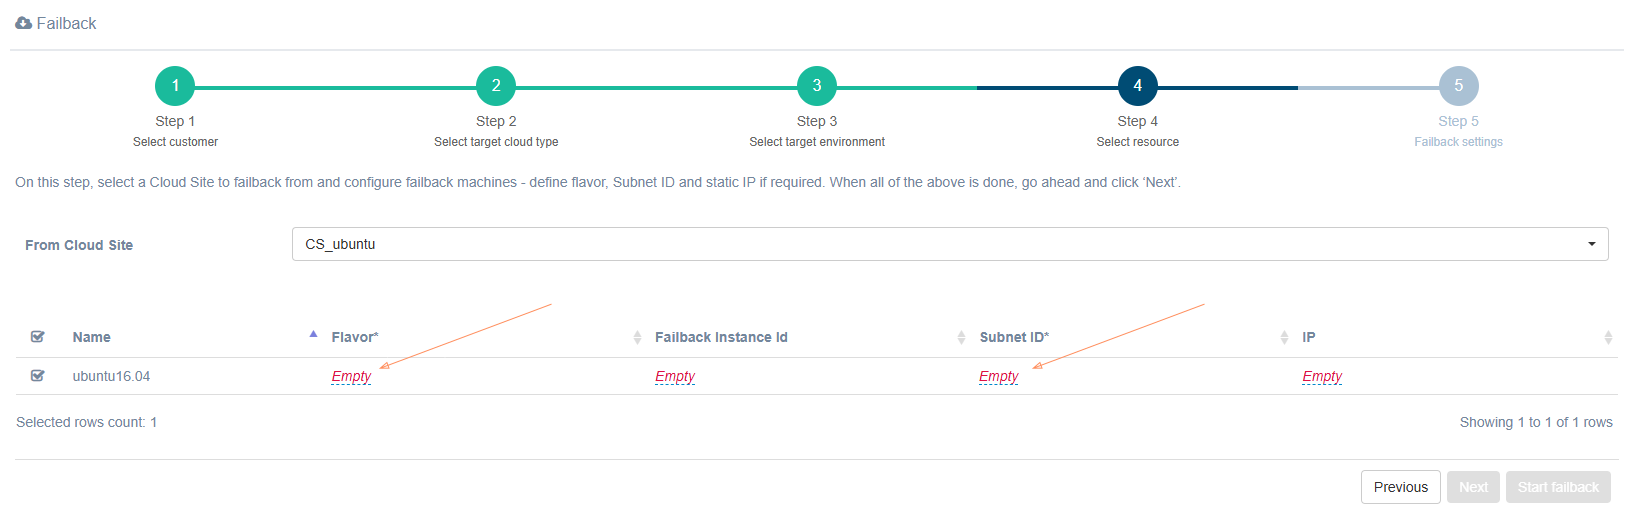
Step 4. Select resource
Select the Cloud Site and machines for Failback, then specify Flavor, Failback instance ID, Subnet ID, and IP. Note that the Flavor and Subnet ID fields are required.
Step 5. Failback settings
Note
If the Failback agent has not been installed beforehand, download it at step 5 and deploy a virtual machine from it. Do not start the Failback process until the agent is installed.
Specify a name for the Failback. The Flavor, Subnet ID, and IP fields are filled in based on the parameters specified in step four.
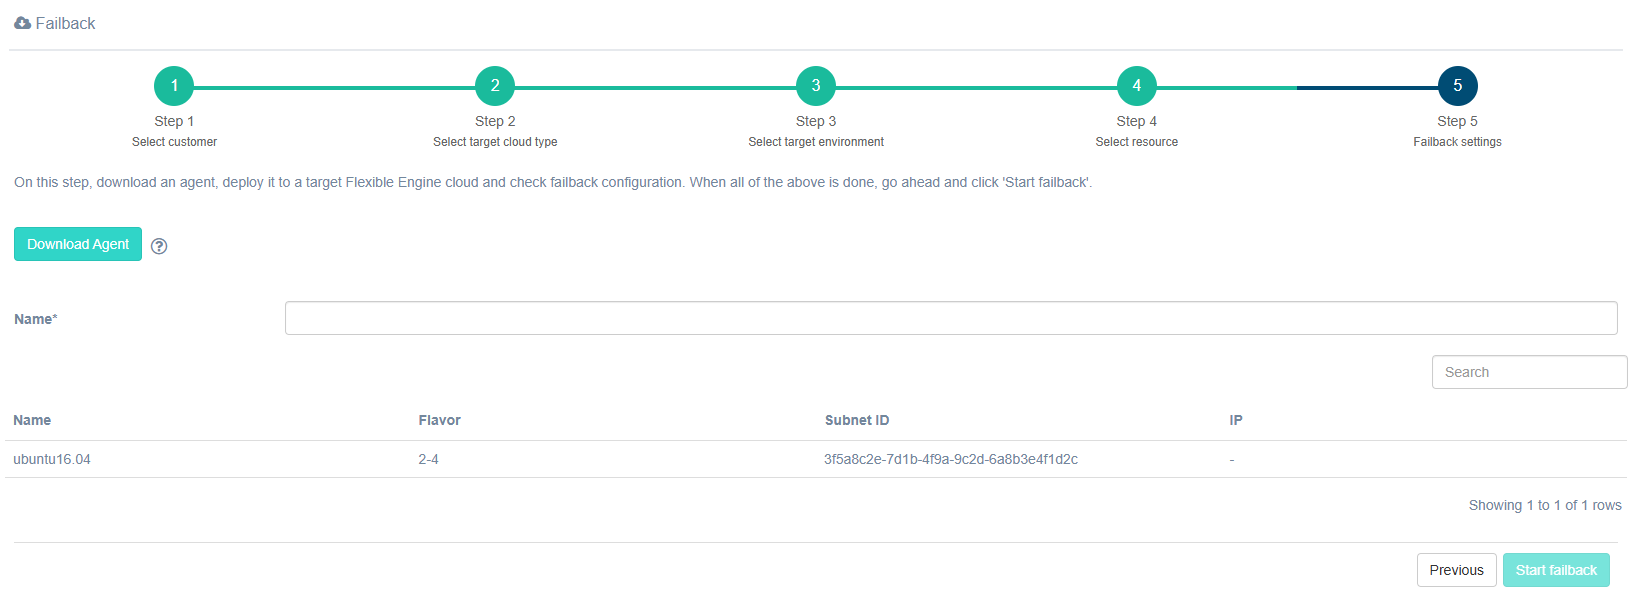
The Start Failback button becomes available after all fields are filled in.
Failback to OpenStack#
OpenStack Failback Agent requirements#
- Ports for correct agent work:
-
- Communicate with the Disaster Recovery host - egress tcp/443
-
- Send logs to the Disaster Recovery cluster - egress udp/12201
-
- Ports to communicate with the cloud API, e.g. tcp/5000 for keystone
OpenStack Failback Agent installation#
To ensure a successful Failback operation, first download and deploy the Failback agent: go to the client page → Manage Clouds. If the migration is being performed to a new cloud, add it first. Then open Actions and select Download Failback Agent. Follow the deployment instructions:
- Download the RAW file of the Failback agent and create a new image from it in the target project.
- Create a new VM from this image and start it.
Note
To allow access to Disaster Recovery, open tcp/443 and udp/12201 for the Failback agent.
OpenStack Failback Process#
Failback process includes five (for the partner) or four (for the customer) steps. It starts from the Failback button of the menu
Failback consists of five steps for the partner or four steps for the customer.
Let’s review the sequence for the partner.
Step 1. Select customer
Step 2. Select target cloud type
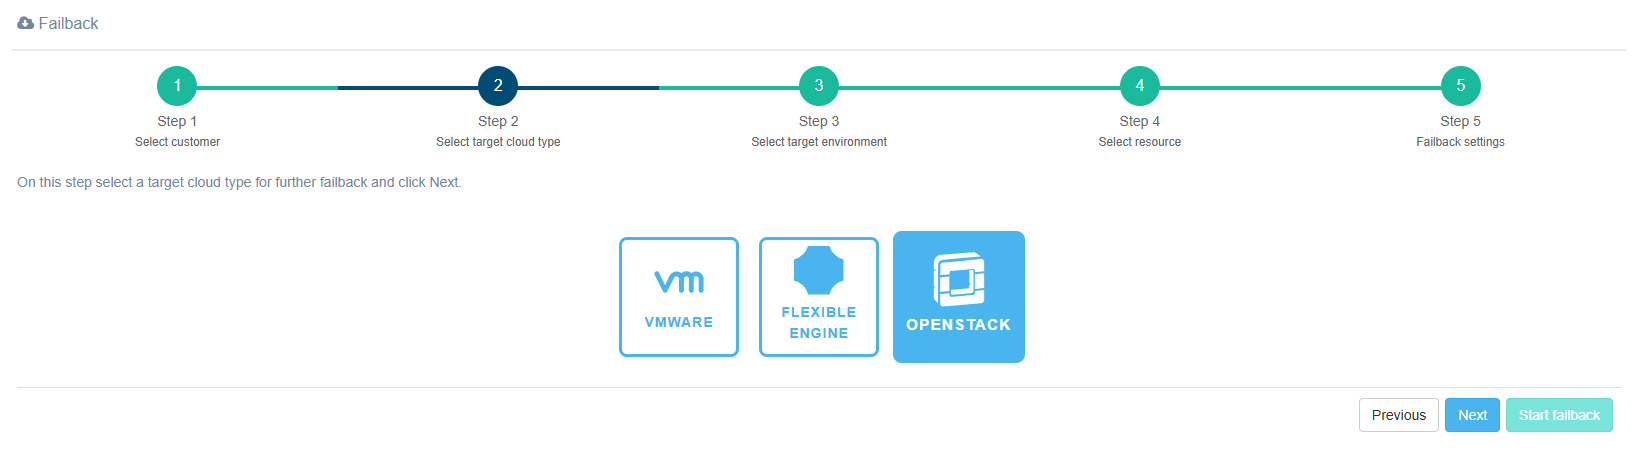
Step 3. Select target environment
Select an already registered OpenStack instance from the list or add a new one.
Note
This guide outlines the steps for configuring a new cloud during Failback. However, it is recommended to configure it in advance, before initiating the Failback process.
When registering a new cloud, fill in fields.
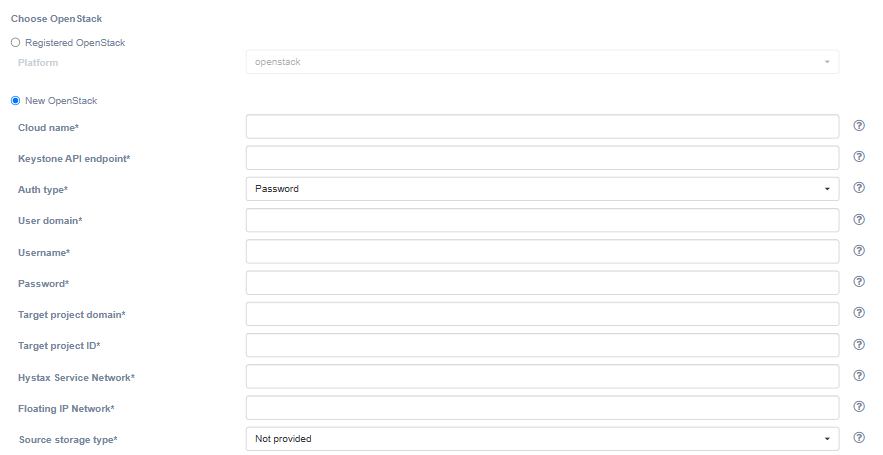
| Field | Description | Example |
|---|---|---|
| Cloud name | The name of the cloud which will be shown in UI. The name must be unique | Failback cloud |
| Keystone API endpoint | Keystone authentication URL | http://controller.example.com:35357/v3 |
| Auth type | Select the Keystone authentication type | Password |
| User domain | User domain name to access the target cloud | default |
| Username | Username to access the target cloud | user |
| Password | Password to access the target cloud | passw |
| Target project domain | Target project domain where failback workloads will be spun up | default |
| Target project ID | Target project ID where failback workloads will be spun up | 39aa9af2e620404984f6d53a964386ef |
| Hystax Service Network | Network which will be used for Hystax failback machines | provider |
| Floating IP Network | External network which will be used to attach Floating IPs to migrated machines. Most Huawei clouds have “admin_external_net” | admin_external_net |
| Source storage type | Choose the source storage type for external agents. The OpenStack replication agent requires a source storage to be set, other agent types do not require or use storage credentials. | Not provided |
| Discovery level | Select the level at which replication agents discover machines. For example, if the level is set to ‘Availability zone’, only one replication agent instance should be deployed per availability zone within a project. Each agent instance discovers machines only within its corresponding availability zone. | Entire project |
Step 4. Select resource
Select the Cloud Site and machines for Failback, then specify Flavor, Subnet ID, and IP. Note that the Flavor and Subnet ID fields are required.
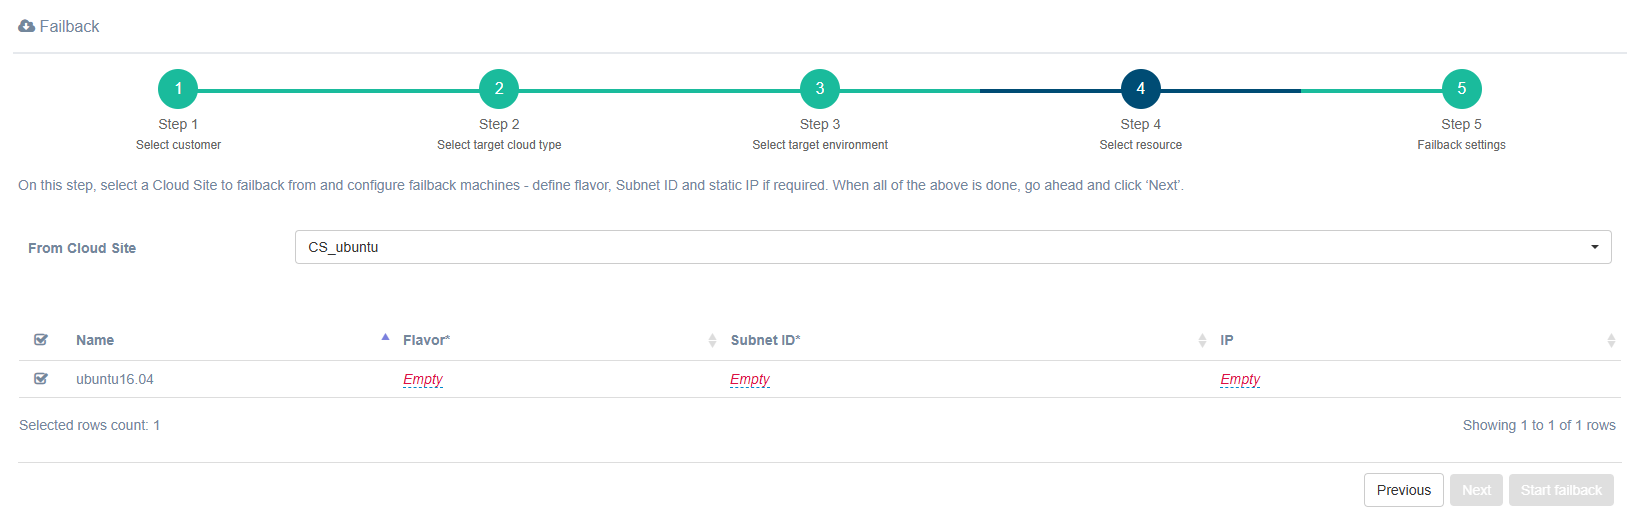
Step 5. Failback settings
Note
If the Failback agent has not been installed beforehand, download it at step 5 and deploy a virtual machine from it. Do not start the Failback process until the agent is installed.
Specify a name for the Failback. The Flavor, Subnet ID, and IP fields are filled in based on the parameters specified in step four.
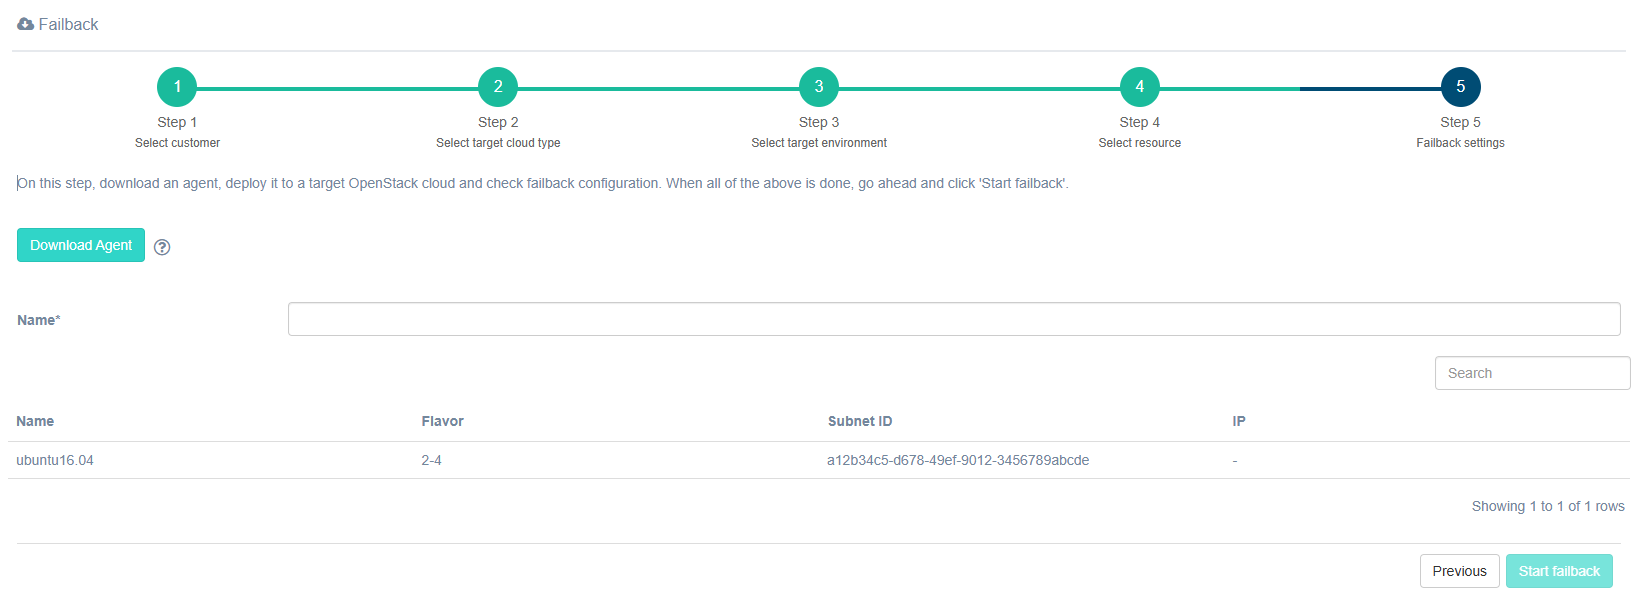
The Start Failback button becomes available after all fields are filled in.
Failback to other clouds#
For other clouds, a failback is done in form of a live reverse migration of workloads to a source environment. Internal replication agents are installed directly on failover machines.
All replications happen in the background and do not require any failover downtime till the final cutover. You can run an unlimited number of test failbacks/migrations.
Please contact your service provider or Hystax to get a migration kit.