Migration process#
The migration process consists of the following stages: preparing a Migration Plan, configuring and launching a Cloud Site, verifying the availability and functionality of services on the running virtual machines, and completing the process by disconnecting or deleting the Cloud Site.
Perform Cloud Site testing as part of the available migration scenarios below. Testing helps identify configuration issues, network misconfigurations, and dependency problems, and increases confidence in service availability. As a result, the risks of downtime and data loss are reduced.
Migration scenarios. Test and final migration#
Standard migration scenario#
The standard migration scenario applies when the source VM is discovered in Migration and at least one full replication has completed (replicating machines).
The migration workflow consists of the following steps:
-
Create or update a Migration Plan to define the target configuration for machines and networks.
-
Start the Cloud Site creation process using one of the following options:
- the Launch button on the Plans tab
- the Migrate option in the left-hand navigation menu
-
Verify Cloud Site VMs and confirm:
- service availability
- workload functionality
- network connectivity
- application dependencies
For details, see Test and final migrations.
-
If additional changes are required, update the Migration Plan and repeat the migration process.
-
For a final migration, detach the Cloud Site from Migration so the migrated VMs remain in the target cloud without Migration components.
-
Connect the migrated VMs to the target infrastructure and put the workloads into production operation:
- configure networking
- enable monitoring
- restore integrations and dependencies
Direct2Target migration scenario#
The Direct2Target (D2T) scenario performs replication without using target cloud APIs. For architecture details, see Direct2Target schema description.
The Direct2Target migration workflow consists of the following steps:
-
Configure the Direct2Target target cloud.
-
Configure the source cloud and install the replication agent.
-
On the customer page download the D2T agent image.
-
In the target cloud, deploy a virtual machine from the D2T image and start it.
Note
The target VM configuration (CPU, RAM, disks, and network settings) must match the source machine configuration. Assign a public IP address to the target VM.
-
In the machine Actions menu, select Edit replication settings and configure the target VM public IP address in the IP address configuration field.
-
Start replication to perform the initial full replication to the target disks.
-
Create or update a Migration Plan to define the migration configuration. Pay particular attention to the
firmwareparameter, which specifies whether the target VM usesBIOSorEFIfirmware. For descriptions of this and other parameters, see Migration Plan syntax. -
Start the Cloud Site creation process using one of the following options:
- the Launch button on the Plans tab
- the Migrate option in the left-hand navigation menu
-
Verify Cloud Site VM and confirm:
- service availability
- workload functionality
- network connectivity
- application dependencies
-
Detach the Cloud Site from Migration so the migrated VMs remain in the target cloud without Migration components.
-
Connect the migrated VMs to the target infrastructure and put the workloads into production operation:
- configure networking
- enable monitoring
- restore integrations and dependencies
Test and final migrations#
After the initial full replication is completed, we strongly recommend performing one or more test migrations before starting the final migration.
Test migrations help validate:
- VM availability
- application functionality
- network configuration
- orchestration and dependencies between services
The test migration workflow is identical to the standard migration scenario, with the following additional recommendations:
-
Before starting the migration, create or update a test suite to validate the migrated workloads.
Note
Preparation of the test suite is a shared responsibility between the customer and the migration service provider.
-
Run the test suite on the active Cloud Site VMs.
-
Review the test results and update:
- Migration Plans
- infrastructure configuration
- network settings
- test procedures
-
When testing is complete, delete the Cloud Site.
-
Repeat the migration workflow until the test results satisfy the migration requirements.
The key difference between a test migration and a final migration is that, after a successful final migration, the Cloud Site must be detached from Migration.
The migration process requires time. Its duration depends on: - the complexity of the Migration Plan - orchestration layers - dependencies between application components
Once all components reach the Active state, the migrated business application is ready for operation.
Warning
Redirecting production traffic is not part of the current platform functionality and must be coordinated with the service provider in advance.
To reduce downtime, we recommend running a simplified validation test suite on the Cloud Site before switching production traffic to the target environment.
Create and prepare Migration Plans#
Migration Plans are scenarios for a migration process in case of test or final migrations. They include descriptions of machines (flavor type, rank, etc.) and network settings. Rules for creating Migration Plans and their syntax.
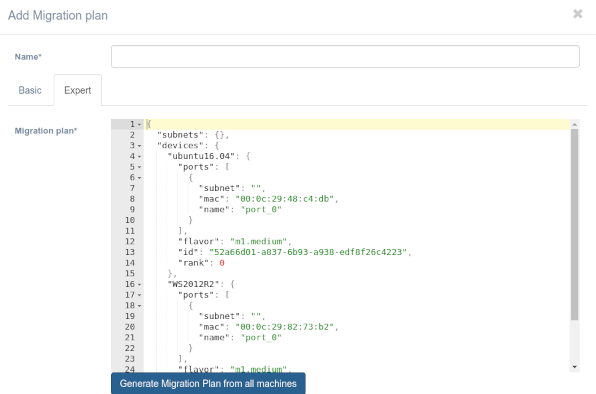
To view Migration Plans, open the Plans tab on the customer page.
Create a Migration Plan#
To create a Migration Plan, open the Plans tab on the customer page and click Add.
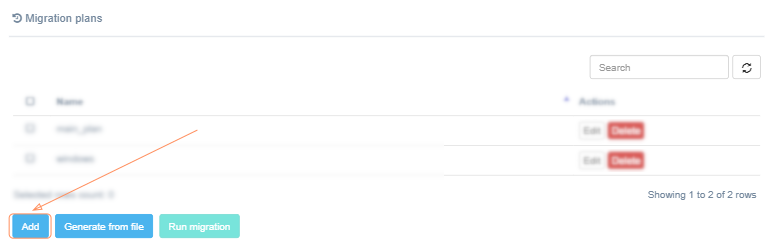
When adding a new plan, specify its name and the contents of the plan. Migration Plan name must be unique within the customer.
There are two modes for creating or editing a plan: Basic and Expert. To switch between them, choose the corresponding tab on the "Generate Migration Plan" page.
The meaning is clear, but I’d simplify it and make the instructions more direct:
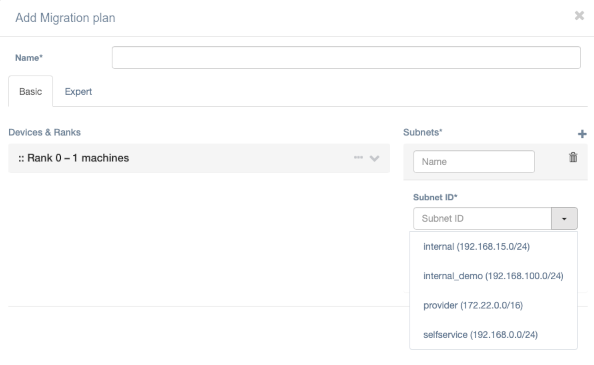
In Basic mode, you can either enter the network settings for a failover machine manually or select a network retrieved directly from the target cloud. Migration can retrieve networks automatically from VMware, OpenStack, Flexible Engine, AWS, and Azure.
To select a network, click + in the Subnets section and select Subnet ID.
The Expert mode allows for a more detailed configuration that should be provided in the JSON format.
The body of a Migration Plan is a JSON instruction for migrating up of the infrastructure and the business application in a target cloud. To generate a plan based on all customer machines, click on the link Generate Migration Plan from all machines.
For the JSON structure and parameters, see Migration Plan syntax.
Migration Plan for multiple machines#
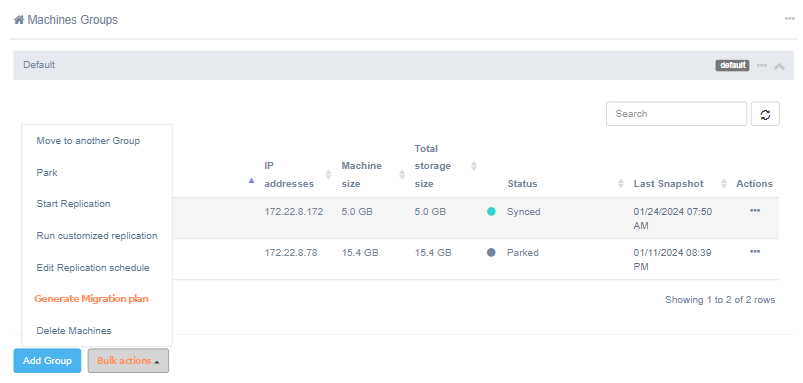
To generate a Migration Plan for several machines or a group of machines, just click Generate Migration Plan in the Bulk Actions menu after selecting them
or the menu item in the group properties
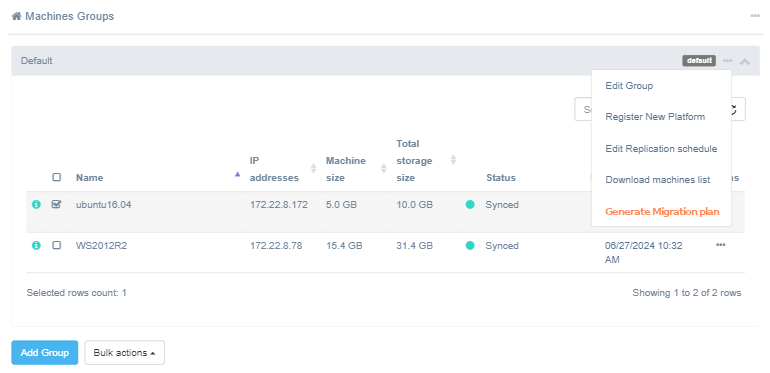
The dialog for creating or editing a Migration Plan opens. Specify a plan name. The Migration Plan name must be unique within the customer. The plan content is generated based on the settings of the selected machines.
Generate a Migration Plan from a file#
This tool is best suited for machines that have already been replicated. It is particularly useful when creating a Migration Plan for multiple machines, as it significantly reduces the time required to configure the plan.
To get started, download the machines list.
In the machines_list.csv file, some fields are populated automatically based on the replication data. Update the flavor field, specify the network cidr where the machine should be deployed, and provide port information in the columns starting with ports.
Once you have updated the file, go to the customer page in Migration, open the Plans tab, and click Generate from file. Click Upload file info, and then click Apply.
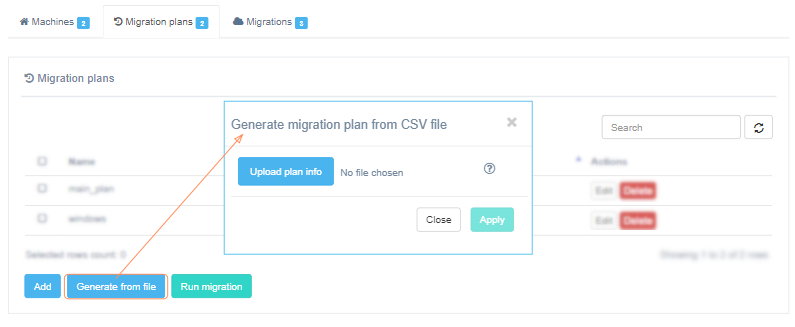
Creating the Migration Plan may take some time. When the plan opens, edit the plan name and other fields if necessary.
Pay close attention to the orange warnings at the top of the window. They indicate potential configuration issues that may affect the migration. Correct any identified issues before saving the plan.
Once the plan is configured, click Save.
Migration Plan syntax#
Migration Plan body is a JSON instruction for restoring infrastructure and business application in a target cloud.
Example of a Migration Plan:
{
    "devices": {
        "IIS-Demo": {
            "rank": 1,
            "id": "52ce9361-b282-72b6-425a-f67347c5b79a",
            "scheduler_hints": {
                "group": "0c1b2901-7687-470e-a82c-6f69e92d5245"
            },
            "ports": [
                {
                    "name": "port_0",
                    "ip": "192.168.15.112",
                    "subnet": "main_subnet"
                },
                {
                    "name": "port_1",
                    "subnet": "external"
                }
            ]
        },
        "rhel7.2": {
            "id": "522f3448-6a56-aa45-2131-207f7dda6664",
            "ports": [
                {
                    "name": "port_0",
                    "ip": "192.168.15.100",
                    "subnet": "main_subnet"
                }
            ],
            "rank": 0,
            "boot_condition": {
                "delay_seconds": 120,
                "type": "wait"
            }
        }
    },
    "subnets": {
        "main_subnet": {
            "cidr": "192.168.15.0/24",
            "subnet_id": "eda47a07-d1dd-4aca-ae8f-c652e997008e"
        }
    }
}
Basetags#
devices -- contains a description of each machine. It is necessary to list all the machines that should be recreated in the Cloud Site:
{
    "devices": {
        "rhel7.2": {
            "id": "522f3448-6a56-aa45-2131-207f7dda6664",
            "ports": {
                "port_0": {
                    "ip": "192.168.15.100",
                    "subnet": "main_subnet"
                }
            },
            "rank": 0,
            "scheduler_hints": {
                "group": "0c1b2901-7687-470e-a82c-6f69e92d5245"
            },
            "boot_condition": {
                "delay_seconds": 120,
                "type": "wait"
            }
        }
    }
}
subnets -- contains a description of networks that need to be recreated on a target site:
{
    "subnets": {
        "main_subnet": {
            "cidr": "192.168.15.0/24",
            "subnet_id": "eda47a07-d1dd-4aca-ae8f-c652e997008e"
        }
    }
}
Syntax of machine description#
Machine description consists of a number of parameters describing machine properties, such as machine name, flavor for the machine in the Cloud Site, network settings, rank and conditions for loading the machines to maintain the sequence and orchestration for the launching process of the Cloud Site:
{
    "rhel7.2": {
        "id": "522f3448-6a56-aa45-2131-207f7dda6664",
        "custom_image_metadata": {
            "hw_qemu_guest_agent": "no",
            "os_require_quiesce": "no",
            "my_os_type": "linux-custom",
            "hw_disk_bus": "scsi",
            "hw_scsi_model": "virtio-scsi",
            "my_custom_image_tag": "linux"
        },
        "security_groups": [
            "sg-1",
            "sg-2"
        ],
        "availability_zone": "zone-1",
        "user_data": "#!/bin/bash\nrpm -e hlragent\nrm -rf /etc/hystax\n",
        "ports": {
            "port_0": {
                "ip": "192.168.15.100",
                "subnet": "main_subnet"
            }
        },
        "rank": 0,
        "scheduler_hints": {
            "group": "0c1b2901-7687-470e-a82c-6f69e92d5245"
        },
        "boot_condition": {
            "delay_seconds": 120,
            "type": "wait"
        }
    }
}
Machine description parameters:
| Parameter | Description | Required field |
|---|---|---|
| machine_name | Base tag for machine description. Name will be used to identify machine in the Cloud Site. | Yes |
| fix_dev_prefix | Enter the prefix to automatically update Linux target disk names during P2V. Possible values: - ‘sd’ (for names like /dev/sda1), - ‘vd’ (for names like /dev/vda1), - ‘xvd’ (for names like /dev/xvda1). Disk names are replaced as a part of Linux P2V in the following files (non-existing files are skipped): - /etc/fstab, - /boot/grub/grub.cfg (also /grub/grub.cfg in case /boot is a separate partition), - /boot/grub2/grub.cfg (also /grub2/grub.cfg in case boot is a separate partition). Example: { "devices": { "ds-debian10-sda": { "fix_dev_prefix": "vd", ... } } } |
No |
| id | Internal id of customer machine that is generated with Migration Plan pre-generation. Can also be found by moving the mouse pointer to the machine name in the machine list on the Customer page. | Yes |
| ports | List of machine's network interfaces configurations. There can be one or more interfaces. Interfaces will be added in the same order in which they are described. Interface parameters description and example see below. | Yes |
| scheduler_hints | Specific scheduler options for failovers. Use group parameter to specify server group for OpenStack failover instances.Example: "scheduler_hints": { "group": "0c1b2901-7687-470e-a82c-6f69e92d5245" } |
No |
| rank | Order in which a group of machines will be launched. For example machines with rank 2 will be launched only after all machines with rank 1 are started and those in turn only after all machines with a rank 0 are started. | Yes |
| boot_conditions | Condition in which a machine is considered to be running. Delay in time is supported after its expiration the machine is considered to be running. The condition extends across the whole rank. If there are several machines with a delay in time the rank is considered fulfilled after waiting for the longest time. Syntax: "boot_condition": { "delay_seconds": number of seconds to wait, "type": "wait" } Example "boot_condition": { "delay_seconds": 120, "type": "wait" } |
No |
| flavor | Name or ID of an existing flavor in the target cloud. For VMware and KubeVirt target clouds, flavor is specified as vCPU-RAM, e.g. 2-4 that stands for 2vCPU and 4GB RAM Example: “flavor”: “2-4” |
Yes |
| disk_bus (KubeVirt only) | Disk controller type. Allowed values: “scsi”, “virtio”. Default, “virtio”. | No |
| config_drive | False by default. Set it as true to use the configuration drive. Example: "config_drive": "true" |
No |
| security_groups | List of security groups to use for the the machine. This will overwrite the default group(s). | No |
| availability_zone | Name of Availability Zone to use for the machine. This will overwrite the availability_zone that is specified in the cloud config settings. | No |
| user_data | Script to be executed on the target machine. To use the key “user_data”, the source machine must have cloud_init installed, otherwise, it will be ignored. This key can be used only for OpenStack target cloud. | No |
| firmware (VMware, oVirt, GCP, Direct2Target, CloudSigma) | Parameter that specifies the firmware used to boot the recovered machine. Supported values are BIOS, EFI, and EFI_SB (oVirt only). If not specified, BIOS is used by default.- Use BIOS for operating systems installed in BIOS mode, including legacy versions of Windows (such as Windows 7 and Windows Server 2008 R2) and older Linux distributions.- Use EFI for operating systems installed in UEFI mode, including Windows 10, Windows 11, Windows Server 2016 and later, and most modern Linux distributions.- Use EFI_SB only when recovering to an oVirt environment that requires UEFI with Secure Boot enabled.The selected firmware must match the operating system installation mode and bootloader configuration. Otherwise, the recovered machine may fail to boot. Example: "firmware": "EFI" |
No |
| guest_id | Guest operating system identifier. Refer to VMware’s official documentation Example: “guest_id”: “ubuntu64Guest” | No |
| hardware_ver | Virtual machine hardware version. Refer to VMware’s official documentation The following format is required “vmx- Example: “hardware_ver”: “vmx-11” |
No |
| byol (AWS only) | If byol is false (or not set), AWS ImportImage is used (AWS does its own P2V). If byol is true, AWS RegisterImage is used and we do our own P2V. Example: "devices": { "sd_small_ubuntu": { "rank": 0, "byol": true, } } |
No |
| ntp_server (Windows only) | Specify the protocol used by Windows operating systems to synchronize. Example: "devices": { "im-WS2019-ntp": { "flavor": "m1.medium", "ports": [ { "name": "port_0", "subnet": "provider-subnet" } ], "id": "52eef058-012b-70dd-9271-28ee5f56d171", "rank": 0, "ntp_server": "ntp6.ntp-servers.net" }, "subnets":{ "provider-subnet": { "name": "provider-subnet", "subnet_id": "6129317f-4987-4bf3-bfd0-c0edc3bc4bba", "cidr": "172.24.1.0/24" } } } |
No |
| hostname (Windows machines in OpenStack clouds only) | New hostname of the Windows machine. Can be set to: - true (default) – use machine name from plan as hostname. - false – do not modify hostname. - any string – set hostname to this string. Example: "devices": { "ds2012test": { "id": "9f51d0de-b6cb-400e-b223-5e748cc39d01", "flavor": "m1.medium", "hostname": "my-super-long-custom-hostname", "rank": 0, "ports": [ { "name": "port_0", "subnet": "DS-internal-2" } ] } }, "subnets": { "DS-internal-2": { "name": "DS-internal-2", "subnet_id": "76377dae-4e35-4183-bafa-b06eef69249e", "cidr": "172.22.0.0/16" } } |
No |
| rclocal_script | Script that runs when Linux boots. Example: "rclocal_script": "#!/bin/bash\ndate > date.txt\n" |
No |
| copy_efi_bootloader | False by default. Set it as true to use a stock bootloader. Example: "copy_efi_bootloader": true |
No |
| key_name | Key pair for a device. Example: "key_name": "yv-key" |
No |
| meta | A list of instance meta tags. OpenStack, OpenNebula. Example: "devices": { "rhel7.2": { ... "meta": { "Image Name": "Hystax_CATI_...", "Image ID": "f389c03b-...", "Image": "image", "Key Name": "username" } } |
No |
| custom_image_metadata | Set custom image metadata for replicated machines. OpenStack only. Example: "custom_image_metadata": { "hw_qemu_guest_agent": "no", "os_require_quiesce": "no", "my_os_type": "linux-custom", "hw_disk_bus": "scsi", "hw_scsi_model": "virtio-scsi", "my_custom_image_tag": "linux" }, It is possible to set the parameter as a string with a JSON object: "custom_image_metadata": "hw_qemu_guest_agent=no,os_require_quiesce=no,my_os_type=linux-custom,hw_disk_bus=scsi,hw_scsi_model=virtio-scsi,yv_custom_image_tag=Linux". Alternatively, this parameter can be set as an additional option during the initial configuration step or when adding a cloud. Note that if the parameter is set both during initial configuration/cloud addition and in the Migration Plan, the Migration Plan settings take priority and will be applied to the cloud, even if the value is an empty string. |
No |
Ports' interface description has the following parameters:
| Parameter | Description | Required parameter |
|---|---|---|
| name | Interface name | Yes |
| ip | Interface IP address. Windows adapters will be configured as DHCP by default. If you want to set static configuration, use this field in conjunction with mac field. |
No |
| mac | Interface mac address. Ignored for AWS target cloud. | No |
| subnet | Subnet name that the interface will belong to | Yes |
| routing_allowed | Allows machine to be a router (has “true” or “false” values, default value is “false”). Ignored for AWS target cloud. | No |
| floating_ip | Adds floating_ip for port (has “true” or “false” values, default value is “false”). Using this parameter with the “true” value limits the machine to have only one port. “floating_ip”: “ |
No |
| mtu (Windows only) | The largest size of a packet that can be sent in a network connection without needing to be fragmented. Use in conjunction with a mac address. Example: "devices": { "DS2012R2MULMBR": { "id": "9f51d0de-b6cb-400e-b223-5e748cc39d01", "flavor": "m1.medium", "rank": 0, "ports": [ { "name": "port_0", "ip": "172.22.8.249", "mac": "08:00:27:46:79:29", "gateway_ip": "172.22.1.2", "dns_nameservers": [ "172.22.1.2", "8.8.4.4" ], "mtu": 1511, "subnet": "DS-internal-2" } ] } }, "subnets": { "DS-internal-2": { "name": "DS-internal-2", "subnet_id": "76377dae-4e35-4183-bafa-b06eef69249e", "cidr": "172.22.0.0/16" } } |
No |
| interface (KubeVirt only) | Interface type. Allowed values: “masquerade” or “bridge”. Default: “masquerade”. | No |
Examples:
"ports": [
    {
        "name": "port_0",
        "ip": "192.168.15.100",
        "subnet": "main_subnet"
    }
]
Ports, subnets, mac, ip, gateway, and dns. To set static - use mac (windows failover):
  {
    "devices": {
        "sd_small_ubuntu": {
            "rank": 0,
            "ports": [
                {
                    "name": "port_0",
                    "ip": "172.22.8.144",
                    "mac": "08:00:27:46:79:27",
                    "gateway_ip": "172.22.1.2",
                    "dns_nameservers": [
                        "172.22.1.2",
                        "172.22.1.3"
                    ],
                    "subnet": "subnet_1"
                }
            ],
            "id": "5260881c-c921-f037-df78-6105f018a9c2",
            "flavor": "m1.medium"
        }
    },
    "subnets": {
        "subnet_1": {
            "name": "subnet_1",
            "cidr": "172.22.0.0/16"
        }
    }
}
In the case of floating IP:
  {
    "devices": {
        "centos": {
            "ports": [
                {
                    "name": "port_0",
                    "floating_ip": true,
                    "subnet": "subnet_0"
                }
            ]
        }
    }
}
Syntax of network description#
Network description consists of a number of parameters, such as network name, its CIDR and the address of DNS servers.
Example:
{
    "subnets": {
        "main_subnet": {
            "cidr": "192.168.15.0/24",
            "subnet_id": "eda47a07-d1dd-4aca-ae8f-c652e997008e"
        }
    }
}
Network description parameters:
| Parameter | Description | Required parameter |
|---|---|---|
| network name | network identifier name is a base tag for network description | Yes |
| cidr | network CIDR | Yes |
| subnet_id | existing subnet ID in the target cloud. | Yes |
Note
Specified subnet_id must be available for the used Availability Zone.
Edit a Migration Plan#
To edit a Migration Plan, open the Plans tab on the customer page and click Edit for the required plan.
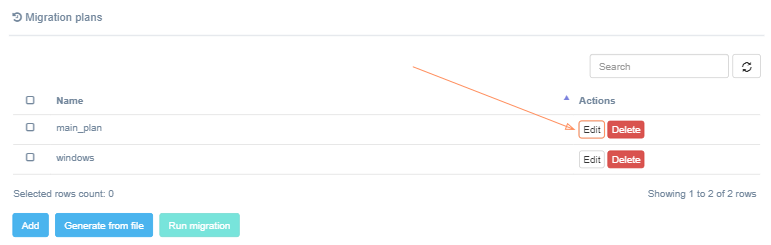
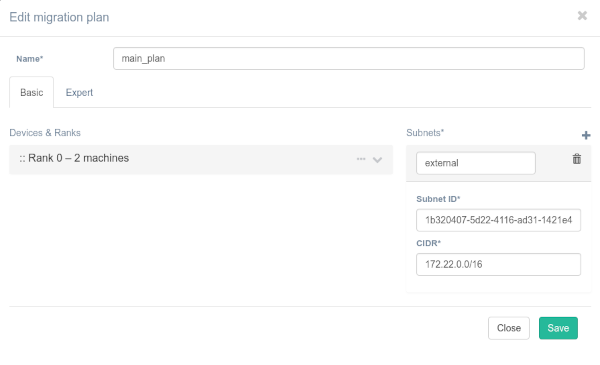
The Migration Plan dialog opens. Modify the required settings.