AWS#
Connect an AWS account to OptScale to import billing data and discover cloud resources.
Choose a connection configuration#
When adding an AWS data source, configure two independent settings:
- Account Type
- Authentication
Billing data configuration is handled separately.
Use this section to choose the appropriate configuration, then follow the linked sections in this order:
-
Choose the account type — Management/Standalone or Member.
-
Choose authentication — Assumed Role or Access Key.
-
Configure AWS permissions — apply the Discover Resources policy to allow OptScale to discover and parse AWS resource data.
-
Configure or select billing data — use an existing data export or create a data export. Member accounts use the management account export.
-
Add the data source in OptScale — follow the Connect to OptScale steps in the section for the selected configuration.
Account Type#
Choose the AWS account type you want to connect.
-
Management/Standalone — select this option for either:
- the management account of an AWS Organization, or
- an independent AWS account that is not connected as a member account.
-
Member — select this option for an account that belongs to an AWS Organization and uses billing data from the corresponding management account.
Authentication#
Choose how OptScale authenticates to the AWS account.
-
Assumed Role — recommended. OptScale assumes an IAM role in the AWS account and uses temporary credentials. This avoids storing long-lived AWS access keys.
-
Access Key — OptScale authenticates using an AWS Access Key ID and Secret Access Key.
The account type and authentication method are independent. Both a Management/Standalone account and a Member account can use Assumed Role or Access Key, depending on the AWS configuration.
| Your AWS setup | Account Type | Authentication |
|---|---|---|
| Independent AWS account | Management/Standalone | Prefer Assumed Role |
| AWS Organizations management account | Management/Standalone | Prefer Assumed Role |
| AWS Organizations member account | Member | Prefer Assumed Role, or use Access Key if required by the existing configuration |
| Existing integration that uses IAM access keys | Corresponding account type | Access Key |
Assumed Role is recommended because it uses temporary credentials and avoids storing long-lived AWS access keys.
Discover Resources policy#
Include this policy to allow OptScale to parse EC2 resource data. Follow steps 1–5 of the instructions. Insert the JSON on the Type or paste a JSON policy document step:
{
    "Version": "2012-10-17",
    "Statement": [
        {
            "Sid": "OptScaleOperations",
            "Effect": "Allow",
            "Action": [
                "s3:GetBucketPublicAccessBlock",
                "s3:GetBucketPolicyStatus",
                "s3:GetBucketTagging",
                "iam:GetAccessKeyLastUsed",
                "cloudwatch:GetMetricStatistics",
                "cloudwatch:GetMetricData",
                "s3:GetBucketAcl",
                "ec2:Describe*",
                "s3:ListAllMyBuckets",
                "iam:ListUsers",
                "s3:GetBucketLocation",
                "iam:GetLoginProfile",
                "cur:DescribeReportDefinitions",
                "iam:ListAccessKeys",
                "elasticloadbalancing:Describe*",
                "s3:GetIntelligentTieringConfiguration",
                "s3:GetLifecycleConfiguration",
                "s3:GetAnalyticsConfiguration",
                "s3:GetMetricsConfiguration"
            ],
            "Resource": "*"
        }
    ]
}
Management/Standalone account#
Use Management/Standalone for an AWS Organizations management (payer) account or for an independent AWS account.
OptScale supports AWS Organizations so you can connect several data sources and centrally manage data from multiple accounts while receiving billing exports on a single invoice. The management account is the only account that has access to collective cloud spending data. When you register this account type in OptScale, you can detect an existing data export or create one automatically.
Warning
Connecting the AWS Organizations management account does not automatically create data sources for its member accounts. Add every member account whose expenses you want OptScale to process; expenses for unconnected member accounts are ignored.
Configure Assumed Role#
Assume role in AWS is a mechanism for obtaining temporary access rights. Instead of storing long-term credentials, a user or service can assume an IAM role and operate with its permissions for a limited time. This approach simplifies access management, reduces the risk of credential leaks, and enables secure cross-account interactions.
To perform an assume role, you need two accounts:
-
Account A provides the credentials OptScale uses to call
sts:AssumeRole. This is where the user, application, or service that needs access lives. -
Account B is the AWS account being connected to OptScale. It contains the resources and the IAM role. Account B creates an IAM role with the required permissions and a trust policy that allows Account A to assume it.
Configure AWS permissions#
1. Configure data exports. Having a data export configured for your cloud account is the main prerequisite before you continue. If a data export has not been configured, refer to the Create an AWS Data Export instruction or Data Export not configured yet.
2. Copy the External ID from OptScale. The role in Account B is created with an external ID, so obtain the value before you create it.
- Go to OptScale → Data Sources → click Add → select AWS.
- For Account Type, select Management/Standalone, and for Authentication, select Assumed Role.
- Keep Use External ID enabled and copy the generated External ID, or click Generate to get a different value.
- Leave the page open. You return to it in Connect to OptScale to finish the form with the same external ID.
An external ID is a shared secret that AWS recommends for roles assumed by a third-party service. Requiring it in the trust policy prevents the confused deputy problem, in which someone who learns the ARN of your role tries to reach it through OptScale. See Access to AWS accounts owned by third parties in the AWS documentation.
3. Account B:
- Create an IAM role (AWS Console → IAM → Roles → Create role) (e.g.,
CrossAccountAccessRole):- In the Trusted entity type step, select Another AWS account.
- Enter the Account ID of Account A.
- Select Require external ID and paste the value copied from OptScale.
-
Edit the trust policy under the Trust relationships tab → Edit trust policy
{ "Version": "2012-10-17", "Statement": [ { "Effect": "Allow", "Principal": { "AWS": "arn:aws:iam::<AWS account ID>:root" }, "Action": "sts:AssumeRole", "Condition": { "StringEquals": { "sts:ExternalId": "<external_id>" } } } ] }- Replace
<AWS account ID>with the account ID of Account A. - Replace
<external_id>with the value copied from OptScale in step 2.
Note
Omit the
Conditionblock only if you turn off Use External ID in OptScale. The trust policy and the data source must agree: if one requires an external ID and the other does not send a matching value,sts:AssumeRolefails and the data source cannot connect. - Replace
-
Update policy:
- Navigate to the Permissions tab → click Add permissions → Create inline policy
-
Go to JSON tab → paste the JSON:
{ "Version": "2012-10-17", "Statement": [ { "Sid": "AllowCURAndBCMToWriteToS3", "Effect": "Allow", "Action": [ "s3:PutObject", "s3:GetObject", "s3:GetBucketPolicy" ], "Resource": [ "arn:aws:s3:::<bucket_name>/*", "arn:aws:s3:::<bucket_name>" ] }, { "Sid": "AllowCostAndUsageReports", "Effect": "Allow", "Action": [ "cur:DescribeReportDefinitions" ], "Resource": "*" }, { "Sid": "AllowS3AndIAMOperations", "Effect": "Allow", "Action": [ "s3:GetBucketPublicAccessBlock", "s3:GetBucketPolicyStatus", "s3:GetBucketTagging", "s3:GetBucketAcl", "s3:GetBucketLocation", "s3:ListBucket", "s3:PutBucketPolicy", "s3:ListAllMyBuckets", "iam:GetAccessKeyLastUsed", "iam:GetLoginProfile", "iam:ListUsers", "iam:ListAccessKeys" ], "Resource": "*" }, { "Sid": "AllowMonitoringAndInfrastructureReadOnly", "Effect": "Allow", "Action": [ "cloudwatch:GetMetricStatistics", "cloudwatch:GetMetricData", "ec2:Describe*", "elasticloadbalancing:Describe*" ], "Resource": "*" }, { "Sid": "AllowBCMExports", "Effect": "Allow", "Action": [ "bcm-data-exports:ListExports", "bcm-data-exports:GetExport", "bcm-data-exports:CreateExport" ], "Resource": "*" }, { "Sid": "OptScaleOperations", "Effect": "Allow", "Action": [ "s3:GetBucketPublicAccessBlock", "s3:GetBucketPolicyStatus", "s3:GetBucketTagging", "iam:GetAccessKeyLastUsed", "cloudwatch:GetMetricStatistics", "s3:GetBucketAcl", "ec2:Describe*", "s3:ListAllMyBuckets", "iam:ListUsers", "s3:GetBucketLocation", "iam:GetLoginProfile", "cur:DescribeReportDefinitions", "iam:ListAccessKeys", "elasticloadbalancing:Describe*", "s3:GetIntelligentTieringConfiguration", "s3:GetLifecycleConfiguration", "s3:GetAnalyticsConfiguration", "s3:GetMetricsConfiguration" ], "Resource": "*" } ] } -
Replace
<AWS account ID>with the AWS Account ID (12 digits without “-”). - Replace
<bucket_name>with the name of the bucket. - Save.
4. Set up an IAM policy for Account A:
- Go to IAM → Policies → Create policy
-
JSON tab → paste the JSON:
{
"Version": "2012-10-17",
"Statement": [
    {
    "Effect": "Allow",
    "Action": "sts:AssumeRole",
    "Resource": "*"
    }
]
}
Connect to OptScale#
Once the role is configured, add the data source to OptScale.
1. Return to the Connect Data Source page left open when you copied the external ID, or go to OptScale → Data Sources → click Add → select AWS.
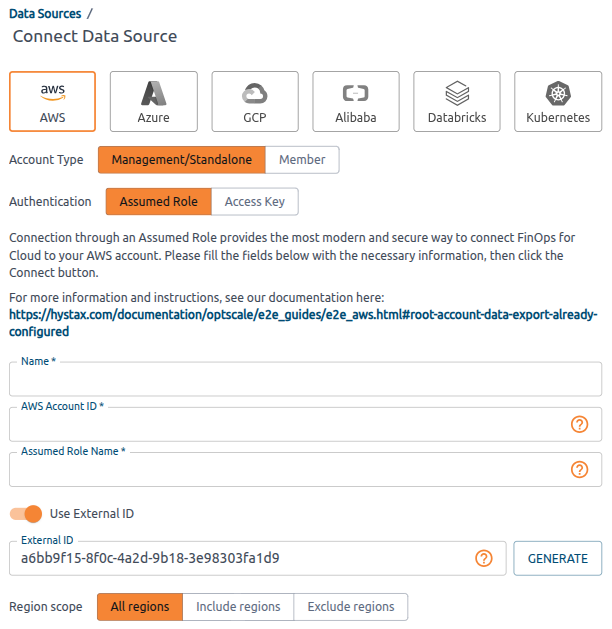
2. Choose the connection configuration and describe the account you are connecting:
- Account Type — select Management/Standalone.
- Authentication — select Assumed Role.
- Name — a display name for the data source.
- AWS Account ID — the AWS account ID of Account B (12 digits without “-”).
- Assumed Role Name — the name of the IAM role created in Account B.
- Use External ID — keep the toggle enabled and leave the External ID value that you put into the trust policy of that role. Clicking Generate replaces the value, so update the trust policy to match before you connect.
- Region scope — All regions, Include regions, or Exclude regions.
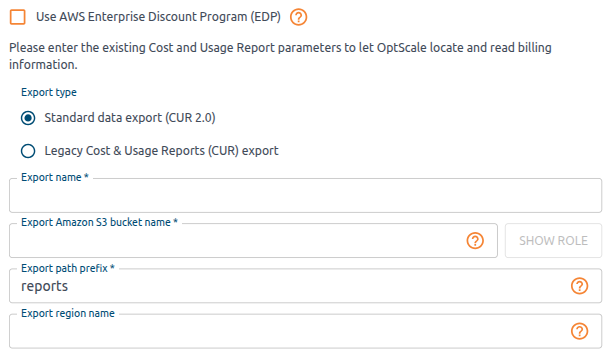
3. Describe the data export that OptScale reads billing information from. Take the values from the report configured earlier: AWS Billing and Cost Management → Data Exports → find the report → open its details.
- Use AWS Enterprise Discount Program (EDP) — select this checkbox if the account is covered by an EDP agreement with AWS.
- Export type — Standard data export (CUR 2.0) or Legacy Cost & Usage Reports (CUR) export, matching the type of the report configured earlier.
- Export name — the name of the report.
- Export Amazon S3 bucket name — the Amazon S3 bucket where the data export is stored. Click Show role to display the assumed role definition for the values you entered and compare it with the role created in Account B.
- Export path prefix — the S3 prefix prepended to the exported report files. The default value is
reports. - Export region name — the AWS region of the Amazon S3 bucket where the data export is stored.
4. Click Connect.
Attention
Wait for the export to be generated by AWS and uploaded to OptScale according to the schedule (which is performed on an hourly basis).
Please contact our Support Team at [email protected] if you have any questions regarding the described configuration flow.
Configure Access Key#
Access Key authentication uses an AWS Access Key ID and Secret Access Key from an IAM user.
Data Export already configured#
When you register a Management/Standalone account that already has a data export, OptScale can detect that export automatically.
Case 1: Credentials and data export belong to one account#
Configure Access Key authentication#
1. Configure data exports. Having a data export configured for your cloud account is the main prerequisite before you continue. If a data export has not been configured, refer to the Data Export not configured yet instruction.
2. Update bucket policy:
- Navigate to the Permissions tab of your AWS S3 bucket → select Bucket Policy.
-
Click Edit → insert a JSON code snippet:
{ "Version":"2012-10-17", "Statement":[ { "Sid":"EnableAWSDataExportsToWriteToS3AndCheckPolicy", "Effect":"Allow", "Principal":{ "Service":[ "billingreports.amazonaws.com", "bcm-data-exports.amazonaws.com" ] }, "Action":[ "s3:PutObject", "s3:GetBucketPolicy" ], "Resource":[ "arn:aws:s3:::<bucket_name>/*", "arn:aws:s3:::<bucket_name>" ], "Condition":{ "StringLike":{ "aws:SourceAccount":"<AWS account ID>", "aws:SourceArn":[ "arn:aws:cur:us-east-1:<AWS account ID>:definition/*", "arn:aws:bcm-data-exports:us-east-1:<AWS account ID>:export/*" ] } } } ] } -
Replace
<bucket_name>with the name of the bucket. - Replace
<AWS account ID>with the AWS Account ID (12 digits without “-”). - Save.
3. Create user policies for Discover Resources and ReadOnly access.
-
ReadOnly access:
-
Follow steps 1–5 of the instructions.
-
Insert the JSON code in the Type or paste a JSON policy document step:
{ "Version":"2012-10-17", "Statement":[ { "Sid":"ReportDefinition", "Effect":"Allow", "Action":[ "cur:DescribeReportDefinitions" ], "Resource":"*" }, { "Sid":"GetObject", "Effect":"Allow", "Action":[ "s3:GetObject" ], "Resource":"arn:aws:s3:::<bucket_name>/*" }, { "Sid":"BucketOperations", "Effect":"Allow", "Action":[ "s3:ListBucket", "s3:GetBucketLocation" ], "Resource":"arn:aws:s3:::<bucket_name>" } ] } -
Replace
<bucket_name>with the name of the bucket created on the previous step.
-
-
Discover Resources: attach the Discover Resources policy.
4. Create user and grant policies:
-
Go to Identity and Access Management (IAM) → Users → create a new user.
-
In Step 2. Set permissions, select Attach policies directly → attach the policies created earlier.
-
Confirm the creation of the user.
5. Create access key:
-
Go to Identity and Access Management (IAM) → Users → select the created user → create an access key
-
Download the .csv file with Access key and Secret access key.
Connect to OptScale#
Once the user is configured, add the data source to OptScale.
1. Go to OptScale → Data Sources → click Add → select AWS.
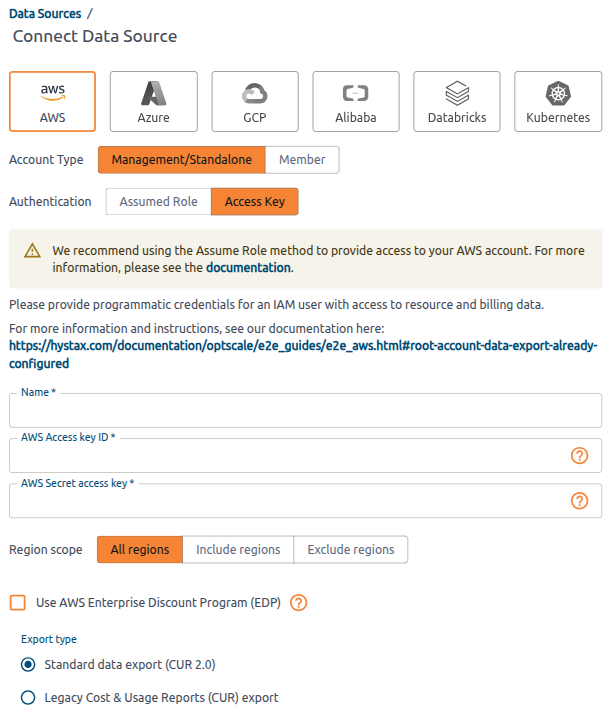
2. Choose the connection configuration and provide the credentials of the IAM user:
- Account Type — select Management/Standalone.
- Authentication — select Access Key. The banner that appears recommends Assumed Role instead; see Configure Assumed Role if you prefer that method.
- Name — a display name for the data source.
- AWS Access key ID — the Access key from the .csv file downloaded earlier.
- AWS Secret access key — the Secret access key from the same file.
- Region scope — All regions, Include regions, or Exclude regions.
- Use AWS Enterprise Discount Program (EDP) — select this checkbox if the account is covered by an EDP agreement with AWS.
- Export type — select the type of the report configured earlier: AWS Billing and Cost Management → Data Exports → find the report → export type.
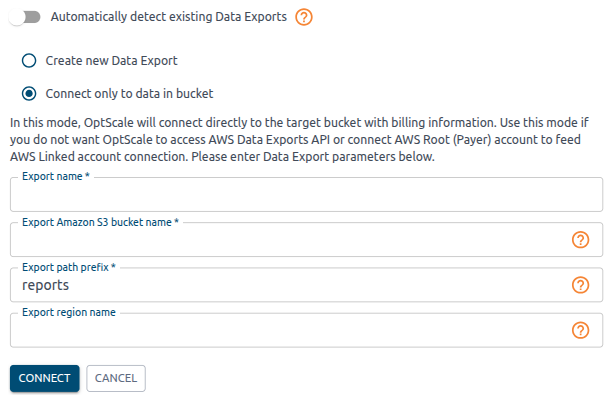
3. Point OptScale at the existing data export instead of letting it look for one:
- Switch Automatically detect existing Data Exports off.
- Select Connect only to data in bucket. In this mode OptScale reads the bucket directly instead of calling the AWS Data Exports API.
- Export name — AWS Billing and Cost Management → Data Exports table → Export name column.
- Export Amazon S3 bucket name — AWS Billing and Cost Management → Data Exports table → S3 bucket column.
- Export path prefix — AWS Billing and Cost Management → Data Exports table → click the export name → Edit → Data export storage settings → S3 destination → the last folder name without “/”. For the S3 destination s3://aqa-bill-bucket/report-cur2, enter report-cur2.
- Export region name — the AWS region of the Amazon S3 bucket where the data export is stored.
4. Click Connect.
Attention
Wait for the export to be generated by AWS and uploaded to OptScale according to the schedule (which is performed on an hourly basis).
Please contact our Support Team at [email protected] if you have any questions regarding the described configuration flow.
Case 2: Credentials and data export belong to different accounts#
This case applies when credentials for Account1 are used to create a data source in OptScale, but the data export bucket is located in Account2.
Note
AWS requires permissions in both the bucket policy and the user policy to enable bucket access.
Note
The created cloud account gets expenses for Account1 only.
Configure Access Key authentication#
1. Configure data exports. Having a data export configured for your cloud account is the main prerequisite before you continue. If a data export has not been configured, refer to the Data Export not configured yet instruction.
2. Create user:
-
Go to Identity and Access Management (IAM) → Users → create a new user.
-
Confirm the creation of the user.
3. Create user policies for Discover Resources and ReadOnly access.
-
ReadOnly access:
-
Follow steps 1–5 of the instructions.
-
Insert the JSON code in the Type or paste a JSON policy document step:
{ "Version": "2012-10-17", "Statement": [ { "Sid": "OptScaleBucketReadOnly", "Effect": "Allow", "Principal": { "AWS": "arn:aws:iam::<AWS account1 ID>:user/<your_user>" }, "Action":[ "s3:ListBucket", "s3:GetBucketLocation", "s3:GetObject" ], "Resource": [ "arn:aws:s3:::<bucket_name>/*", "arn:aws:s3:::<bucket_name>" ] } ] } -
Replace
<AWS account1 ID>with the AWS Account1 ID (12 digits without “-”). - Replace
<your_user>with the user created on step 3. - Replace
<bucket_name>with the name of the bucket created on the previous step.
-
-
Discover Resources: attach the Discover Resources policy.
Select the user, select Attach policies directly → attach the policies created.
4. Update bucket policy:
- Navigate to the Permissions tab of your AWS S3 bucket → select Bucket Policy.
-
Click Edit → insert a JSON code snippet:
{ "Version": "2012-10-17", "Statement": [ { "Sid": "OptScaleBucketActionsAllow", "Effect": "Allow", "Principal": { "AWS": "arn:aws:iam::<AWS account1 ID>:user/<your_user>" }, "Action":[ "s3:ListBucket", "s3:GetBucketLocation", "s3:GetObject" ], "Resource": [ "arn:aws:s3:::<bucket_name>/*", "arn:aws:s3:::<bucket_name>" ] } ] } -
Replace
<AWS account1 ID>with the AWS Account1 ID (12 digits without “-”). - Replace
<your_user>with the user created on step 2. - Replace
<bucket_name>with the name of the bucket. - Save.
5. Create access key:
-
Go to Identity and Access Management (IAM) → Users → select the created user → create an access key
-
Download the .csv file with Access key and Secret access key.
Connect to OptScale#
Once the user is configured, add the data source to OptScale.
1. Go to OptScale → Data Sources → click Add → select AWS.
2. Choose the connection configuration and provide the credentials of the IAM user created in Account1:
- Account Type — select Management/Standalone.
- Authentication — select Access Key. The banner that appears recommends Assumed Role instead; see Configure Assumed Role if you prefer that method.
- Name — a display name for the data source.
- AWS Access key ID — the Access key from the .csv file downloaded earlier.
- AWS Secret access key — the Secret access key from the same file.
- Region scope — All regions, Include regions, or Exclude regions.
- Use AWS Enterprise Discount Program (EDP) — select this checkbox if the account is covered by an EDP agreement with AWS.
- Export type — select the type of the report configured earlier: AWS Billing and Cost Management → Data Exports → find the report → export type.
3. Point OptScale at the data export in Account2 instead of letting it look for one:
- Switch Automatically detect existing Data Exports off.
- Select Connect only to data in bucket. In this mode OptScale reads the bucket directly instead of calling the AWS Data Exports API, which is what makes the cross-account setup work.
- Export name — AWS Billing and Cost Management → Data Exports table → Export name column.
- Export Amazon S3 bucket name — the bucket in Account2 that the export is written to: AWS Billing and Cost Management → Data Exports table → S3 bucket column.
- Export path prefix — AWS Billing and Cost Management → Data Exports table → click the export name → Edit → Data export storage settings → S3 destination → the last folder name without “/”. For the S3 destination s3://aqa-bill-bucket/report-cur2, enter report-cur2.
- Export region name — the AWS region of the Amazon S3 bucket where the data export is stored.
4. Click Connect.
Attention
Wait for the export to be generated by AWS and uploaded to OptScale according to the schedule (which is performed on an hourly basis).
Please contact our Support Team at [email protected] if you have any questions regarding the described configuration flow.
Data Export not configured yet#
When you register a Management/Standalone account that does not yet have a data export, OptScale can create the export automatically.
Configure Access Key authentication#
1. Create user policy for bucket and export creation access.
-
Go to Identity and Access Management (IAM) → Policies.
-
Create a new policy for fully automatic configuration (both bucket and export are created):
-
Follow steps 1–5 of the instructions.
-
Insert the JSON code on the Type or paste a JSON policy document step:
{ "Version":"2012-10-17", "Statement":[ { "Sid":"ReportDefinition", "Effect":"Allow", "Action":[ "cur:DescribeReportDefinitions", "cur:PutReportDefinition" ], "Resource":"*" }, { "Sid":"CreateCurExportsInDataExports", "Effect":"Allow", "Action":[ "bcm-data-exports:ListExports", "bcm-data-exports:GetExport", "bcm-data-exports:CreateExport" ], "Resource":"*" }, { "Sid":"CreateBucket", "Effect":"Allow", "Action":[ "s3:CreateBucket" ], "Resource":"*" }, { "Sid":"GetObject", "Effect":"Allow", "Action":[ "s3:GetObject" ], "Resource":"arn:aws:s3:::<bucket_name>/*" }, { "Sid":"BucketOperations", "Effect":"Allow", "Action":[ "s3:PutBucketPolicy", "s3:ListBucket", "s3:GetBucketLocation" ], "Resource":"arn:aws:s3:::<bucket_name>" } ] } -
Replace
<bucket_name>with the name of the bucket.
-
-
Discover Resources: attach the Discover Resources policy.
2. Create user and grant policies:
-
Go to Identity and Access Management (IAM) → Users → create a new user.
-
In Step 2. Set permissions, select Attach policies directly → attach the policies created earlier.
-
Confirm the creation of the user.
3. Create access key:
-
Go to Identity and Access Management (IAM) → Users → select the created user → create an access key
-
Download the .csv file with Access key and Secret access key.
Connect to OptScale#
Once the user is configured, add the data source to OptScale.
1. Go to OptScale → Data Sources → click Add → select AWS.
2. Choose the connection configuration and provide the credentials of the IAM user:
- Account Type — select Management/Standalone.
- Authentication — select Access Key. The banner that appears recommends Assumed Role instead; see Configure Assumed Role if you prefer that method.
- Name — a display name for the data source.
- AWS Access key ID — the Access key from the .csv file downloaded earlier.
- AWS Secret access key — the Secret access key from the same file.
- Region scope — All regions, Include regions, or Exclude regions.
- Use AWS Enterprise Discount Program (EDP) — select this checkbox if the account is covered by an EDP agreement with AWS.
- Export type — select Standard data export (CUR 2.0), which is recommended for new integrations.
3. Describe the data export for OptScale to create:
- Switch Automatically detect existing Data Exports off.
- Select Create new Data Export.
- Export name — a new name for the data export.
- Export Amazon S3 bucket name — the bucket to store the export in. OptScale creates the bucket if it does not exist yet; if it does, OptScale creates the export inside it under the prefix below.
- Export path prefix — a new prefix to prepend to the names of the report files.
- Export region name — the AWS region of the Amazon S3 bucket.
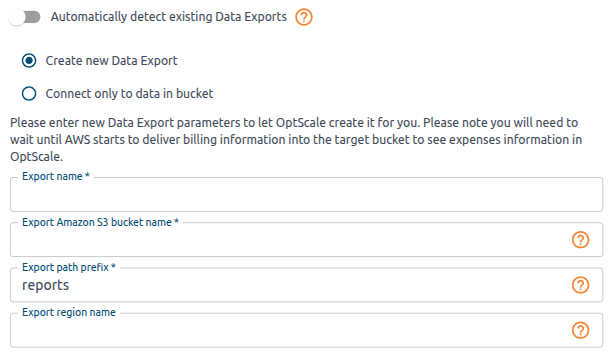
4. Click Connect, then wait for AWS to generate the export and upload it to OptScale according to the schedule (approximately one day).
Warning
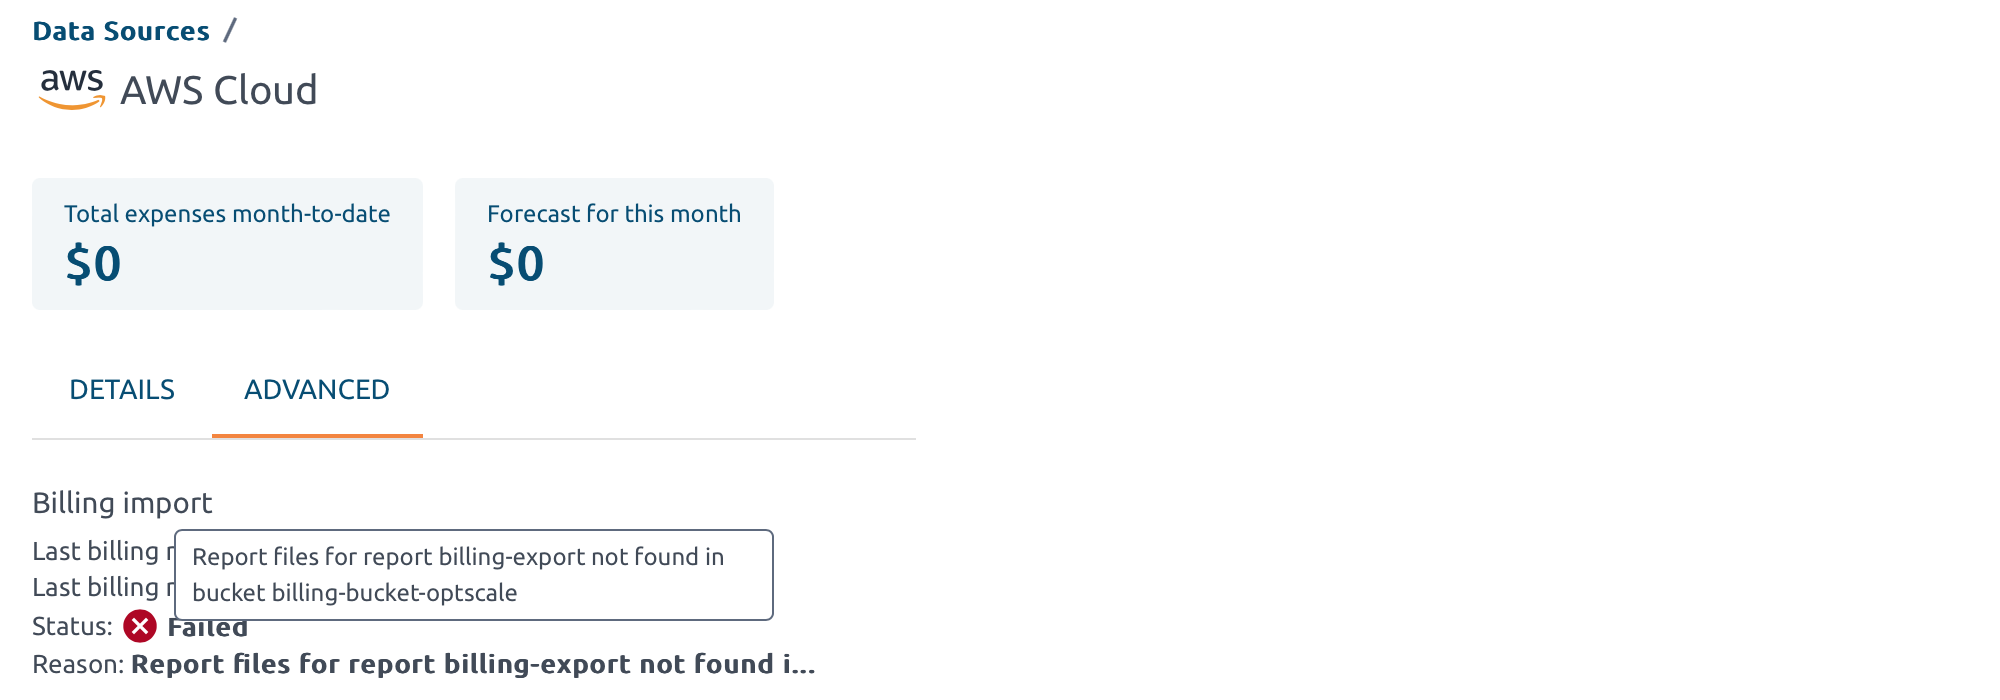
AWS updates or creates a new export file once a day. If the export file is not placed in the specified bucket under the specified prefix, the export will fail with an error.
Member account#
A Member data source does not provide its own consolidated billing export. OptScale associates its expenses with billing data received from the corresponding Management account. Connect the management account as well as each member account whose expenses you want OptScale to process.
Assumed Role#
Authentication setup is the same as Configure Assumed Role for a Management/Standalone account. Create the IAM role and trust policy in the member account you are connecting (Account B), and use Account A for the credentials that call sts:AssumeRole.
When you add the data source in OptScale:
- For Account Type, select Member.
- For Authentication, select Assumed Role.
- Fill in Name, AWS Account ID, Assumed Role Name, External ID (the same value as in the trust policy of the role), and Region scope.
Do not configure a separate data export on the member account. Billing data comes from the management account export.
Access Key#
Before you connect, attach the Discover Resources policy to the IAM user so OptScale can parse EC2 resource data.
1. Go to OptScale → Data Sources → click Add → select AWS.
2. Choose the connection configuration and provide the credentials of the IAM user:
- Account Type — select Member. The form drops the data export parameters, because a member account receives its billing data through the management account.
- Authentication — select Access Key. The banner that appears recommends Assumed Role instead; see Assumed Role if you prefer that method.
- Name — a display name for the data source.
- AWS Access key ID — the Access key of the IAM user in the member account.
- AWS Secret access key — the Secret access key of the same user.
- Region scope — All regions, Include regions, or Exclude regions.
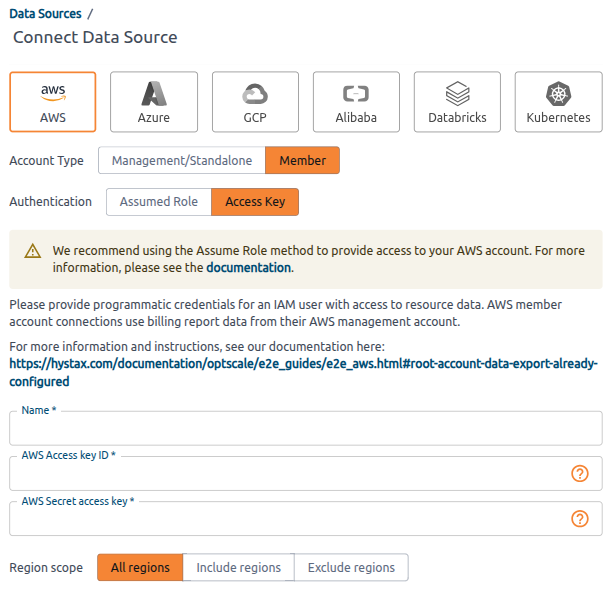
3. Click Connect. If some of the provided values are invalid, an error message indicates a failure to connect.
Note
If you connect only an AWS member account without connecting the management account, OptScale cannot import billing data.
Please contact our Support Team at [email protected] if you have any questions regarding the described configuration flow.
Create an AWS Data Export#
OptScale supports:
- Standard Data Export (CUR 2.0) — recommended for new integrations.
- Legacy CUR — use only for existing integrations that still rely on the legacy report format.
Creating a data export is only available for the Management/Standalone account (the Organizations management or payer account). Member accounts are centrally managed and receive their billing data through the management account invoice.
To use automatic or manual billing data import in OptScale, first create a data export in AWS. See the AWS Data Exports documentation.
-
Navigate to AWS Billing & Cost Management → Data Exports.
-
Create a new data export:
-
Standard (recommended):
1. Select Standard data export as the export type.
2. Enter the export name.
3. Select CUR 2.0 → select the Include resource IDs checkbox → choose the time granularity for how you want the line items in the export to be aggregated.
4. Select Overwrite existing data export file → choose the compression type.
5. Set the data export storage setting:
- Create a new or use an existing bucket for the export.
- Enter the S3 path prefix that you want prepended to the name of your data export.
6. Confirm export creation. Data export is prepared by AWS within 24 hours.
-
Legacy CUR Export (existing integrations only):
1. Select Legacy CUR export (CUR) as the export type.
2. Enter the export name.
3. Select the Include resource IDs and Refresh automatically checkboxes.
4. Set the data export delivery options:
-
Choose the time granularity for how you want the line items in the export to be aggregated.
-
Select Overwrite existing report.
-
Choose the compression type.
5. Set the data export storage setting:
-
Create a new bucket or use an existing one for the export.
-
Enter the S3 path prefix that you want prepended to the name of your data export.
6. Confirm export creation. Data export is prepared by AWS within 24 hours.
-
-
When it is done, follow Data Export already configured.
Migrating from CUR to CUR 2.0#
Use this section if an AWS data source (Legacy CUR export schema) has already been connected and you want to configure CUR 2.0 data and update the AWS data source.
A new bucket is required#
Configure#
Create a new data export with the CUR 2.0 schema:
1. Navigate to AWS Billing & Cost Management → Data Exports page → click Create.
2. Select Standard data export as an export type, enter Export name. This name is required when updating a data source in OptScale.
3. Fill in the Data table content settings section:
- Select CUR 2.0.
- Select the Include resource IDs checkbox.
- Choose the time granularity for how you want the line items in the export to be aggregated.
4. Fill in the Data export delivery options section:
- Choose Overwrite existing data export file.
- Select compression type.
5. Configure a new bucket in the Data export storage setting section. Fill in the S3 path prefix and S3 bucket name fields. Note the AWS region of the bucket as well. All three values are required when updating a data source in OptScale.
6. Confirm export creation. The data export is prepared by AWS within 24 hours.
Connect to OptScale#
When the bucket is ready, go to OptScale → Data Sources → click the AWS data source → click UPDATE CREDENTIALS.
1. Provide the credentials of the IAM user that OptScale uses for this data source:
- AWS Access key ID — the key the data source uses at the moment. Replace it if the key has changed.
- AWS Secret access key — the matching secret access key. This field is always empty when the dialog opens, so fill it in even if the key itself stays the same.
- Region scope — All regions, Include regions, or Exclude regions.
- Use AWS Enterprise Discount Program (EDP) — select this checkbox if the account is covered by an EDP agreement with AWS.
2. Switch Update Data Export parameters on and describe the export created in Configure, so that OptScale reads the new bucket instead of the old one:
- Export type — select Standard data export (CUR 2.0).
- Export name — the name you gave the export.
- Export Amazon S3 bucket name — the S3 bucket name of the new bucket.
- Export path prefix — the S3 path prefix of the new export.
- Export region name — the AWS region of the new bucket.
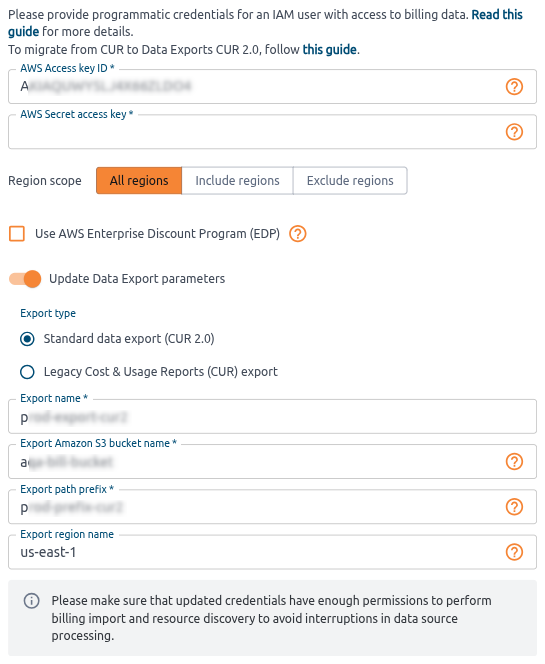
3. Click Save and wait for the new export to be imported.
Note
Make sure the submitted credentials have enough permissions for both billing import and resource discovery, otherwise the data source stops being processed.
The bucket already exists#
Use this case if you have already connected an AWS data source (on Legacy CUR export schema) and want to configure CUR 2.0 data into the same bucket.
Configure#
Create a new data export with the CUR 2.0 schema:
1. Navigate to AWS Billing & Cost Management → Data Exports page → click Create.
2. Select Standard data export as an export type, enter Export name. This name is required when updating a data source in OptScale.
3. Fill in the Data table content settings section:
- Select CUR 2.0.
- Select the Include resource IDs checkbox.
- Choose the time granularity for how you want the line items in the export to be aggregated.
4. Fill in the Data export delivery options section:
- Choose Overwrite existing data export file.
- Select compression type.
5. Update the Data export storage settings section contents:
- Click Configure → Select existing bucket → choose an existing S3 bucket → click Select bucket.
- Enter a new S3 path prefix. This prefix is required when updating a data source in OptScale.
6. Confirm export update.
Connect to OptScale#
When the export is ready, go to OptScale → Data Sources → click the AWS data source → click UPDATE CREDENTIALS.
1. Provide the credentials of the IAM user that OptScale uses for this data source:
- AWS Access key ID — the key the data source uses at the moment. Replace it if the key has changed.
- AWS Secret access key — the matching secret access key. This field is always empty when the dialog opens, so fill it in even if the key itself stays the same.
- Region scope — All regions, Include regions, or Exclude regions.
- Use AWS Enterprise Discount Program (EDP) — select this checkbox if the account is covered by an EDP agreement with AWS.
2. Switch Update Data Export parameters on and describe the export created in Configure. The bucket stays the same, so only the export itself changes:
- Export type — select Standard data export (CUR 2.0).
- Export name — the name you gave the export.
- Export Amazon S3 bucket name — leave the bucket the data source already uses.
- Export path prefix — the new S3 path prefix, not the one the legacy CUR export writes to.
- Export region name — the AWS region of the bucket.
3. Click Save and wait for the new export to be imported.
Note
Make sure the submitted credentials have enough permissions for both billing import and resource discovery, otherwise the data source stops being processed.