Whitepaper 'FinOps and cost management for Kubernetes'
Please consider giving OptScale a Star on GitHub, it is 100% open source. It would increase its visibility to others and expedite product development. Thank you!
Ebook 'From FinOps to proven cloud cost management & optimization strategies'
OptScale FinOps
OptScale — FinOps
FinOps overview
Cost optimization:
AWS
MS Azure
Google Cloud
Alibaba Cloud
Kubernetes
MLOps
OptScale — MLOps
ML/AI Profiling
ML/AI Optimization
Big Data Profiling
OPTSCALE PRICING
cloud migration
Acura — Cloud migration
Overview
Database replatforming
Migration to:
AWS
MS Azure
Google Cloud
Alibaba Cloud
VMWare
OpenStack
KVM
Public Cloud
Migration from:
On-premise
disaster recovery
Acura — DR & cloud backup
Overview
Migration to:
AWS
MS Azure
Google Cloud
Alibaba Cloud
VMWare
OpenStack
KVM
Technical whitepapers

Customer PoC onboarding guide for MS Azure (disaster recovery)

Hystax Acura starter pack MS Azure DR

Please perform the following steps in order to run migration and disaster recovery for the PoC or, later, in production.

1. Prepare for a deployment

Create a security group allowing the following traffic:

• Hystax Acura host:

    • • Ingress – udp/12201
      • Ingress – tcp/4443
      • Ingress – tcp/443

• Hystax Cloud Agent (spawned automatically in the Target Project)

    • • Ingress – tcp/80
      • Ingress – tcp/3260
      • Ingress – tcp/15000

Prepare networks in advance to be used by Hystax Acura

2. Deploy Hystax Acura

Set your cloud using the following steps: 

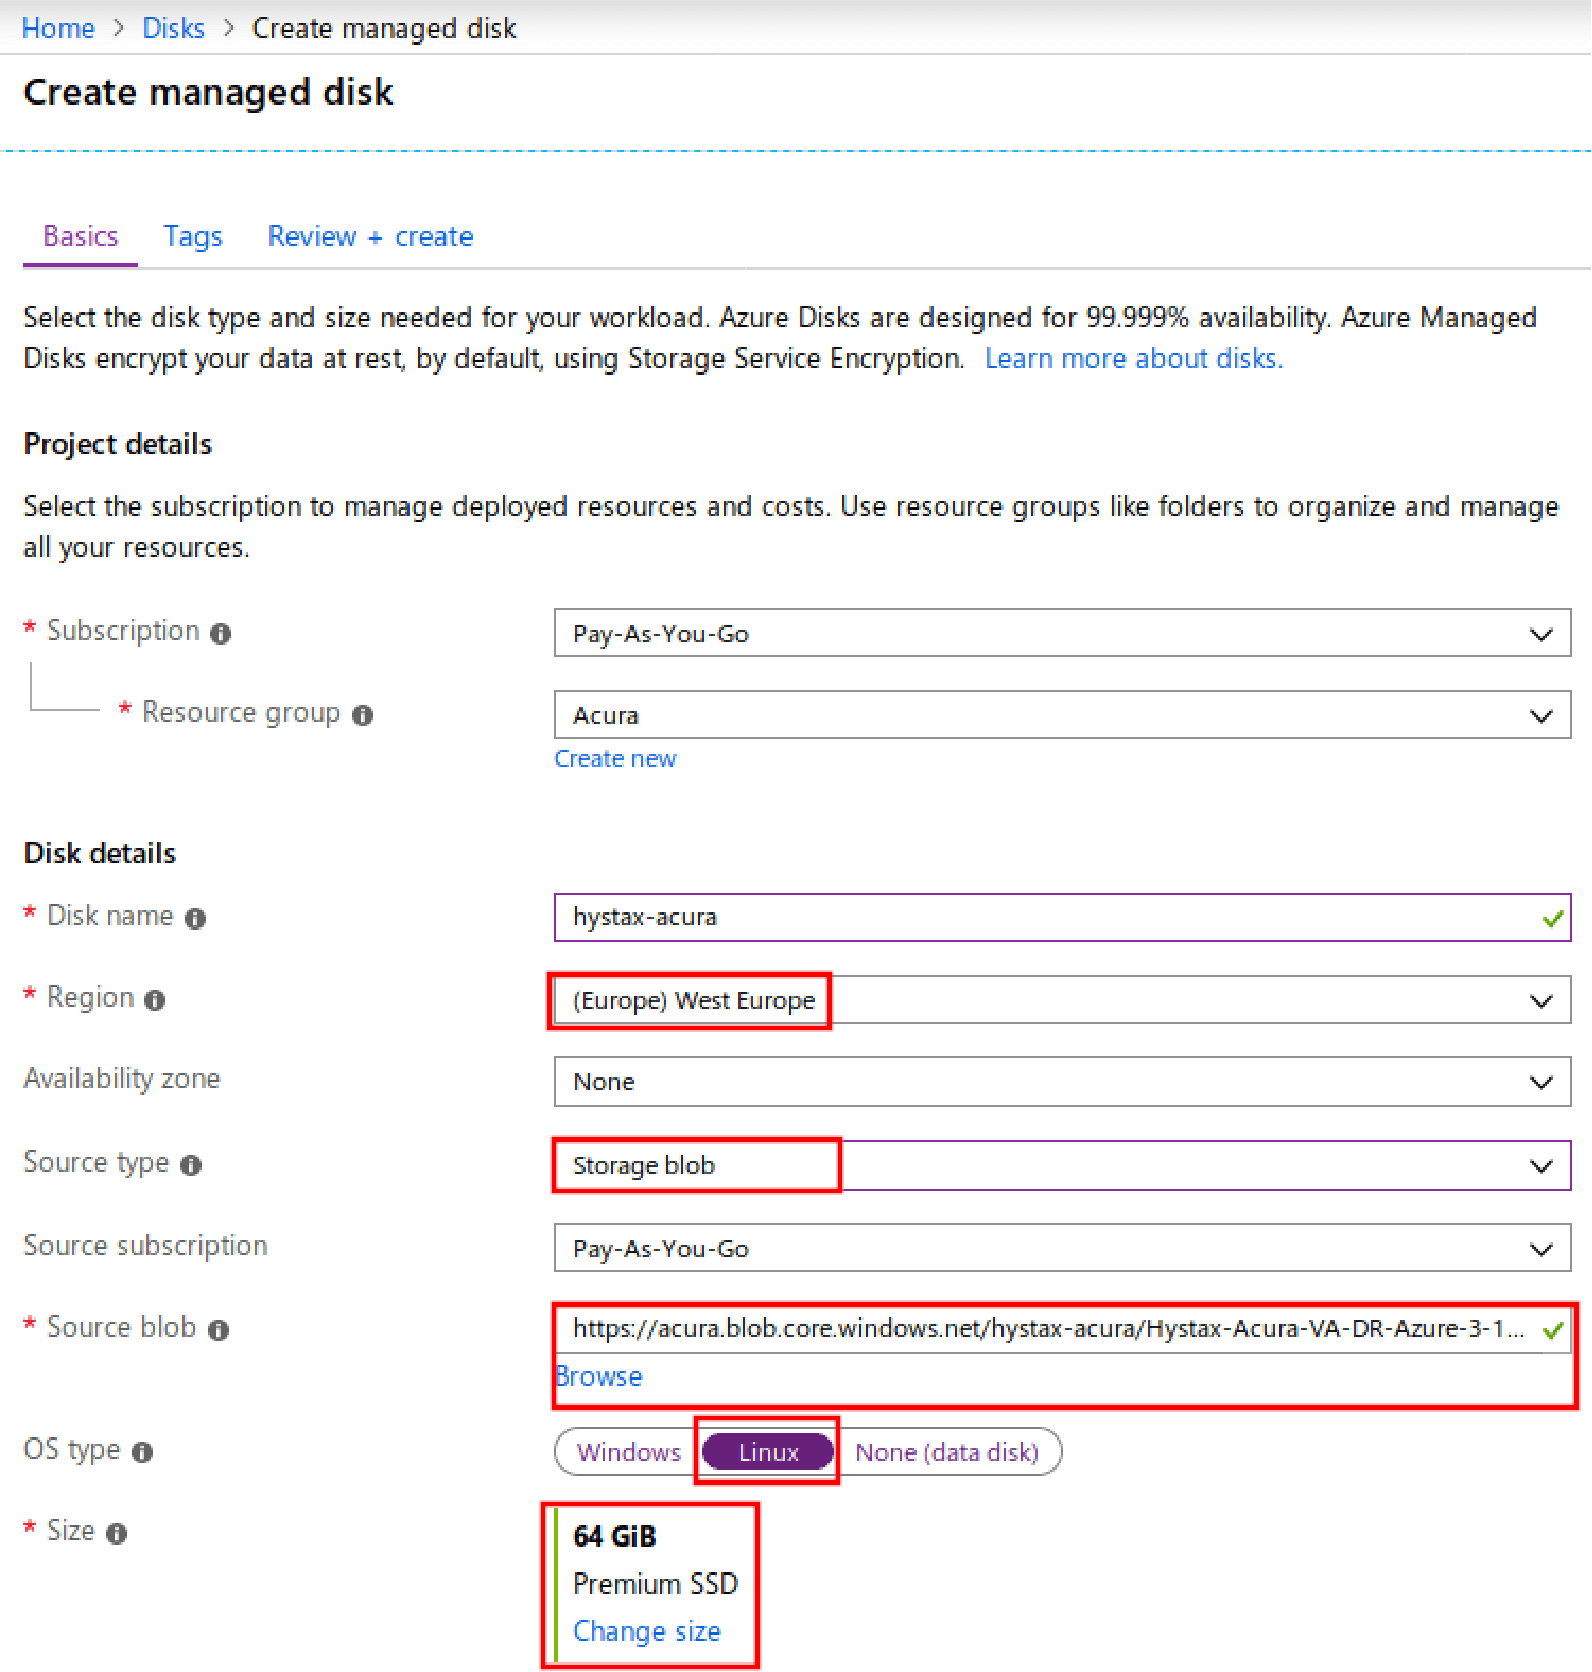
1. Go to “Disks” and create a Disk using the Blob uploaded by Hystax Team

  • The region for the disk should be the same as the Storage Account region
    (you won’t see Blob otherwise)
  • The OS should be set to “Linux”
  • Disk size should be at least 100 GB
  • The disk type should be “Premium SSD“
onboarding guide for MS Azure

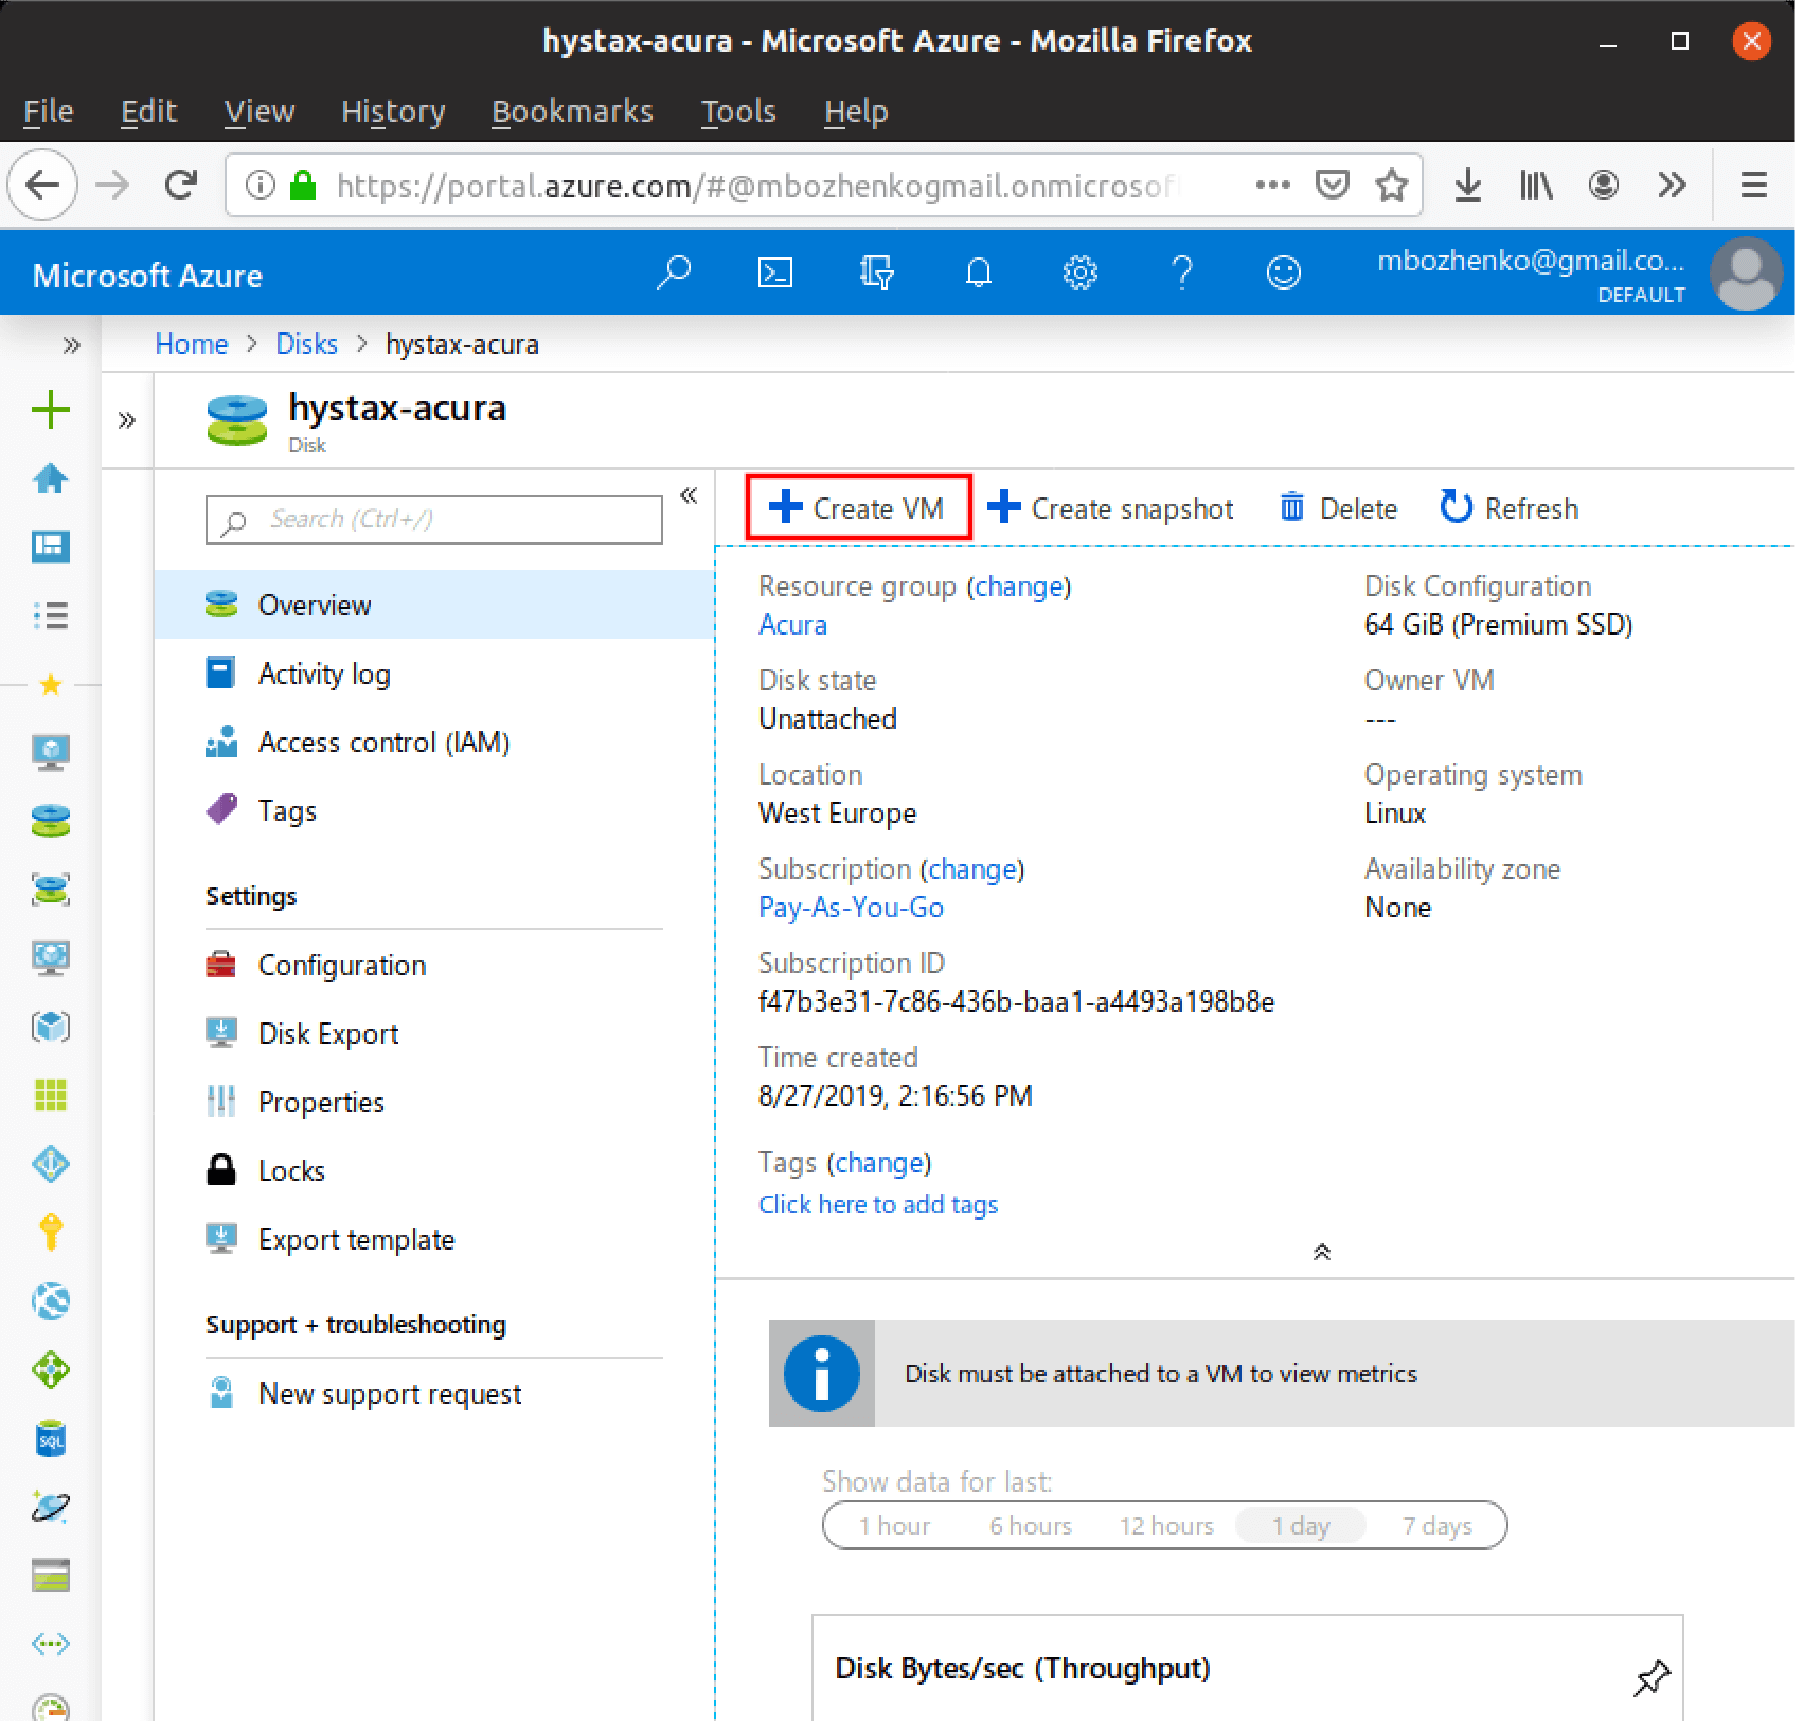
2. Create a VM using the created Disk

Find the created Disk in Disks, click on it and press “Create VM”

onboarding guide for MS Azure
Required settings for VM:
  • At least 4 CPU and 16GB RAM – Standard_D4s_v3 VM type
  • Static Public IP
  • The following inbound network ports must be opened:
    – 80, 443, 4443 TCP
    – 12201 UDP

3. Pass Acura Initial Configuration

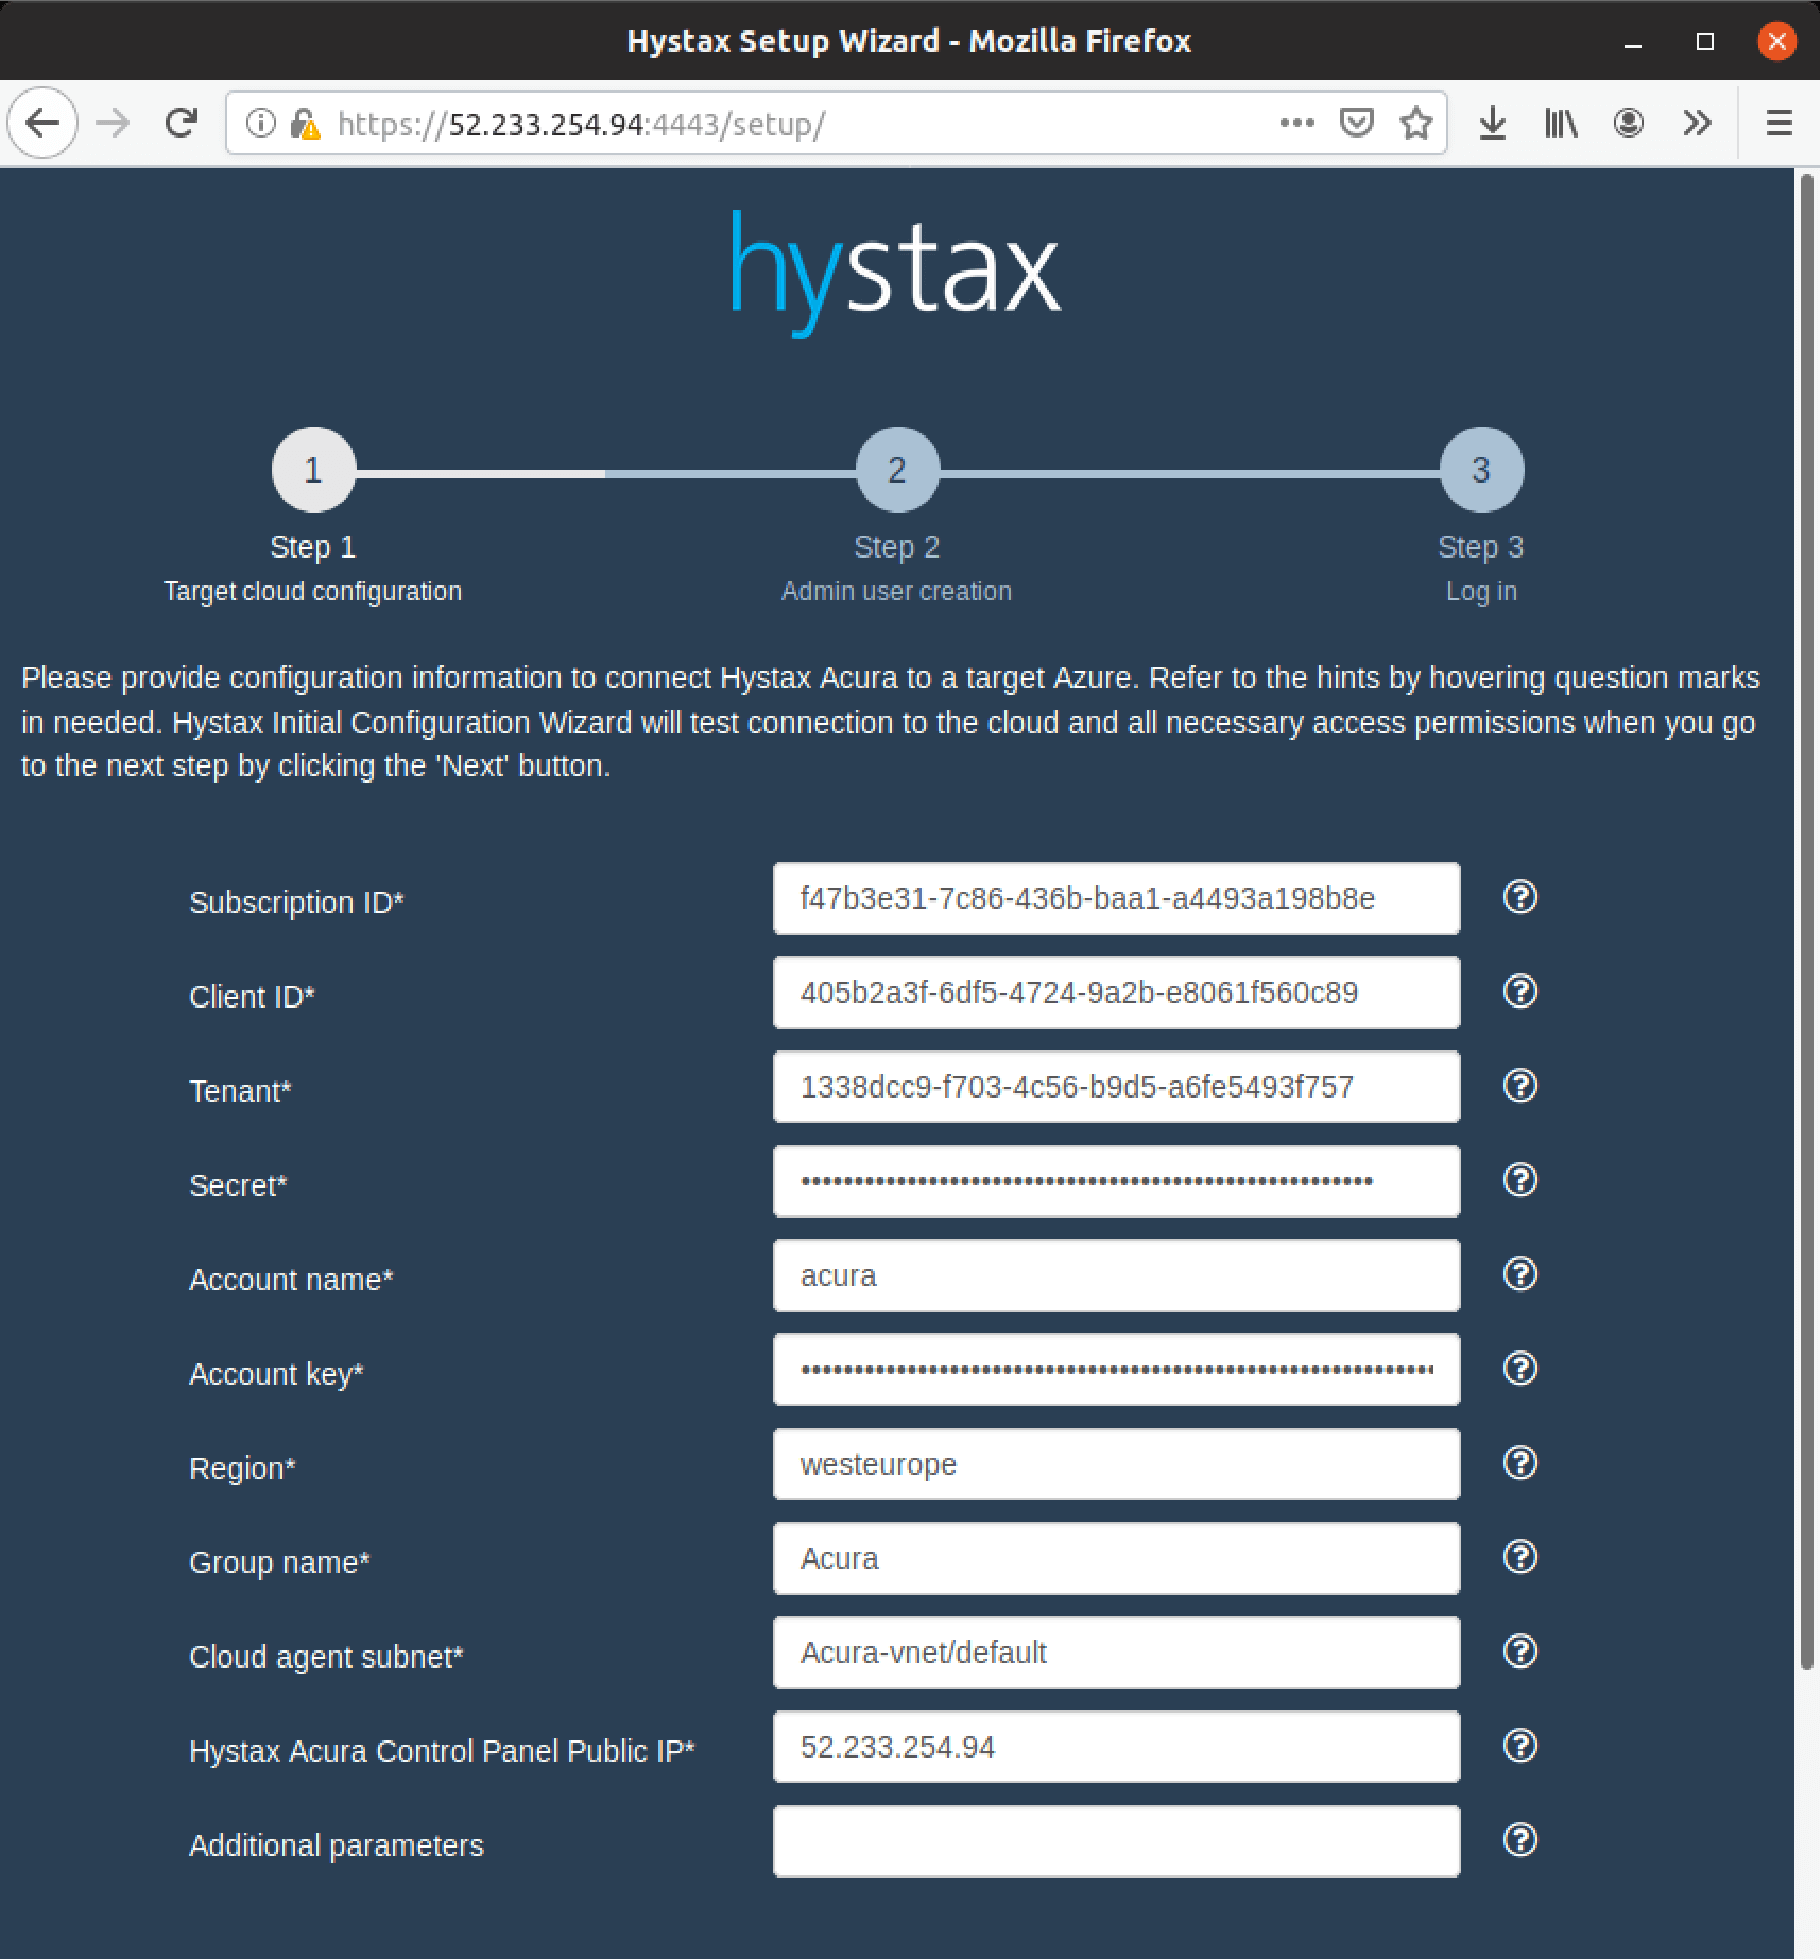
Once the VM is started, wait approximately 20 minutes for it to boot up, then open its public IP in a web browser. Please accept the certificate warnings and then you will see the initial configuration page:

onboarding guide for MS Azure

Please consult the following manual on how to create an Application Account and obtain “Application (Client) ID“, “Tenant“, and “Secret“. The Application Account for Acura should have the “Contributor” role assigned.

Please find the instructions to go through the initial configuration below:

https://hystax.com/wp-content/uploads/2019/08/Hystax-Acura-Installation-Guide-Azure.pdf

3. Getting started with Hystax Acura

After you complete the initial configuration, you will be taken to the page where you need to enter a login and password for the user created during the initial configuration. After that, you will be taken to the customer page.

Please read this document Step-by-Step Guide, describing the full flow – from machine protection and to its recovery and failback in case of disaster or use the detailed description by each point below.

4. Download and install a replication agent

Please read the instructions below, download the agent for the respectful operating system, and install it.

Download and install replication agents

5. Proceed with replication

Once the replication agent is installed, the machine can be migrated:

Replication new machines

To run ML/AI or any workload with optimal performance and infrastructure cost with OptScale – a FinOps and MLOps open source platformcontact us today.

6. Create DR Plans

Choose one or several machines for which you need to generate a migration plan. Specify the necessary settings when creating the migration plan. You can use the instructions below for this:

Create a DR plan

7. Running a failover

The failover is a customer business application running in the backup DC, which consists of network infrastructure and components included in the business application. You can use the instructions below for this:

Create a failover

8. Failback

When the main site is restored after an accident, it is necessary to failback to it with all changes accumulated on the backup site since the cloud site started and redirect user traffic to it. You can use the instructions below for this:

Create a failback

9. Video instruction:

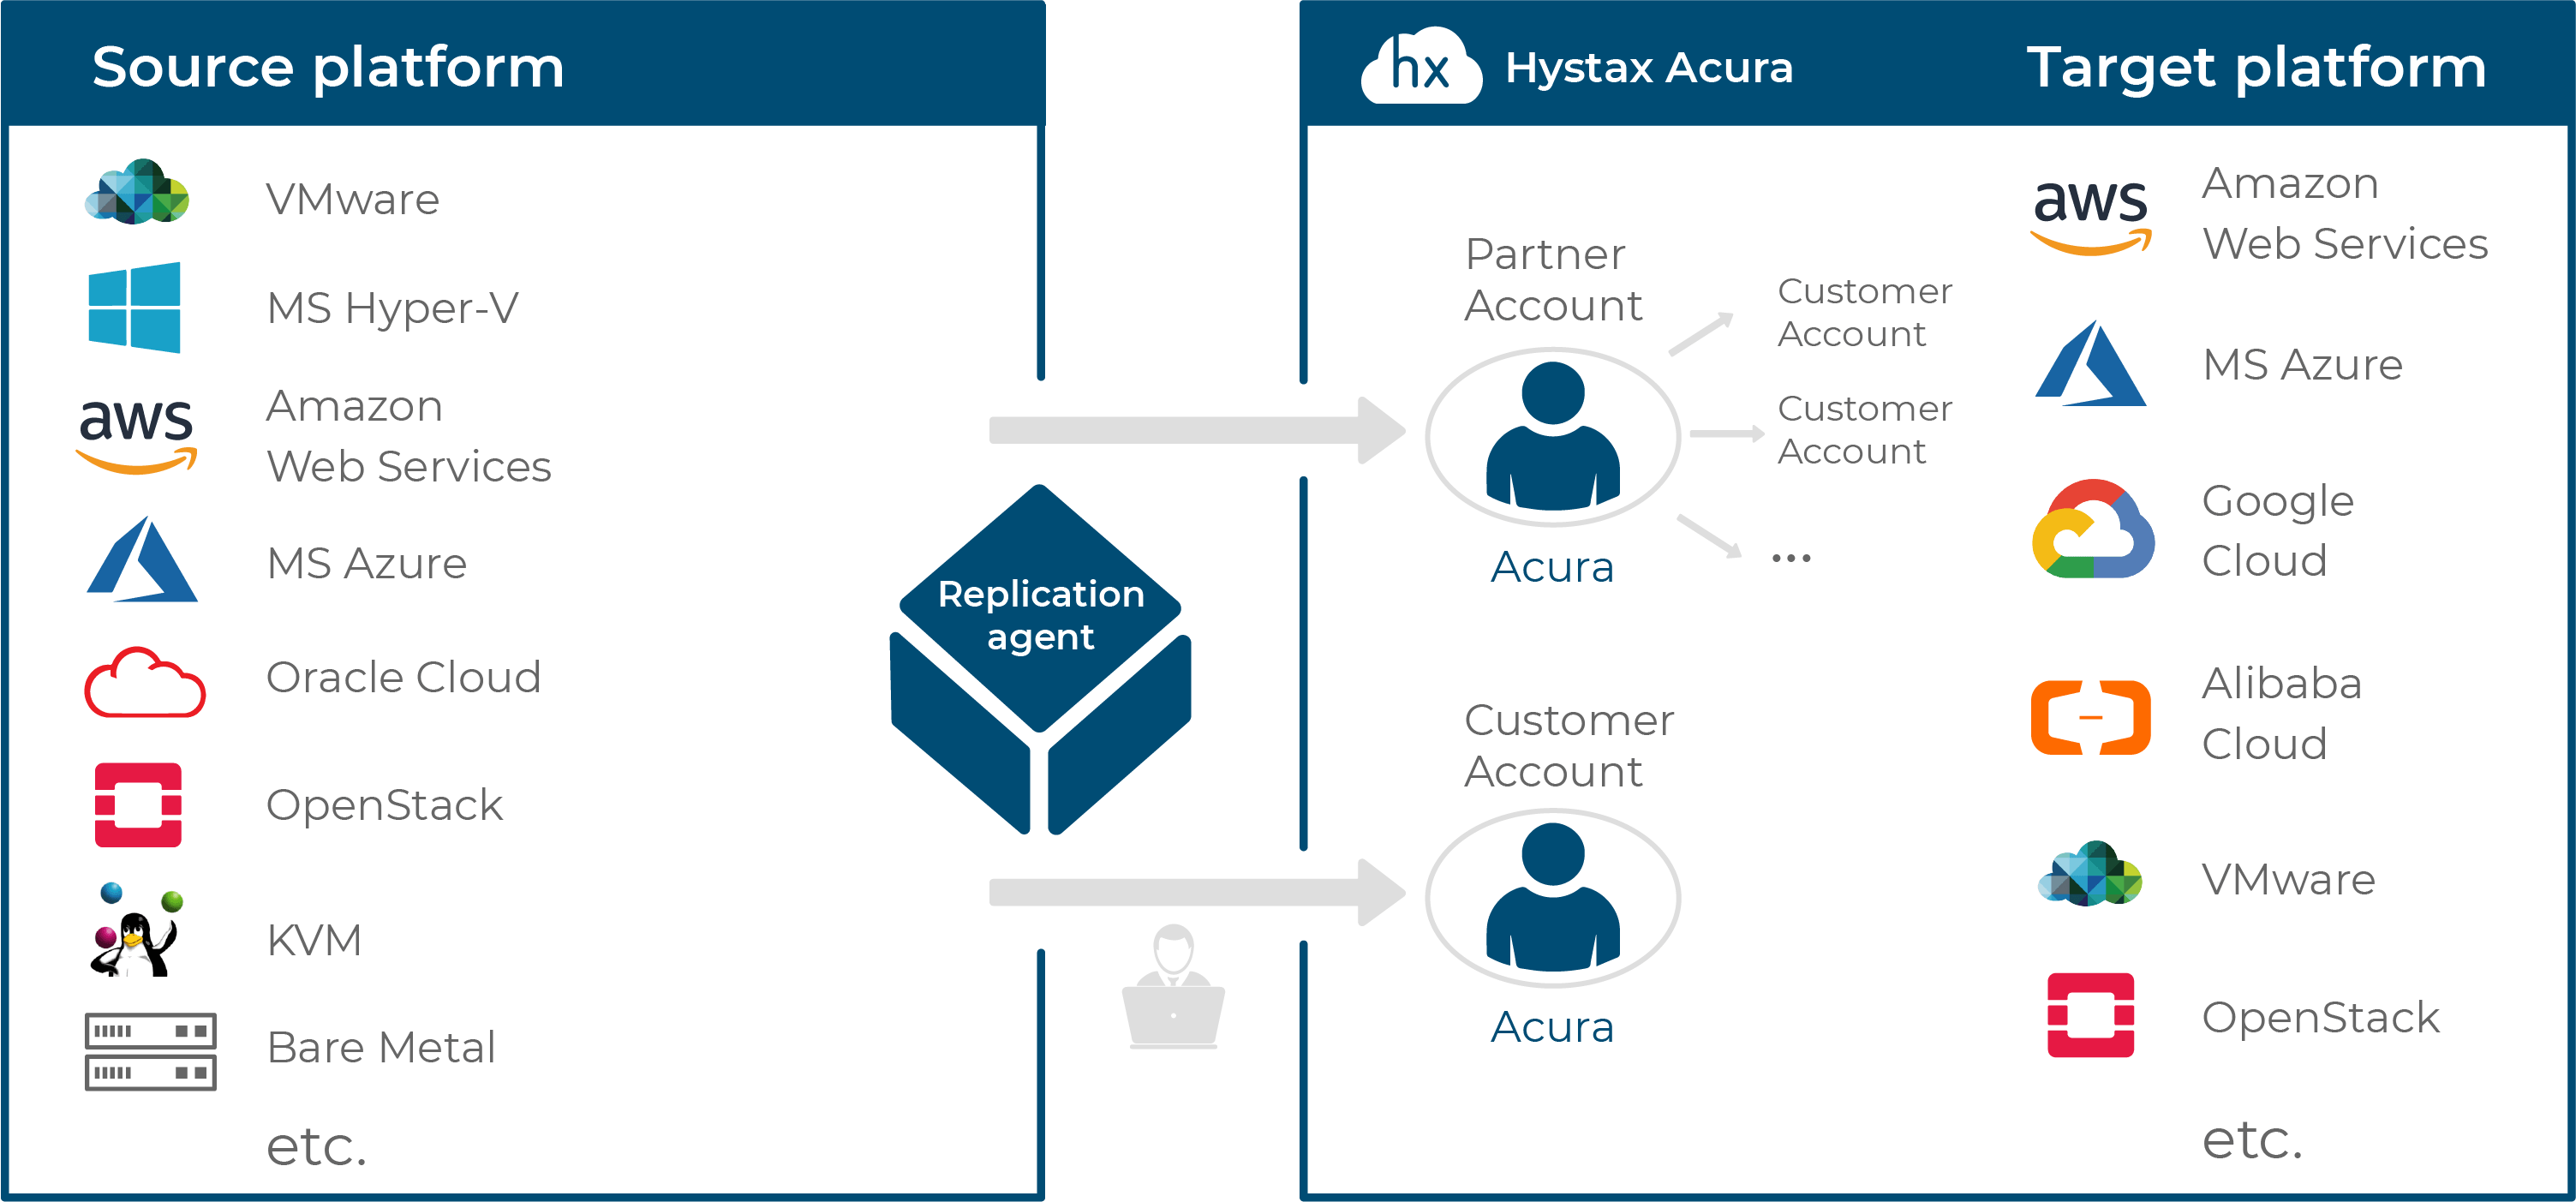
10. Supported clouds and platforms

Disaster Recovery flow usually consists of the following stages:
supported cloud platforms

Useful links:

Contacts

Email: [email protected]
Phone: +16282511280
Address: 1250 Borregas Avenue Sunnyvale, CA 94089

Enter your email to be notified about new and relevant content.

You can unsubscribe from these communications at any time. Privacy Policy