Atribuir tags aos recursos do MS Azure é essencial para criar uma taxonomia bem organizada e transparente na sua nuvem e atingir uma otimização significativa dos custos da nuvem. Quando feita corretamente, essa prática pode fornecer uma base consistente para aplicar políticas comerciais universais em toda a organização e, mais importante, para rastrear os gastos com a nuvem com a ajuda das suas ferramentas de gerenciamento de custos da nuvem.
Pode haver certos desafios na implementação de uma estratégia econômica e bem equilibrada para lidar com recursos, portanto, as breves instruções fornecidas neste artigo devem ajudar você a navegar na nuvem seguindo as principais diretrizes e aproveitar as melhores práticas para a plataforma MS Azure.

As tags do MS Azure são pares nome-valor que são usados para especificar metadados adicionais como uma propriedade do objeto, agrupar logicamente recursos e fornecer uma melhor visão geral de uma determinada conta de nuvem. As tags podem ser aplicadas a recursos individuais que foram criados com a ajuda do Azure Resource Manager ou, geralmente, a todo o grupo de recursos do qual eles fazem parte. A marcação é feita no nível da plataforma Azure, o que não afeta o desempenho dos recursos associados de forma alguma, e o serviço também é gratuito.
As tags como pares nome-valor podem ser qualquer coisa que ajude a identificar a classe à qual um recurso específico deve pertencer. Por exemplo, uma chave de tag de recurso pode ser definida como "Departamento" e o valor como "Engenharia". Embora elas possam ser modificadas a qualquer momento, é melhor aplicar tags consistentemente durante o estágio de criação do recurso para evitar qualquer confusão e sobrecarga adicional associada à otimização. Dessa forma, você poderá classificar facilmente seus recursos no portal do Azure usando as tags para obter uma visão rápida de todos os recursos que estão sob vários departamentos, pools de orçamento, ambientes de produção, etc.
Depois que uma tag é criada e atribuída a um recurso, ela será refletida no relatório periódico de uso do Azure, que está disponível no formato CSV no Portal de Gerenciamento de Contas. Este relatório tem como objetivo fornecer insights sobre os custos incorridos pelos recursos marcados e ajudar a analisar as métricas mais detalhadamente, classificando o uso do recurso com base nas tags.
Regras para implementar a estratégia de marcação correta no ambiente MS Azure
Embora adicionar tags aos recursos do Azure seja muito simples, há certas regras e limitações que o usuário deve estar ciente:
- Há um máximo de 15 tags que podem ser associadas a um recurso (VM, rede, etc.) ou grupo de recursos.
- Os recursos devem ser implantados usando o modelo ARM (Azure Resource Manager) para poder usar tags; os recursos ASM (implantados com o modelo de implantação clássico) não são suportados e precisam ser reimplantados por meio do Resource Manager para poder aplicar tags neles.
- Somente caracteres alfanuméricos podem ser usados para tags.
- O número máximo de caracteres para um nome de tag é 512. Para contas de armazenamento, isso é limitado a 128 caracteres. Não diferencia maiúsculas de minúsculas.
- O número máximo de caracteres para um valor de tag é 256. Diferencia maiúsculas de minúsculas.
- A função de colaborador integrada (ou a função de colaborador para um recurso específico) deve ser usada ao aplicar tags.
- Não há hierarquia de herança para tags, o que significa que as tags aplicadas no nível do grupo de recursos não são herdadas por seus membros.
- Os prefixos de nome de tag “Azure”, “Windows” e “Microsoft” são reservados e não podem ser usados.
- Depois que uma tag é criada e aplicada a um recurso, ela é automaticamente adicionada à taxonomia de toda a assinatura.
Como aplicar uma tag ao seu recurso do MS Azure
Há várias maneiras de aplicar uma tag ao seu recurso do Azure. Para este exemplo, digamos que há uma VM que requer marcação.
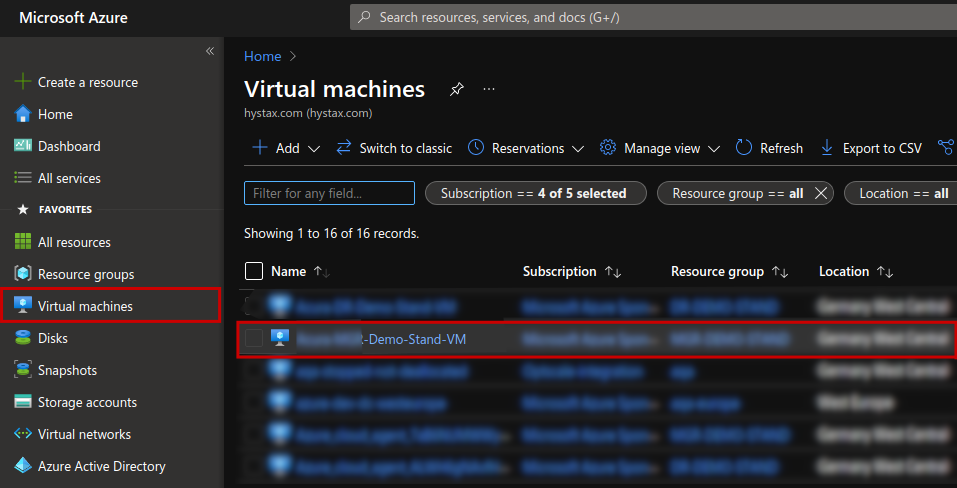
No console do MS Azure, navegue até a seção Máquinas virtuais na barra lateral esquerda e selecione a VM na lista para acessar sua visão geral.
Após redirecionado, encontre a opção de menu “Tags” à esquerda e clique nela. Você verá duas caixas de entrada de forma livre que correspondem ao Nome da tag e ao Valor da tag. Preencha esses campos e clique em “Aplicar” para salvar o resultado.
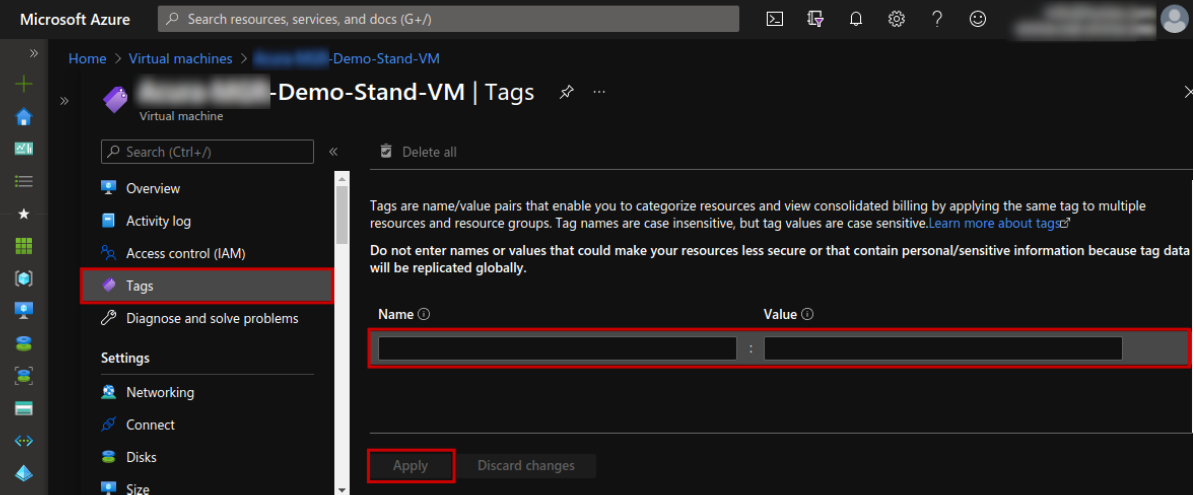
Esta ação criará uma tag que estará disponível em sua assinatura do Azure. Então, quando você acessar a seção Tags de outro recurso, você poderá escolher na lista de tags existentes.
Para obter uma visão geral conveniente das tags aplicadas, clique em Gerenciar visualização → Editar colunas → Adicionar coluna → Tags → Salvar
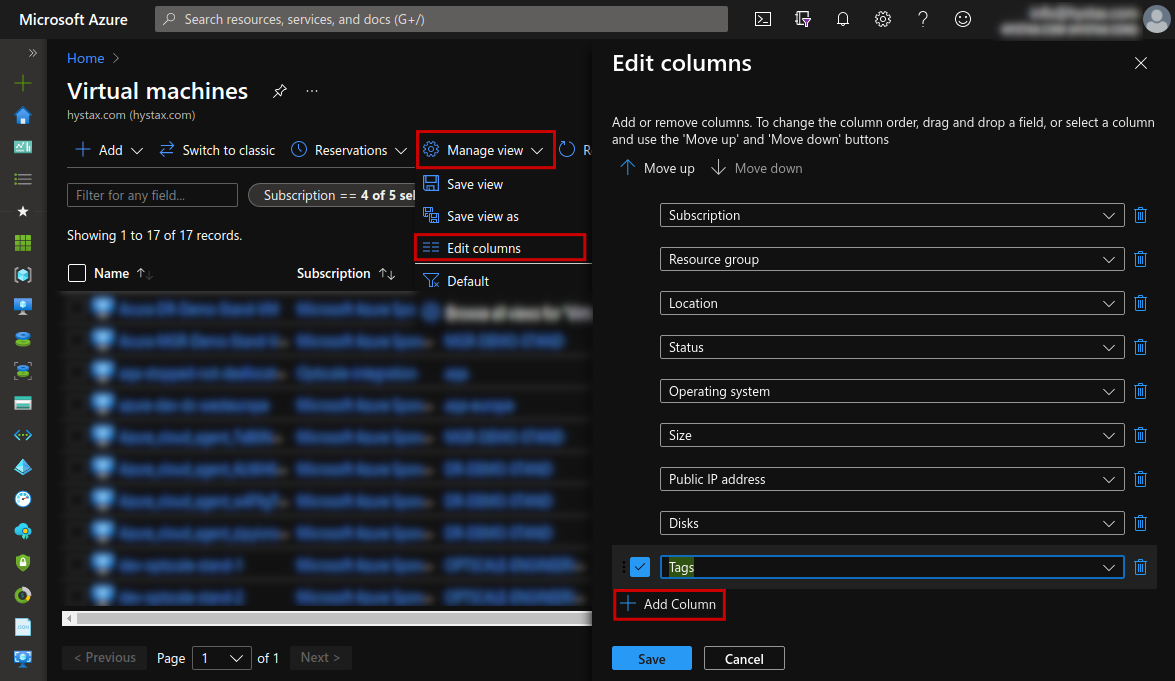
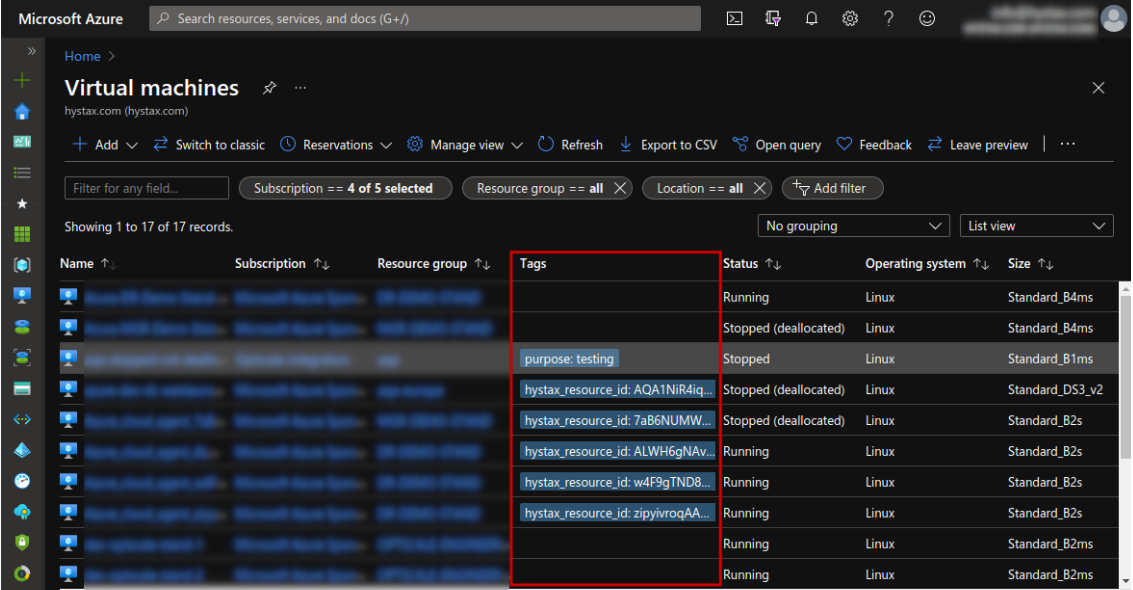
Aparecerá uma nova coluna para Tags que permite acesso rápido e oportunidades de edição para os recursos listados. Clique nas tags correspondentes para abrir suas páginas e modificar nome/valores.
Além disso, você pode usar a caixa de pesquisa na parte superior para descobrir as tags existentes. Digite Etiquetas para ser redirecionado para a seção Tags (localizada em Services). Se você selecionar qualquer tag lá, uma lista contendo todos os recursos aos quais essa tag foi aplicada será mostrada em uma nova página.
O sistema de marcação é uma parte essencial de um processo de gerenciamento de nuvem eficaz. Ele é projetado para trazer visibilidade aos custos e padrões de uso do MS Azure, o que ajuda a atingir as metas de otimização de custos de nuvem.